Search models, users, collections, and posts

USW-Flex-2.5G-8-PoE 19-inch Modular Rack Mount

IP Report

Print Profile(2)

All
P1S
X1 Carbon
P2S
A1
X1E
P1P
H2S
H2D Pro
X1
H2D
H2C
X2D
A2L

0.2mm layer, 3 walls, 20% infill
Designer
6.6 h
2 plates
5.0(30)

PETG-CF - 0.2mm layer, 3 walls, 25% infill
9.8 h
2 plates
5.0(1)

Open in Bambu Studio
Boost
97
377
79
49
826
462
Released 

Description

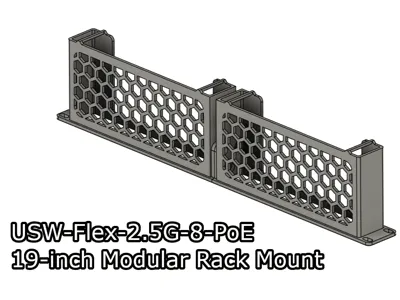
A modular, 2-part, 19-inch rack mount adapter for the Ubiquiti Unifi USW-Flex-2.5G-8-PoE.


This mount is part of a 19-inch modular rack mount system I designed, you can mix and match the modules with other mounts. Take a look at my models here to find out the other 19-inch mount modules.

Boost Me (for free)

I make these models for free, and it takes time and material to test them out. Your boost will help me keep releasing new models! Thank you!

Membership

Want to support me further? Or sell my prints? Please consider one of my membership tiers. Thank you!

Join

Do you like my models? Consider buying me a coffee ;)

Parts

  • 3x M5x10 screws.
  • 3x M5 hex nuts.

Assembly

OBS.: The modules used in this tutorial are only for illustration purposes, and I'm using it for the whole series. It might not reflect the models you download from this page.

  • To assemble the parts, insert the 3 screws into the Right module.
  • Then align it with the Left module.
  • After that, insert the hex nuts in the screws, and use a screwdriver or Allen key.
  • Tighten the screws until you start feeling resistance, and the nuts are securely into place. After that, you can install the mount in your rack.

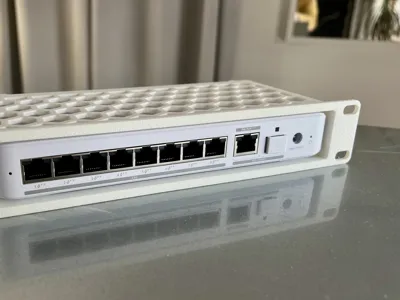
Installing the switch

To install your switch to this mount, simply slide it in. But once you reach the rubber feet on the bottom, press them a little so they can compress and enter the mount, after that the switch should slide and will stay securely in place.


Print Settings

Rafts:

Doesn't Matter.

Supports:

No.

Resolution:

0.2 or 0.24

Infill:

20% or more

Filament:

Any.

Comment & Rating (79)

(0/1000)

Great Design - thank you. Printed 2 of them for my 2 Switches. Only Problem I have is they Bend pretty much in den Middle where both are connected. Any Chance for an "stronger" Version?
The designer has replied
0
Reply
Hi! Thank you :) Could you share a picture of the issue so I can have a better idea of the area that needs improvement?
0
Reply
Replying to @mauker :
Thank you for the Reply. Hope you can see what I mean.
(Edited)
1
Reply
Replying to @user_3432943989 :
Oh yes, I can definitely see it now. Thank you for sharing! I'll try and see a way to reinforce this. But to quickly solve your issue, for now, perhaps you could move the mount 1 unit down, so it can get some extra support from the device below.
0
Reply
Hello I am completely new to 3D printing and I have a Bambu Lab P1S with the AMS I tried to print this model with PETG filament (Polymaker black). Why PETG? Because I will also be printing the rack for the USG Max which gets very hot, so PETG should be necessary and both racks would have been in the same material However the print had a lot of stringing and it detached halfway through What should I do please Michael
The designer has replied
Show original
0
Reply
Hello! First of all, welcome to the 3D printing world :) I have a few questions to try and help you with this issue. 1) Did you try to print directly from the Handy App using my profile? If so, it is tuned for PLA, so you should change that either on Bambu Handy or on Bambu Studio to match the filament you're using. 2) Did you dry your filament before printing? PETG gets wet easier than PLA. So it's best to dry it before printing. 3) Is your printing bed cleaned? If not, try to clean it with water and dish soap. Avoid touching it with your fingers, as that may leave oils that will make the print detach from the surface mid-print. From what I can see in your pictures, it could be related to those 3 points. So please let me know so I can help you further.
0
Reply
Replying to @mauker :
Hello Mauker Thank you very much for your reply I am new to 3D printing and it is truly very interesting 1) I do not have the application open, but it seems I chose a profile for Polymaker PETG filament, but perhaps that has nothing to do with the print profile. I will try to check that as soon as I can 2) The filament was brand new and I had just taken it out of its sealed vacuum bag. And foolishly I thought it was dry, but after reading reviews, that means nothing and it can be humid even when new. But now the spool has been in the Bambu Lab AMS for about 16 hours. And in the Bambu Lab AMS I put several compartments with desiccant beads 3) For cleaning, I clean the build plate with the correct products before each print
Show original
0
Reply
Replying to @MickeyMJJ :
Following up In videos, I've seen some people use a type of glue Maybe I should buy some I also read that for PETG, it's not recommended to run the fans perhaps that's also an issue Also for this type of print do you think the printer should be left open Thank you Michael
Show original
0
Reply
Great print. Made a slight modification to allow for power cable, printed in PLA+ and came out great. Might modify the other side to mount the power supply. A+
2
Reply
do you have the design for this we can use?
0
Reply
can you upload that file?
0
Reply
Boosted
Printed really nice. Switch fits and it looks great in the rack. Thanks!
The designer has replied
1
Reply
Heya! Thanks for sharing the review and make! Your rack looks great!
0
Reply
Where did you get the blank for the left side?
1
Reply
Hey Mauker, thanks for putting this model together, my first print turned out really nice. Are you planning to add a cutout for the power cord to the 19-inch model like you did the 10-inch model?
The designer has replied
2
Reply
Heya! Thanks :) Yes, I am!
0
Reply
Replying to @mauker :
This is great news, thank for your efforts on all these module rack mounts. They are helping my network rack come together quite nicely. I'll check back later this afternoon on progress of the power cord cutout :) only kidding.
0
Reply
Replying to @mauker :
Just following up if you were able to make one with the power cord cut out. Looking at adding this to my rack and would love that option. Your work is great and make the racks look clean!
0
Reply
Boosted
Print Profile
0.2mm layer, 3 walls, 20% infill
came out fine.
The profile uploader has replied
profile
1
Reply
Hi! Thank you for sharing your make and for the review as well :) I'm glad you liked it
0
Reply
Prints great, fits great. I used one side from this model and the other from your USW-Flex-2.5G-8 model
1
Reply
Print Profile
0.2mm layer, 3 walls, 20% infill
printed good and fits perfectly.
0
Reply
It's nice! Certainly sucks to have to screw it together, but I don't have a 19" print bed, so not the makers fault! Printed great, don't be afraid to bump the strength! infill or layers. This is not to say that it is flimsy, mine seems very firm, I jut think, this it is plastic, and beef it up! :-)
(Edited)
0
Reply
Boosted
Print Profile
0.2mm layer, 3 walls, 20% infill
Combined parts to fit full size rack, worked well.
0
Reply

License

If you want to use this model commercially, please join my membership.
Join Now
This user content is licensed under a
Creative Commons Attribution-Noncommercial-Share Alike