Search models, users, collections, and posts

Mounts and Stevenson screen to Netatmo (weather)

IP Report

Print Profile(13)

All
A1 mini
H2S
H2D
P1S
X1 Carbon
A1
X1E
H2D Pro
X1
P1P
P2S
H2C
X2D
A2L

Netatmo, all parts
Netatmo, all parts
Designer
23.5 h
20 plates
5.0(11)

Stevenson screen to Netatmo Outdoor Module
Designer
8.2 h
10 plates
5.0(10)

Mount to Netatmo Outdoor Module - Type A
Designer
1.6 h
1 plate
4.0(2)

Mount to Netatmo Outdoor Module - Type B
Designer
1.3 h
1 plate
5.0(1)
Click to see more

Open in Bambu Studio
Boost
90
283
80
42
379
204
Released 

Description

Boost Me (for free)

If you found this model useful, please consider leaving a Boost, thanks!

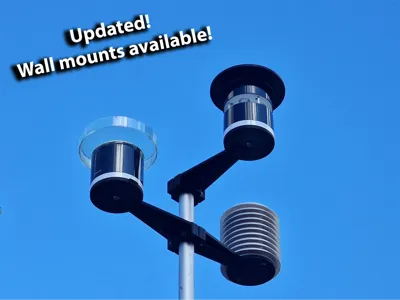
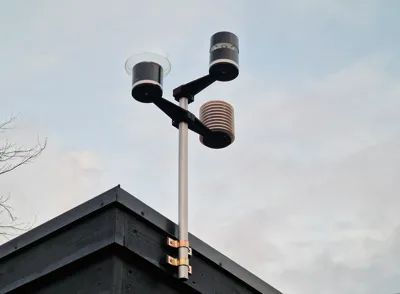
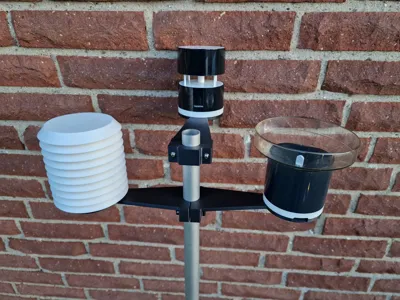
After some months on the table outside it was finally time for me time to fix some mounts for my Netatmo products. I have made this mount for pipes with 25mm diameter. It's a fairly standard size that's not too big or too small. It's my 100% own design. I have tried to make it as easy as possible. 


Some information that can be good to know:

  • Use ABS filament beacuse the items shall be outdoors. 
  • Use only white ABS filament for the Stevenson Screen, other colours may affect the measuring results.
  • I have been used Bambu Lab X1 Carbon with textured PEI plate for my prints. I had some problems

    in the beginning with warping. I notice it was better with 100°C then standard 90°C bed temperature.

  • Clean the plate with dishwashing liquid and warm water before printing. 
  • Tighten the screws evenly and don't tighten to hard. 

  • Preasssemble and test all parts before installation if necessary.
  • Change to new battery before installation?


If something is unclear, please comment. This the most complex models I have made with a lot of parts.
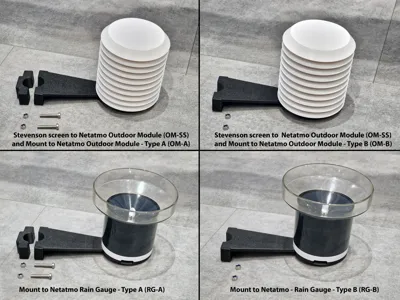
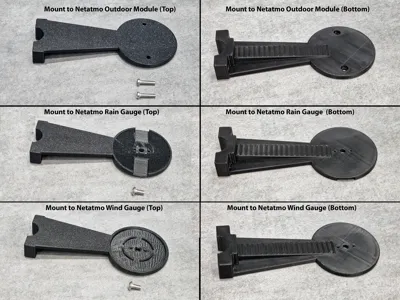
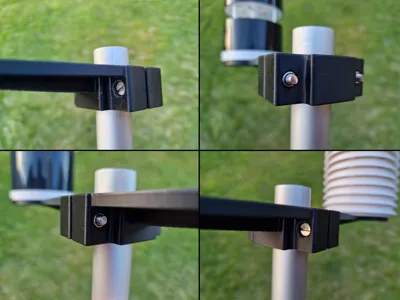


Type A consist of:

1Pcs mount with holes for two screws.

1Pcs Clamp with holes for two nuts.


Type B consist of:

1Pcs mount with holes for two nuts.


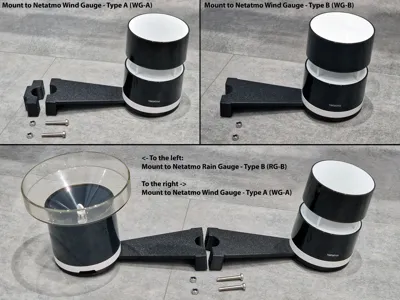
There are two ways to install the mounts. 

  1. You can use them “stand alone”, Type A. 


    or


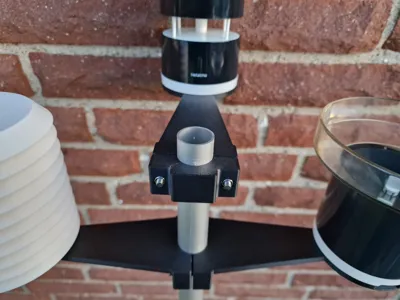
  2. You can mount them “side by side”. One must be Type A and the other one must be Type B.

    (No need to print the clamp that is in Type A models, you can use the cut tool in Bambu Studio to delete it)


Either if you use mount Type A as a ‘stand alone’ 

or 

Type A and Type B in a “side by side” installation you need:


2Pcs Stainless steel Slotted Cheese Head Screws M5 x 30mm. 

2Pcs Stainless steel nuts M5, preferably lock nuts.


And when you shall install the Netatmo products to the mount you need following parts:


Rain Gauge

1Pcs screw 1/4", length 1/2 inch (approx 12,7mm, not longer!)  (Standard camera mount thread)

(I have used screws from this kit: https://www.amazon.se/dp/B09J3NF3FR?ref=ppx_yo2ov_dt_b_fed_asin_title)


Wind Gauge 

1Pcs screw 1/4", length 1/2 inch (approx 12,7mm, not longer!)  (Standard camera mount thread)

(I have used screws from this kit: https://www.amazon.se/dp/B09J3NF3FR?ref=ppx_yo2ov_dt_b_fed_asin_title)


Outdoor Module

2Pcs Stainless steel Slotted Cheese Head Screws M5 x 20mm.

2Pcs Stainless steel nuts M5, preferably lock nuts.


For people who is living in Sweden, Norway, Finland or Poland I have bought 

the screws and nuts from the company Jula (Jula.se, Jula.no, Jula.fi, jula.at):

10Pcs M5 x 20mm, art.no 315523 

10Pcs M5 x 30mm, art.no 315531

10Pcs M5 lock nuts, art.no 316257


If you only want to use the Stevenson screen for your Outdoor Module you need:

2Pcs Stainless steel Slotted Cheese Head Screws M5 x 15mm. 

2Pcs Stainless steel nuts M5, preferably lock nuts.


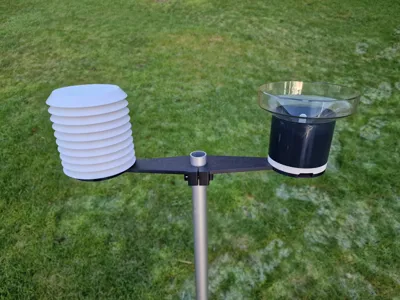
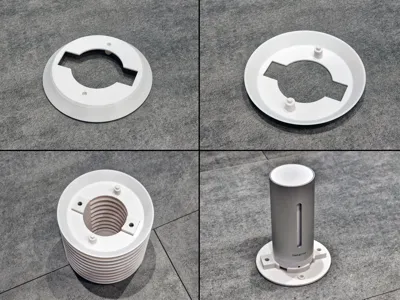
For the assembly of the Stevenson screen you need to take it slow and careful.

  1. Start with the lid and install the nuts.


  2. Turn it upside down and place the Outdoor Module into the lid. 

    Please notice how the Outdoor Module is placed! Very important!

    And after installing the screens, you will see how they should be fixed.


  3. Carefully place the bottom on the top and see so everything fits good before you screw in the screws. 

    Notice, if you push too hard you push out the nuts from the holes. If it happens, you can fix it by take a

    finger between the screens and get the nut back in the hole. The same if you shall unscrew, don't push.

    If you shall use a mount you shall screw the screws thru the mount first of course. :)


  4. Then you are finish with assembly of the Stevenson screen. 
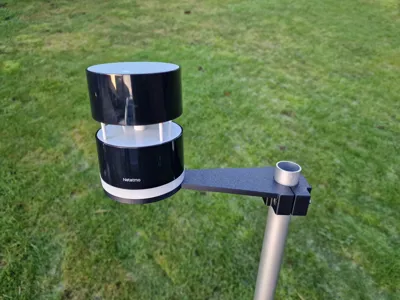
Update 2025-09-11


Added a protective cover for the wind gauge. Not the "prettiest", but it works. 

Have used it for maybe 3 months without problem with water inside.


Update 2025-09-06


Pictures © Werigandus


The user Werigandus have made a customizable adapter from different diameters to 20mm that my models are designed for.

You find the model here: Adapter for Netatmo Mounts (parametrizable)


Many thanks for this Werigandus!  
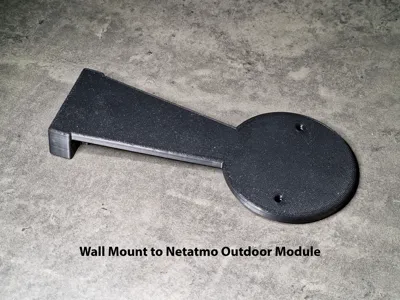
Update 2025-07-21.

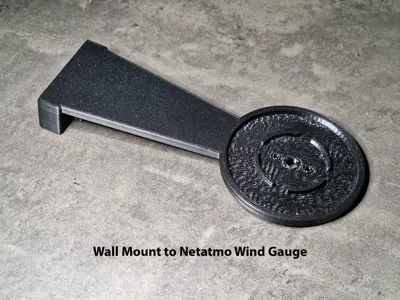
Added wall mounts for:

Outdoor Module

Rain Gauge

Wind Gauge

Update 2025-07-16.

I have reinforced the wind gauge a little, I get a slight feeling on my own wind gauge that it might be needed.

All print profiles are also for A1 Mini from today.

Update 2025-01-27.

I have reinforced the model for the Wind Gauge to better handle the weight of the Wind Guage, not sure the previous version was to weak, but I do this to be on the safe side. 


Boost Me (for free)

I hope you like my models. If you found this model useful, please consider leaving a Boost, thanks!

Comment & Rating (80)

(0/1000)

Print Profile
A 1 Mini 0.2mm layer, 2 walls, 15% infill
Worked out fine. I had to improvise the mount with wires. But the design works fine. Kudos
The profile uploader has replied
0
Reply
Thank you very much for the feedback
0
Reply
Replying to @Kalgraff :
I dont know if it is too much to ask but I'd love to be able to print the bracket (type A) but on A1 mini in PETG. I tried modifying current design but I couldn't get it to print successfully.
(Edited)
0
Reply
Replying to @user_2952553025 :
Could you try contacting the person who created the model? Henrik, maybe he can help you?
0
Reply
Print Profile
Netatmo, all parts
The print worked very well and I also printed the screws and nuts directly Since I wanted to use a 35mm pipe I fashioned an adapter from 35mm to 20mm as a slip-on sleeve The 20mm supports are attached to it
(Edited)
The profile uploader has replied
Show original
0
Reply
Thanks for sharing this! Looks very good! 👍 If you want, publish the adapter on your profile and add more dimensions also if you want. And then I will link to your model.
0
Reply
Replying to @Henrik_Sweden :
Show original
0
Reply
Replying to @Werigandus :
Sorry for late replay, to me honest I forgot it. Sorry. But I have updated my page with your model. I used your photos, I hope it's okey. Thanks again!
0
Reply
Boosted
Works great. I printed mine in PETG and used a Type B mount to attach to a shed.
The designer has replied
designer
1
Reply
where can I find the same mount you used?
0
Reply
Replying to @user_2952553025 :
I have updated the page with wall mounts for Outdoor Module, Rain Gauge and Wind Gauge. I hope that can help you if you still is looking for this.
1
Reply
top anemometer protection fits very well
The designer has replied
Show original
designer
1
Reply
Thank you for sharing your print, I'm glad you like it. :)
0
Reply
Boosted
So much more compact than the one I made out of wood!
0
Reply
Boosted
Print Profile
Stevenson screen to Netatmo Outdoor Module
Great
0
Reply
Love the designs, but I have an issue with the Stevenson cover. All seemed to work well until we're now in 32 degrees celcius and the outdoor sensor only indicates 21 and 84% humidity. I took it out and all readings came back to normal.
The designer has replied
0
Reply
Hmm, this phenomenon sounds very strange. It would be more “normal” if the temperature readings were higher when the air is completely still. At the same time, I don’t think the air becomes 100% still, and the thermometer itself doesn’t generate heat in that way. And if the sun is shining on the Stevenson screen, that would also create some air movement. Do you have the possibility to move it to another location and see what happens? Have you tried changing the battery? Have you tried restarting the base station? It sounds very strange and I don’t really have a good explanation. I personally haven’t noticed anything unusual at all, and I’ve had mine running for about 17 months. Otherwise, let’s hope one of the above helps — and if not, let’s hope you happen to have 21°C all year round. 😉 Glad you like my model otherwise. 👍 Please keep me updated on how it goes.
0
Reply
Replying to @Henrik_Sweden :
Seems my module died. :( It's not giving any reading any more
0
Reply
Replying to @TonyWo :
It was sad to read. Hopefully you still have a warranty. Have you tried new batteries? Have you tried adding it to the base station again? Maybe remove it first and then add it again. Is it possible to reset the module?
0
Reply
Print Profile
Netatmo, all parts
(Edited)
0
Reply
Boosted
Hi @Henrik_Sweden, can you by any chance add a design for a lagrer pole diameter? I can do a small donation for this
The designer has replied
0
Reply
Hi @malyutins, If you look at the bottom of the model page, you'll see a link to a customizable adapter that @Werigandus has made. You choose your pole diameter and the top will be 20mm and fit the mounts I've made. Could it get any better! :) Many thanks Werigandus for your model that you share with us! Link: https://makerworld.com/en/models/1750615-adapter-for-netatmo-mounts-parametrizable Thank you @malyutins for the 5-star rating and the boosts. Many thanks!
1
Reply
Boosted
@Henrik_Sweden looks good! I added a bit of duct tape because adapter had a bit smaller diameter, but generally very satisfied with the mounts, thank you! I printed all with ASA plastic
designer
1
Reply
Replying to @malyutins :
@malyutins It looks very nice and I'm really glad you like it. :)
0
Reply
I find the bracket very nice. Would it be possible if you could adapt it for a 50mm pipe as well? I would like to attach the rain and wind gauge to my flagpole
The designer has replied
Show original
designer
1
Reply
Hi Marcus, I will try to help you, I'll send you an PM regarding this.
0
Reply

License

This user content is licensed under a Standard Digital File License.

You shall not share, sub-license, sell, rent, host, transfer, or distribute in any way the digital or 3D printed versions of this object, nor any other derivative work of this object in its digital or physical format (including - but not limited to - remixes of this object, and hosting on other digital platforms). The objects may not be used without permission in any way whatsoever in which you charge money, or collect fees.