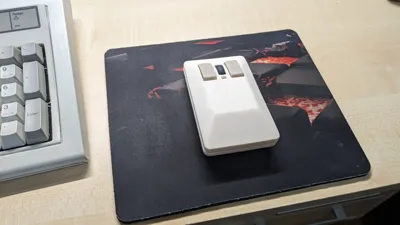
Amiga Tank Mouse

Copyright Claim

Amiga Tank Mouse

Boost
212
279
79

Print Profile(3)

All
A1 mini
P1S
P1P
X1
X1 Carbon
X1E
A1

0.16mm layer, 3 walls, 15% infill
Designer
4.4 h
2 plates
4.9(37)

0.16mm layer, 3 walls, 15% infill
Designer
4.2 h
1 plate
5.0(4)

0.16mm layer, 3 walls, 15% infill
Designer
4 h
1 plate
5.0(4)

Boost
212
279
79
22
393
279
Released

Description

Pretend it´s the 80s and use your old mouse from way back when, with an updated touch.


Inspired by the legendary Commodore Amiga 1351 “Tank mouse”, but with modern features, like scroll wheel and dpi switch.


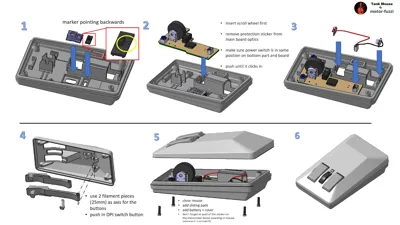
This mouse uses the Bambulab wireless mouse kit :

Wireless Mouse Components Kit 002


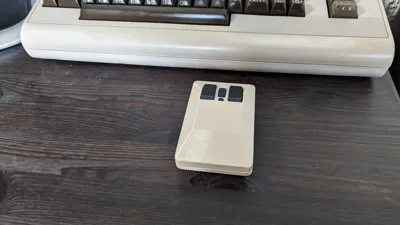
Print in 2 colors (buttons darker) for original effect.


Also available with a profile for one color or a profile with 2 colors on one print bed (AMS required).


27.01.2024 small update: the “bridges” between buttons and scroll-wheel are now slightly reinforced for a more durable mouse. Thanks to “Himmelsnetz” for the suggestion.
 
Update: If you want to have the scroll wheel in the same color as the buttons (looks gorgeous), you can find a wheel from JeffA here:
Scroll Wheel 


Documentation (1)

Assembly Guide (1)
Mouse-Assembly_5f08d4d7-f1e9-456f-a91c-5a5bb59233a7.pdf

Comment & Rating (79)

Please fill in your opinion
(0/5000)

Print Profile
0.16mm layer, 3 walls, 15% infill
Absolutely AMAZING design! Everything works perfectly! I even created an a 3d-printed scroll wheel, and it looks even better now!!!
(Edited)
The designer has replied
4
Reply
Hey, that´s an amazing idea. The scroll wheel looks great....
(Edited)
1
Reply
nice print but two issues: 1st, there is nothing to hold the circuit board down so the switch stops working. 2nd, the filament for a hinge is too loose so it slides out. I was able to fix the second issue by folding a piece of filament in a Z shape then use it for both hinges (see attached picture).
The designer has replied
1
Reply
1st issue: You did not realize that the block that supports the DPI-switch is also holding the circuit board down? 2nd issue: your printer seems to make pretty big holes when the filament does not stick by itself. The last bit of the hole is tapered to clamp the filament. If this does not work your holes are probably bigger than they should be....
0
Reply
By the way: nice color. a very military version of the "tank" mouse....
0
Reply
Beautiful design and easy assembly! I was concerned about the overhangs, but tree supports handled them like a champ. I printed the body in CF, so layer lines aren't visible. The ergonomics aren't great (those corners are sharp), but visually, it's incredible! Thanks for the excellent model!
The designer has replied
2
Reply
That CF filament looks awesome. Matt black is a color I have not tried on the mouse, yet. very cool....
1
Reply
Print Profile
0.16mm layer, 3 walls, 15% infill
Is it ergonomic? No! Is it awesome? YES.
(Edited)
3
Reply
Many thanks to the Amiga for the model, which gave me the feel of a retro mouse. I thought it had a few areas to improve, I thought I needed a key with some bounce, so I added hot glue to the hinges and it gave me Came with great feedback and it made it easy for me to install. I feel like this spot could be redesigned as a latch. Thanks again Amiga !!
The designer has replied
1
Reply
Interesting mod. However, this depends on preference. I prefer my mouse buttons with minimum resistance. That´s why I decided for the "axis-design"....
0
Reply
Love it,is very cute!!
The designer has replied
0
Reply
Nice colors. This is pretty close to the original...
0
Reply
Printed well so far. Thanks for the model. Printed it with Bambu ABS in white. works great. Just dont know why i can't rate :)
(Edited)
1
Reply
Print Profile
0.16mm layer, 3 walls, 15% infill
Everything fits very good - excellent design and a cool retro-feeling!
1
Reply
Print Profile
0.16mm layer, 3 walls, 15% infill
The model is great. Be aware and calibrate your filament first. Here are thin structures. After calibration this print works perfectly. 👍😊
(Edited)
1
Reply
Print Profile
0.16mm layer, 3 walls, 15% infill
Printed in eSun PLA+.
0
Reply