Search models, users, collections, and posts

Sugar rocket

GIF

Print Profile(1)

All
A1 mini
P1S
H2D
H2D Pro
P2S
H2C
X1E
A1
X1
P1P
X1 Carbon
H2S
X2D
A2L

0.2mm layer, 4 walls, 15% infill
Designer
4.1 h
3 plates
4.8(26)

Open in Bambu Studio
Boost
394
923
89
38
781
397
Released 

Description

Boost Me (for free)

Hi, a boost and a follow would really help me with future designs. Thanks for the support!

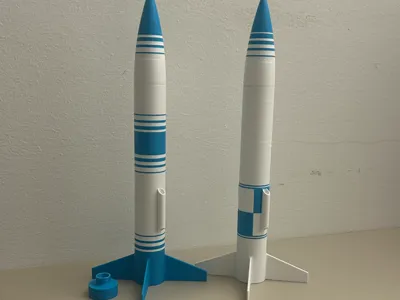
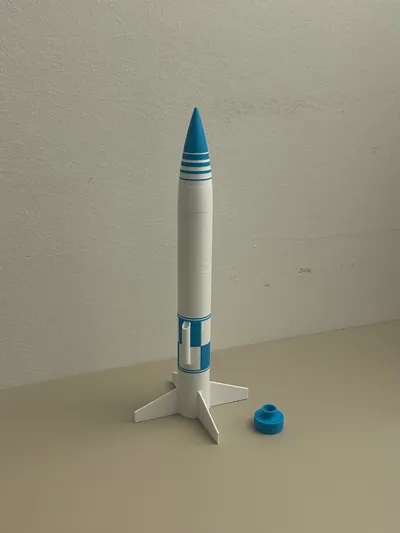
Here is a small model of a rocket (about 25cm tall) that actually works!

The small hole in the inside wall is there for future upgrades (such as a parachute).

To make it fly you will need potassium nitrate (KNO3) which is a stomp remover, sugar and a 4-5mm rod to guide the takeoff.


  1. Mix the two components (about 70% potassium nitrate and 30% sugar) and press them into the rocket using the tool provided in the files, if you can it would be optimal to grind it finer with a coffe grinder;

      2. When the mixture is compact use a 5-7mm bit to drill a hole into the motor (almost full length);


      3. Now glue in place the nozzle and the nose cone;


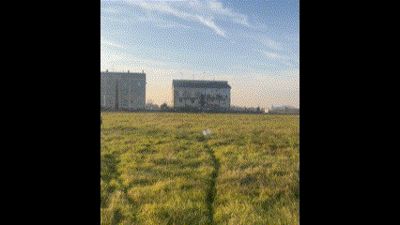
You are ready to fly!


IMPORTANT


Mixing potassium nitrate and sugar can be very dangerous do it only if you know what to do or you are supervised.


The nose cone MUST be printed with 100% infill, at least from 25mm to full height, otherwise the rocket will be unstable and spin out of control, i included the optimal sliced files for the A1 mini


Comment & Rating (89)

(0/1000)

you can also add certain substances to boost performance such as red iron oxide and different types of sugar. here's a basic example from my perspective with sugar rockets.just be safe.. 1. Propellant Formulation Ingredients: - Potassium Nitrate (KNO₃): 65% by weight (oxidizer). - Must be finely ground (use a ball mill) to <100 µm particle size. - Purity: ≥99.9% (agricultural-grade KNO₃ may contain impurities that destabilize combustion). - Sucrose (Sugar): 35% by weight (fuel). - I would recommend using sorbitol, a sugar alcohol, it's easier and safer with better performance. - Optional Additives (for performance tuning): - Red Iron Oxide (Fe₂O₃): 1–2% by weight (burn rate catalyst). - Paraffin Wax: 1–2% (binder/flexibility to reduce cracking). Melting Process: 1. Dry Mix: Combine KNO₃ and sugar in a 65:35 ratio. Add Fe₂O₃ if using. 2. Heat Slowly: Use a double boiler (never direct flame) to melt the mixture at ~160–180°C (320–356°F). Stir continuously until it forms a caramel-like slurry. 3. Cast into Grain: Pour into a preheated mold (to prevent cracking) with a central core rod (for burn geometry).
designer
15
Reply
This is a great model. Still need to test it, but I have one question. I have printed all of the parts in the file, and they all make sense, but what am I supposed to do with this container looking thing. It looks like a container for the sugar and KNO3, but it doesn't fit in the rocket. Please explain what it is for.
The designer has replied
0
Reply
hi, it is just a test motor i used to make a static fire, i used a load cell and got 3kg of thrust
0
Reply
Replying to @thebarbar :
Thank you. That makes so much more sense. I have a follow up question though. Do I have to print 1 nozzle for the rocket and another nozzle for the test motor? The file only comes with one so I was thinking of how I could reuse it but if I secure it on the test motor with super glue, then I won't be able to get it off to put it on the rocket. Anyway, thank you for the support (and the amazing file). Can't wait to test it!
0
Reply
Replying to @user_4155731312 :
yes, you will need to print an additional nozzle for the test motor, i didn't consider it when i uploaded the sliced file on makerword
0
Reply
so it printed well and i want to make the fuel to test it , but i have a question how does the plastic pla doesnt melt from the heat like in the modle you directly jam the fuel into the body and then you drill a hole in it and put a fuse and do you have any printable stand for it ? and do you have a video other than the one you put for it clearer and thank you for your design , and i would recommend for the airodynamics to put fins on the body also it would be a great update for it
(Edited)
The designer has replied
designer
1
Reply
hi, the pla doesn't melt because if the propellant is mixed properly the combustion happens so fast that the plastic doesn't have enough time to heat up, however the rocket is designed to be single use. I don't have a 3d printable stand because you really need a metal shaft to launch it from to ensure it goes straight, it would be dangerous otherwise. I'm not sure about the fins on the body of the rocket, because any fin that is higer than the ones that are already there would actually decrease the aerodynamic stability. That is due to the short lenght of the rocket which I designed to fit in the a1mini, i tried a lot of fin shapes and combinations on openrocket, but that one seems to be the best.
1
Reply
I suggest using the Test model to try out the propellant, simply follow the same steps to load the rocket, glue the nozzle and light it while pointing down. If done correctly the powder will burn completly in about one second, but anything lower than 2 seconds should work. This is important because the faster the powder burns, the more thrust it will generate, and the less time the pla will have to melt.
1
Reply
Boosted
Print Profile
0.2mm layer, 4 walls, 15% infill
Very easy to print. Did use brim for both the rocket and cone. The nozzle printed great for me without. Ran one test with the normal size and was impressed with the results. Printed a maxed out version for X1C. +38% all dimensions. A little sketchy but worthy of an experiment. Thank you for the model. Finally burning some sugar!
The profile uploader has replied
profile
2
Reply
Hi, thanks for the comment and the boosts, glad to know that actually someone else made this model fly!
0
Reply
Print Profile
0.2mm layer, 4 walls, 15% infill
Had to rearrange and reslice. For some reason, the layout provided kept losing adhesion for the smallest circular part. Resolved by adding a brim. Once printed, everything is well within tolerance, just waiting on salt petre to get it flying 😜
The profile uploader has replied
profile
1
Reply
Hi, tanks for the feedback, i added a brim to the print profile and a model to test the motor without printing the whole rocket. I also modified the file so that you don't have to print the presser again if you want to print multilple rockets.
0
Reply
Boosted
Not the intended purpose, but after playing with this a little in the slicer, we modified it to launch off of a 1" PVC pipe with ~35psi air pressure. Worked great for a school project! Thanks!
The designer has replied
0
Reply
Thanks for the feedback! happy you liked the model
0
Reply
Boosted
Print Profile
0.2mm layer, 4 walls, 15% infill
awesome, waiting to test
0
Reply
same PLA
0
Reply
Good model!
0
Reply
Print Profile
0.2mm layer, 4 walls, 15% infill
for a model, it's great! I'm just having trouble with my fuel. I'll work on it
0
Reply
Print Profile
0.2mm layer, 4 walls, 15% infill
ABS Print
0
Reply

License

This user content is licensed under a Standard Digital File License.

You shall not share, sub-license, sell, rent, host, transfer, or distribute in any way the digital or 3D printed versions of this object, nor any other derivative work of this object in its digital or physical format (including - but not limited to - remixes of this object, and hosting on other digital platforms). The objects may not be used without permission in any way whatsoever in which you charge money, or collect fees.