Tomecaster 3D Printed Modular Guitar v1


Print Profile(0)
Description
Intro
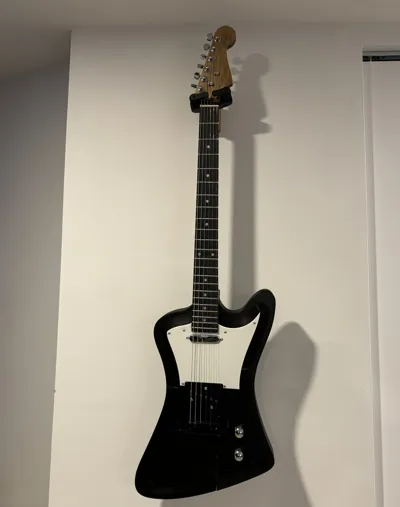
Introducing the Tomecaster: Pronounced "Tome-caster" or “Tom-eh-caster” (because my name is “Tom” hehe…)
A modern design made to work with widely available parts used to build T-style guitars like Telecasters as well as some rather flexible options. This is meant as a modular platform that allows you to build and customize body shapes to your liking without the need for much, or any, disassembly between iterations.
For those asking, pickup switching is done via push-pull pots instead of a traditional pickup selector switch. The option for one will be added in a future variation
Build
A mix of 3D printed parts and purchased parts will be required to assemble a working instrument
Quick Notes:
- The core supports string-through body with an appropriately compatible bridge and string ferrules. But bridge-slung strings work just as well if you go with the Harley Benton kit or any similar style bridge
3D Printed Parts
The following parts are required to be printed. All parts are numbered with respect to their corresponding STL and/or print files (if I ever get to uploading the print files I used…)
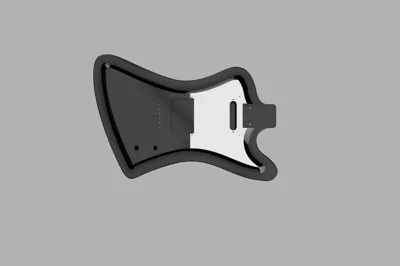
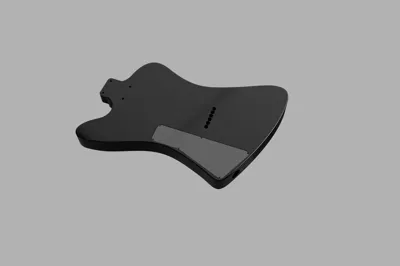
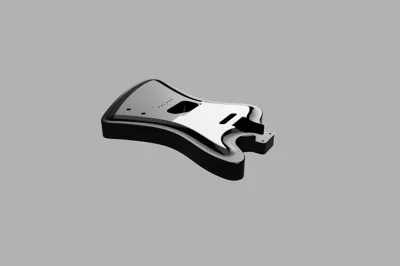
- 00 - Core: The central structure of the guitar and the only required piece to assemble a barebones instrument that is sort-of-kind-of playable
- 01 - Top Neck: The section located closet to your left nipple when playing the guitar right-handed
- 02 - Bottom Neck: The section located closet to your left thigh when playing right-handed
- 03 - Top Butt: The top of the butt of the guitar if that makes sense… Located closet to your right nipple when playing right-handed
- 04 - Bottom Butt: The section that houses all of the controls/electronics (knobs, switches, jacks, etc.)
- 05 - Pick Guard: A pick guard that follows the shape of the top-carve of the body with holes to mount the neck pickup
- 06 - Control Cover: A cover to hide the hole for the electronic on the back of 04 - Bottom Butt
Purchased Parts
This is a rough guideline to getting parts that should work with the printed models, but is no means exhaustive or explorative. Feel free to buy whatever parts you like and play around to get the look/feel you want. Here are some recommendations and things I've tried
I have purchased every single one of the below listed parts. Nothing is sponsored. I do not get money from suggesting any of these products. I have simply used them in the past and can give some feedback/opinions and feel comfortable enough including them here as rough suggestions to the people of the interwebs.
Kits
- Harley Benton TE DIY-KIT: https://harleybenton.com/product/te-diy-kit/
- Probably one of the easiest ways to get started with this project. I personally used many parts from this kit when designing and prototyping. I used this template - https://www.thingiverse.com/thing:1784929 - along with a router to cut the headstock to look like a classic Fender-style headstock
Necks
Any neck with a roughly 2" x 1 ½" hole patterns typical of Fender Telecasters should fit (American company with American dimensions, don't blame me!)
- The Harley Benton one
Neck Plates
- https://www.amazon.ca/Fender-0991448100-F-Neckplate-Chrome/dp/B000WN4J9S/ref=sr_1_7?crid=2KZ01KFSB45YJ&keywords=fender+neck+plate&qid=1696004276&sprefix=fender+neck+plate%2Caps%2C90&sr=8-7
- https://www.amazon.ca/Musiclily-Fender-Stratocaster-Telecaster-Guitar/dp/B00CP3GP5Y/ref=sr_1_11?crid=1PXFN1QB4ODN3&keywords=strat%2Bneck%2Bplate&qid=1696004302&sprefix=strat%2Bneck%2Bplate%2Caps%2C95&sr=8-11&th=1
- The Harley Benton one
Jacks + Jack Plates
- https://www.amazon.ca/gp/product/B0841CG8NR/ref=ppx_yo_dt_b_search_asin_title?ie=UTF8&th=1
- https://www.amazon.ca/gp/product/B08FDR6HXK/ref=ppx_yo_dt_b_search_asin_title?ie=UTF8&psc=1
- https://www.amazon.ca/gp/product/B07P77KZ3V/ref=ppx_yo_dt_b_search_asin_title?ie=UTF8&th=1
- The Harley Benton one works but is quite curved
Pickups
- https://www.amazon.ca/gp/product/B06XHDF75L/ref=ppx_yo_dt_b_search_asin_title?ie=UTF8&psc=1
- These are expensive but they sound f-ing amazing. But, like, maybe don't put them in a 3D printed guitar…
- The Harley Benton ones are OK and work for this application
Bridges
- https://www.amazon.ca/gp/product/B01JA0RS64/ref=ppx_yo_dt_b_search_asin_title?ie=UTF8&th=1
- This is the one I designed the pick guard around so it fits best and is pretty inexpensive
- https://www.amazon.ca/gp/product/B098D1CRVP/ref=ppx_yo_dt_b_search_asin_title?ie=UTF8&th=1
- I have one of these and will get to designing a pick guard that better fits it in the future
- https://www.amazon.ca/gp/product/B001CC3CV4/ref=ppx_yo_dt_b_search_asin_title?ie=UTF8&psc=1
- The Harley Benton one, but the screw holes are a little off. They will still work though
String Ferrules
You now, the little metal thingies that go behind the guitar in the string-through-body designs that prevent the knubs from your strings from passing straight through the guitar body
Pickup Selector
- https://www.amazon.ca/gp/product/B0002E2G2E/ref=ppx_yo_dt_b_search_asin_title?ie=UTF8&th=1
- Yeah, I know, this version doesn't include a blade switch mount but a future version will for those that want one
Control Knobs
Pots / Potentiometers
- https://www.amazon.ca/gp/product/B0002KZEAO/ref=ppx_yo_dt_b_search_asin_title?ie=UTF8&psc=1
- Can be used for volume and/or tone
- https://www.amazon.ca/gp/product/B000P0SSMM/ref=ppx_yo_dt_b_search_asin_title?ie=UTF8&psc=1
- Can ONLY be used for the tone pot. Will not work for volume. You will have no output if you try
Tuners
Additional holes might be needed to be drilled to fit Fender tuners on non-Fender necks to accomadate the alignment pins
- https://www.amazon.ca/gp/product/B000L6GD04/ref=ppx_yo_dt_b_search_asin_title?ie=UTF8&psc=1
- WAY overkill for this but they're great
- The Harley Benton ones
- I actually used genuine Fender USA tuners from the 80's in mine… Yeah I'm dumb, I know.
Strap Things
Screws
Assembly
- Mount the bridge pickup into the bridge
- Mount the neck pickup to the pick guard
- If using them, lightly tap/hammer the string ferrules into the holes on the underside of 00 - Core
- Pull the bridge pickup wires through the hole in the pickup cavity (optionally but recommended, run an additional wire that will be clamped beneath the bridge for grounding along with the pickup leads)
- Attach the bridge to 00 - Core using the screws that were provided with your bridge
- Using super glue (future version won't require glue), and one at a time to ensure everything adheres properly, attach 01, 02, 03, and 04 to 00 - Core
- Pull the neck pickup wires through the hole in the cavity and attach the pick guard to the body
- Follow a wiring guide to install the remaining electronics. There are a billion tutorials on the internet. I will upload a custom diagram soon with push-pull pickup selector pots
- Attach the neck using a neck plate
- String it up and enjoy!
Future Variations
V2
- Make body larger. Proportions are a bit off
Arbitrary Timeline
- Will add mount for blade or Gibson-style pickup selector switch
- Will add different pick guards that fit different bridges
- Body parts should be able to be attached and removed without adhesive for quickly mocking up and designing new pieces
- Open to suggestions!
Comment & Rating (2)