SKADIS x MITTLED (LED BAR)


Print Profile(1)

Bill of Materials
- IKEA MITTLED 60CM x 1:
- IKEA VÅGDAL 3.5m x 1:
- IKEA TRÅDFRI 10W x 1:
- IKEA FÖRNIMMA 3.5m x 1:
Description
This model was designed using coffee, filament, and questionable life choices.
If it earned a spot on your printer, it might deserve a 👍 Like too. 😄
Checkout my newest release:

SKADIS x MITTLED
I’ve been wanting to add some lighting to my SKADIS wall for a while. My goal was indirect lighting—something I could look at without staring directly into the light source. While browsing IKEA for something completely different, I stumbled upon the MITTLED LED bars. These are ready-to-use components with a generous 3.5m cable, and they can even be made smart by adding a TRÅDFRI driver. So, I decided to give it a try.
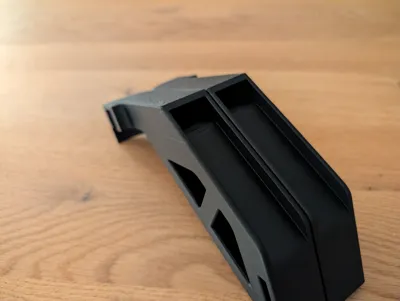
To make it work for my setup, I designed a simple holder. It keeps the LED bar in place and hides the cable neatly, which was important since my SKADIS board is black, and visible cables would’ve been distracting. The holder is angled to position the light higher, so it doesn’t take away usable space on the board. Plus, I added a shield to block direct visibility of the LED bar, ensuring the light feels soft and unobtrusive. Since it doesn’t bear any weight, you can just push it onto the top edge of the SKADIS board—no extra fasteners needed.
Here’s what you’ll need from IKEA:
- IKEA MITTLED 60CM - ~22€
https://www.ikea.com/de/de/p/mittled-led-lichtleiste-fuer-arbeitsplatte-dimmbar-weiss-60528584 - IKEA VÅGDAL 3.5m - ~5€
https://www.ikea.com/de/de/p/vagdal-verbindungskabel-weiss-70463600 - IKEA TRÅDFRI 10W - ~15€
https://www.ikea.com/de/de/p/tradfri-treiber-fuer-kabellose-steuerung-smart-grau-50356187 - IKEA FÖRNIMMA 3.5m - ~6€
https://www.ikea.com/de/de/p/foernimma-anschlusskabel-50446881
Total cost: ~48€
Thoughts
Can it be done cheaper? Probably yes. I tried, and I failed. I wanted something integrated into Zigbee and got frustrated trying to make it work with my setup. Off-the-shelf parts became the simpler solution. I did consider using HUE Play Bars, but they would have been even more expensive and required additional extension cables since the standard ones are too short. With TRÅDFRI, I get long cables and easy extensions, so it just made sense.
It works for me—for now.
Assembly
 Put everything somewhere so you can reach it. |  You now need to decide on what side you want to guide the cable. Place the bar with the open end towards the back and the LEDs facing you. |
 Fiddle in the cable from the back… |  … align it firmly into place rotating the cable slighty … |
 … and push the bar into the connector. |  You can now push the covers over the led bar. |
 When you are done it should look like this. |  You can now simply insert it onto your Skadis. Done. |
Additional Notes
If you want to use a different size of MITTLED, the 3. Plate in the profile is a template; you can scale it to the width you need it.
Example for 30cm
Formula: <bar width> - 4cm + 2mm
30cm - 4cm + 2mm = 262mm
You have a length of 262mm you need to cover, divide it into useful parts you can print.
Example: 2x 131mm = 262mm
I hope you enjoy the design! Please leave a comment or rating if you like it and share your feedback!
Follow me on Instagram for unregular updates 😅.
License
You shall not share, sub-license, sell, rent, host, transfer, or distribute in any way the digital or 3D printed versions of this object, nor any other derivative work of this object in its digital or physical format (including - but not limited to - remixes of this object, and hosting on other digital platforms). The objects may not be used without permission in any way whatsoever in which you charge money, or collect fees.
Comment & Rating (50)