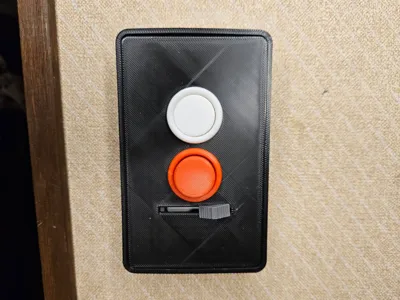
Arcade Button Light Switch w/Dimmer


Print Profile(1)

Description
Decided to make the arcade button style light switch work with the specific panel light switch I have with the dimmer on it that run along the bottom of the Lid and not the side. I've made some of the tolerances a little tighter so you dont have to rely on glue so much. You will have to glue the Lid to the box and you may have to glue the button rings to the face as well. I had one filament brand where tolerances were tight enough on the rings I didnt, and another where I did.
Printing
Plate 1 - Box, Lid, Spacer (optional see step #3), Switch Extension, Adapter Plate
Plate 2 - Buttons, Rings, Dimmer Knob (This plate is Print by Object)
Installation
1. snap the button rings in to the Lid (use glue on the back side to hold in place if need be)
2. glue the lid to the box
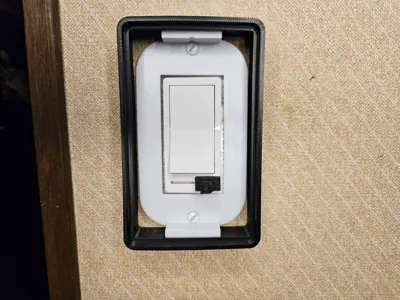
3. your rocker switches will need to be spaced properly for the wall to get best fit. The distance from the top face of adapter plate to the wall should be about .250. If it need to be spaced further from the wall use the small spacer and slip it onto the switch (check picture above)
4. Lightly tighten the adapter Plate down with the screws. Don't over tighten or the mounting tabs will bend outward making it harder to snap the box on
5. Slide the Switch Extension over the dimmer switch
6. drop your buttons in to the rings, they should move freely
7. slide completely assembly on to the adapter plate keeping in mind the Switch Extension for the dimmer need to go through the slot cut out in the Lid. The box should sit flush with wall. If theres a gap, remove adapter Plate and screw switches closer to the wall. If the tabs can't snap on to the adapter Plate then the switch will need spaced further from wall.
8. slide dimmer Knob over the post that sticking through the slot cut out in the Lid. (glue may be needed to secure)
9.ENJOY
Boost Me (for free)
If you found it useful, please send a Boost. Thanks!

Comment & Rating (1)