16.5cm car speaker adapter for Honda Stepwagon RK5


Print Profile(1)

Description
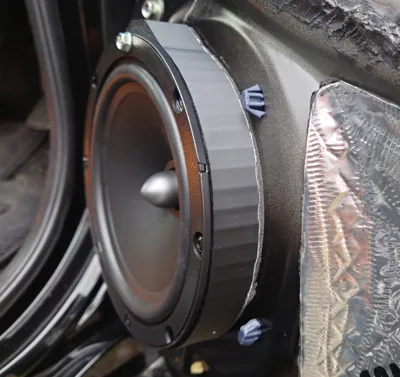
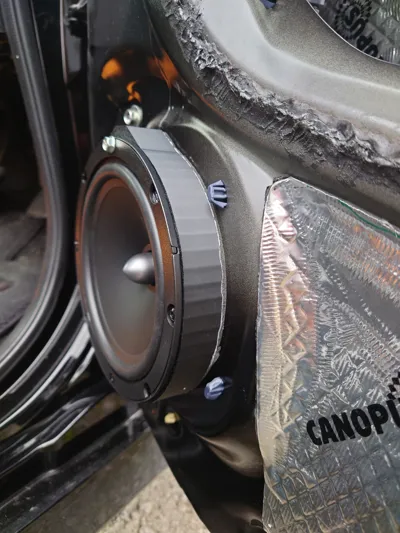
A speaker adapter plate for a 2012 Honda Stepwagon. It allows fitting of a 16.5cm aftermarket speaker in the front and rear. Some assembly and extras are required and the modifications are required to the door cards (front) and speaker covers (rear).
I have only tested these with 16.5cm Focal ASE 165 component and coaxial speakers and printed them with CC3D PC (polycarbonate) filament on a P1S. I have only tested these on a facelift 2012 Honda Stepwagon RK5 Spada “Cool Spirit” with navigation. I am unsure if they fit other 16.5cm speakers or Stepwagon variants.
Printing
- PC recommended (I used black filament by CC3D). PLA not recommended due to the possible high temperatures inside the vehicle.
- 5 wall loops for strength, infill is fine at 15%.
- Supports required. Tree auto in the same material works well enough.
Requirements
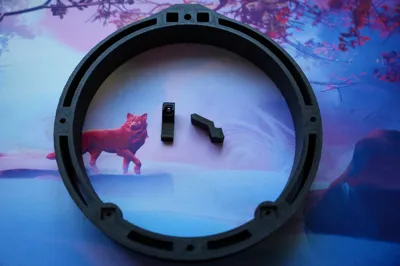
- 2x M3*12mm for attaching the rear clips. Hex socket ones with a button head work well. We don't want the head to protrude above the recess of the clip.
- 3x M4*16mm for attaching the speaker to the adapter.
- The original screw and fitting holding the OEM speaker in.
Optional
- 2mm thick self-adhesive foam (for the rear of the plate to fit snugly).
- You will need an adapter or some soldering skills to connect the new speakers.
Assembly and fitting the speaker to the adapter
- Remove the supports.
- Optionally stick foam to the rear (where the clips fit and where the adapter sits against the car) . Cutting around the edge with a craft knife works well. Also cut around the 4 square recesses.
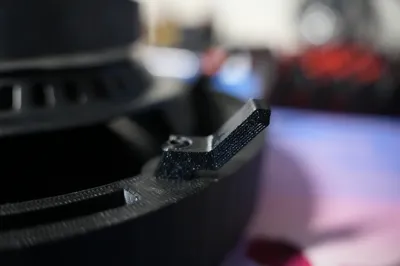
- Push the clips into the 2 bottom recesses on the back of the plate. Note that one is wider than the other.
- Screw in a M3*12mm screw into each. It should be firm but do not overtighten as the material may not be strong enough.
- Fit the speaker using 3 M4*16mm screws. 1 at each side and 1 in the bottom. The top (bigger hole where the "bump" and 2 recesses is) is for the Honda OEM bolt to hold it all in. The orientation of the speaker can matter depending on the speaker. The rear of the speaker's cage and speaker terminals need to clear the door structure (most narrow at the bottom near the clips).
Car modifications
- Both the front door card and the rear covers have a lip which fits around the Honda OEM speaker. These need to be trimmed away as they won't fit over the adapter and aftermarket speaker. A Dremal or similar with a small cutting disc worked well for me.
Fitting to the car (front)
- Remove the door cards. Plastic trim removal tools are highly recommended
- Start popping the top arm rest / window control from the rear. It removes upwards with the front needing to be unhooked. The wiring will need to be disconnected. There is a lever on the connector with a release catch to free it.
- Undo the screw into the door this exposes.
- Use a small flat head screwdriver to push the clip on the bottom of the cover behind the inside door release upwards to release it for removal.
- Undo the 2 screws this exposes.
- Starting on the bottom, get a trim removal tool and starting popping out the push-clips holding the door card onto the door. Get the tool underneath and slide it along to feel where they are so you can prise them out nearby.
- Once the clips are removed, lift the door card upwards slightly and unhook it from the top. As you do so, pop the door release mechanism out of the door card (held in by 4 clips and the 2 screws you removed earlier). The release has cables which can't come with the door card. The door card should now be free.
- Remove the old OEM speaker and disconnect it. It is held in by adhesive and a bolt at the top (that you need to re-use). You may need to cut through the adhesive first with something like a flat metal pry tool/spudger. The top lifts towards you slightly allowing you to lift it out upwards.
- Connect the new speaker.
- Insert the adapter plate/speaker into the bottom first pushing downwards and towards the door to clip it in. Than refit the OEM bolt to the top that you remembered to save earlier (hopefully).
- Trim the lip around the speaker grill on the inside of the door card. It doesn't have to be perfectly flush but try and get close to the honeycomb structure of the grill. A Dremel with a cutting disc works well for this.
- Refit the door card
- Clip the door release back in.
- Hook the top of the card onto the door and make sure it's aligned well
- Start pushing the clips back in to hold it on.
- Refit the screw near the arm rest / window controls.
- Reconnect the window controls (making sure to push the connector's release lever back in to lock it in place)
- Refit the arm rest panel / window controls. Hook in the front first and then push it down to clip it back.
- Refit the 2x screws into the door release and refit the cover.
Fitting to the car rear
- There is a small recess to get a trim removal tool towards the front of the speaker grill. Get a small trim removal tool under it and elsewhere to prise it off towards you. This exposes the rear speaker.
- Remove the old OEM speaker and disconnect it. It is held in by adhesive and a bolt at the top (that you need to re-use). You may need to cut through the adhesive first with something like a flat metal pry tool/spudger. The top lifts towards you slightly allowing you to lift it out upwards.
- Connect the new speaker.
- Insert the adapter plate/speaker into the bottom first pushing downwards and towards the door to clip it in. Than refit the OEM bolt to the top that you remembered to save earlier (hopefully).
- Trim the lip around the speaker grill on the inside of the speaker grill. It doesn't have to be perfectly flush but try and get close to the honeycomb structure. A Dremel with a cutting disc works well for this.
- Refit the speaker grill by pushing it on. It may need to hook in first towards the back.
I hope this and the instructions are useful to you. It took more time and prototypes than I imagined to get this working. :)
Comment & Rating (2)