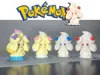
63 Forms! Pokémon Alcremie, Disassembled, Cake Decorations + Valentine's Day Gift Box, No AMS Required


Print Profile(4)

Description
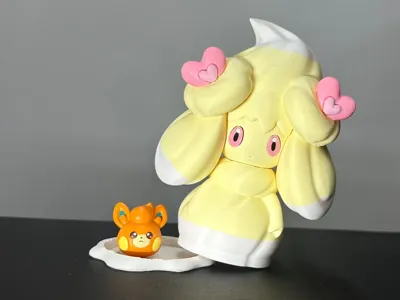
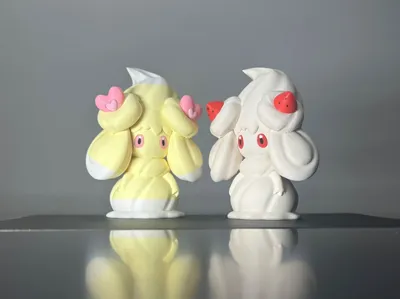
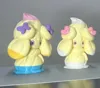
Alcremie figurine, 12.5cm tall. You can place Alcremie on a blank cake, surrounding it with fruits or candies corresponding to the swirl decorations, as a cake topper (remember to use food-safe parchment paper). If the gift is appropriately sized, you can hide it inside the Alcremie box for a delightful surprise! Of course, it's also adorable as a standalone figurine!

Boost Me (for free)
Thank you for your support, trainers! This encourages me to continue creating!
Notice!!! Print monochrome Alcremie using configuration 1 directly. For two-toned and three-toned Alcremie: If you have an AMS, you can directly use configuration 2; the profile has disabled filament purging and the wipe tower, minimizing the chances of stringing. If you do not have an AMS, you can use configuration 3; I have set pause positions, so you can print directly without changing the size. It will automatically pause at the material change layer; simply retract, change materials, and resume printing.
Attention! Attention! Attention! If the head printing fails due to support breakage, modify the support type to standard supports. If printing fails due to supports detaching from the build plate, apply glue! (Updated 2025.06.27)
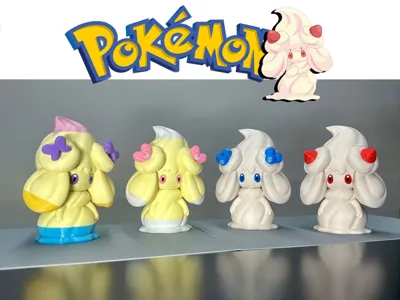
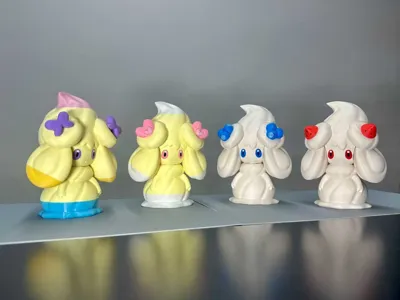
Excluding Gigantamax and shiny variations, Alcremie has 9 body color combinations and 7 swirl types, with 63 possible forms through pairwise combinations. I've made some parts interchangeable to assemble different Alcremie forms using fewer model files.

(I haven't been able to find the original author of this widely circulated Alcremie evolution guide. If anyone knows, please let me know)
I have categorized the different forms:
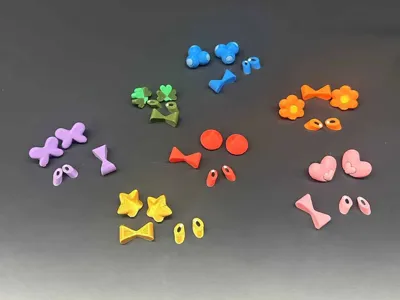
Alcremie has 7 swirl types, and the eye and bow colors change to match the swirl color. Please note that all seven swirl types are included in configuration 1; other configurations do not include swirls! If you print all the swirls, you can obtain different Alcremie forms by simply replacing the swirls, bows, and eyes. However, Alcremie's eyebrow color also changes with the swirl; if you desire a more refined appearance, consider coloring the eyebrows and using the entire face as a replacement part.

Storing these small accessories is a bit of a hassle. I will create a Milcery storage box for storing the swirls next. Who is better suited to carry the swirls than Milcery herself!
There are 9 body color combinations, categorized as follows (using the strawberry swirl as an example):
1. Monochromatic (four variations)

2. Two-toned (four variations)

In the final two-toned variation, the red diamond composite, the neck color differs, requiring separate neck coloring. Further disassembling the neck would yield superior results. As I've run out of pink filament, the corresponding model is not yet available. If you enjoy this Alcremie model, I will modify and upload the red diamond composite configuration separately later.
3. Three-toned (one variation)

Reminder again!!! Print monochrome Alcremie using configuration 1 directly. For two-toned and three-toned Alcremie: If you have an AMS, you can directly use configuration 2; the profile has disabled filament purging and the wipe tower, minimizing the chances of stringing. If you do not have an AMS, you can use configuration 3; I have set pause positions, so you can print directly without changing the size. It will automatically pause at the material change layer; simply retract, change materials, and resume printing.
Assembly Instructions:
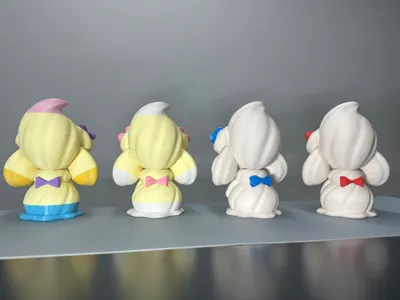
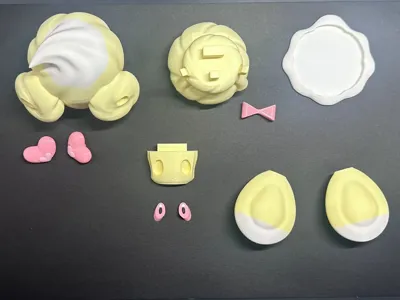
Main body assembly: To facilitate face replacement and color changes during printing, the main body is divided into six parts.
1. Insert the hair into the sides of the body.
2. Insert the face into the head.
3. Insert the head and face into the body simultaneously.
4. Install the swirl, eyes, and bow.
5. Insert the body into the base.
* The longer side of the cream is the rear.

Swirl installation: The base of the swirl has L and R markings. Install them in the corresponding positions on the head and rotate them to the desired angle. The connecting holes are relatively loose for easy replacement. If replacement is not needed, use glue to secure them. Some swirls consist of two parts; it's recommended to use glue to connect them. Some swirl parts are quite small; if assembly is difficult, leave a message, and I will add a print-in-place swirl configuration so you can paint them yourself. The black dots on the strawberry swirl were painted using acrylic paint.

Eye installation: The textures of the two eyes are different. Refer to the image below to distinguish between left and right.

Special notes:
1. Be cautious when removing the head supports; do not break the bangs!
2. The bottom of the head may print poorly; however, this is not a problem. Trim any unruly filament strands; after assembling the face, these imperfections will be hidden.

3. Tree supports were used to facilitate support removal; it is recommended to apply glue to the build plate! Otherwise, disaster may strike!
4. Alcremie's body features lines consistent with the cream curves. I initially created a detachable design for these lines; however, support removal was exceptionally challenging, and the results after assembly were unsatisfactory. Painting the lines using acrylic paint is a superior approach (the displayed image does not depict paint).
License
You shall not share, sub-license, sell, rent, host, transfer, or distribute in any way the digital or 3D printed versions of this object, nor any other derivative work of this object in its digital or physical format (including - but not limited to - remixes of this object, and hosting on other digital platforms). The objects may not be used without permission in any way whatsoever in which you charge money, or collect fees.
Comment & Rating (35)