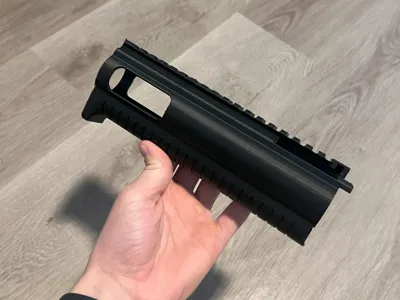
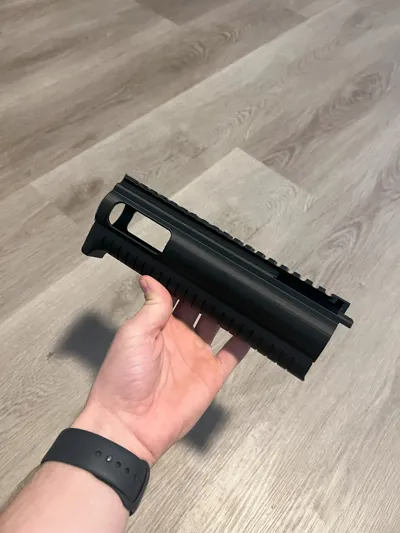
DeAR22 SG22K Handguard 9.0 in


Print Profile(1)

Description
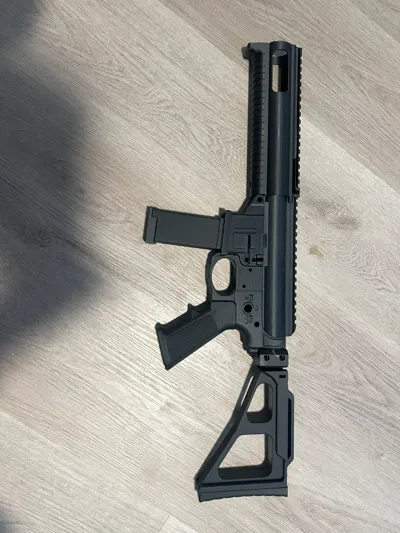
***SGAR22K Upper Receiver (Remix) v2.2***
Remixed By MeatBanana42069
AR22K Originally Released By: likestoshootstuff - https://odysee.com/@likestoshootstuff:6/AR22K-upper:4
SG22K Originally Released By: slightly sketch - https://odysee.com/@pew973867:3/sg22k-remix:6
-Includes edits/remixes of AR22K and SG22K Handguards
-Added 7.5" SG22K Handguard
-Added 9.0" SG22K Handguard
-Uses reinforced Charging Rod and Charging Handle that uses smaller 1/8" (0.125") hex key
-Forgrip positioning moved forwards on AR22K Handguard
-Increased front sight clearance on SG22K Handguard
-AR22K and SG22K Barrel Nuts opened up to fit over muzzle devices
-Minor fitment and structural changes to Receiver from original AR22K Receiver
-----------------------
ORIGINAL AR22K README
-----------------------
AR22K Upper Assembly
Parts needed besides printed parts, and a .22LR barrel and CMMG Bolt:
short hex key - 5/32 or 4mm
1 screw either a #6, #8, or M4 no longer than 1"/25mm
Print all parts oriented how the STL has them already. The handguard can be flipped 180 and printed muzzle down if you prefer.
I printed all my parts with PLA+ 100% infill, supported. Tree supports are way easier to clean.
Assembly instructions:
clear all supports thoroughly
Heat up your hex key with a lighter/candle/torch and press it into the charging handle hole.
It will stop going in when it bottoms out, DO NOT PRESS IT IN ANY FURTHER. You want at least 12mm minimum between the
handle and the inside of the hex key, or it will hit the handguard. Keep the handle in line as best you can
with the key. Quench in water to cool it down after you get it where you want it. pic 1&2
Make sure the hex key will slide into the charging rod and rotate freely,
you may have to run a drill bit into the rod to clear supports. pic 3&4
Make sure the nose of the charging rod moves freely back and forth in the handguard. pic 5
Drop the charging rod into the upper where the nubs on the side of the rod line up with the notches in the rear of the slot.
The rod should slide freely back and forth, clear support boogers, or do whatever you need to and make it happen. pic 6&7
Install your barrel and barrel nut. Clean your threads good, run the nut on and off a few times to mate the threads in good.
There are flats on the barrel nut, but don't get super torquey with it, jut a bit over hand tight is good.
Insert the charging handle/hex key into the handguard pic 8
Slide the handguard over the barrel nut while lining up the hex key with the hole in the charging rod, and sliding everything
together at the same time. pic 9&10
Once you have the handguard seated where it is supposed to be, run a drill bit (smaller than your screw) to drill a pilot hole in the barrel nut.
Don't be a retard and drill into your barrel! pic 11
Attach your foregrip with your screw. It can be angled either forward or backward. It is 3 degrees off from being vertical to the axis of the bore. pic 12
Keep an eye on the lug that the charging handle/hex key locks on to. This may wear over time. It doesn't really need hard slaps, it is plastic after all.
Pew safely.
liketoshootstuff
License
You shall not share, sub-license, sell, rent, host, transfer, or distribute in any way the digital or 3D printed versions of this object, nor any other derivative work of this object in its digital or physical format (including - but not limited to - remixes of this object, and hosting on other digital platforms). The objects may not be used without permission in any way whatsoever in which you charge money, or collect fees.
Comment & Rating (1)