Cat - hueforge


Print Profile(1)


Description
My photos are indeed those of the printed model and not of the original image
-------------------------------------------------------------------------------------------------------------------------------------------------------
Commercial license and exclusive models on Ko-fi!

Thanks!
-------------------------------------------------------------------------------------------------------------------------------------------------------
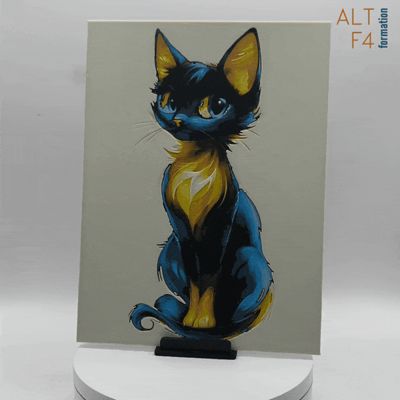
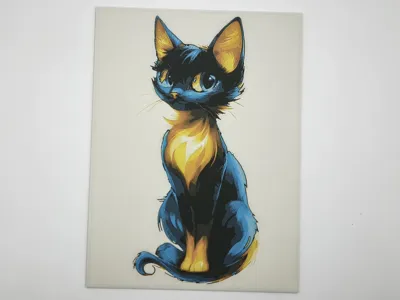
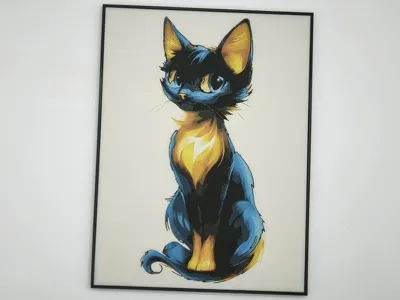
Hueforge of a cat
The photos shows the result in 149.96x200mm and a nozzle of 0.4
Boost Me (for free)
Thanks for your boost and your support!
You can change the X and Y dimensions but do not change the Z dimensions
You must define the printing parameters indicated in the description below and change the filament at the specified heights.
You can use filaments other than those indicated, but the result will differ.
You can use any black PLA
Hueforge description
Print at 100% infill with a layer height of 0.04mm with a base layer of 0.2mm
The Model is 149.96x200mm in size
You may print at higher layer heights below the Base Thickness of 0.8mm
The Max allowed Thickness is 2.48mm and the Actual Thickness is 2.36mm
#000000 PLA BambuLab Basic Black Transmission Distance: 0.6
#0086d6 PLA BambuLab Basic Cyan Transmission Distance: 3.5
#ffffff PLA BambuLab Basic Jade White Transmission Distance: 5
#ff6a13 PLA BambuLab Basic Orange Transmission Distance: 7
#fce300 PLA BambuLab Basic Yellow Transmission Distance: 6
This print uses 5 unique filaments
Swap Instructions:
You do not set Layer Swaps in the slicer. Instead each color is a separate STL file.
The file is named with the piece (Base or Nest) and filament color.
Load all STLs for one piece at once — your slicer will ask if it is a Multi-part model. Select yes.
Assign filaments by color name in the slicer's Object view.
Print everything together. No assembly required after printing.
-------------------------------------------------------------------------------------------------------------------------------------------------------
Don't forget your grandma's advice: Always have a clean plate, a dry and calibrate filament, and make an offering to the god of 3D printing from time to time.
License
You shall not share, sub-license, sell, rent, host, transfer, or distribute in any way the digital or 3D printed versions of this object, nor any other derivative work of this object in its digital or physical format (including - but not limited to - remixes of this object, and hosting on other digital platforms). The objects may not be used without permission in any way whatsoever in which you charge money, or collect fees.
Comment & Rating (0)