


Print Profile(3)


Description
There's a lot of storage systems out there. But most have the same limitation: you're stuck using predetermined sizes.
I designed this system to remedy that.
I'll go into more detail below, but in a nutshell, the way this system works is that you enter your container's inner dimensions subtracting 0.5-1mm for clearance, you specify how many bins you want in terms of rows and columns (like a spreadsheet), specify the size of the bins you want in terms of the row and column values set earlier, wall thickness and bin height. The generated bins are sized to perfectly fill your container. This system is especially useful for organizing drawers.
There's two files to customize; empty bins, and filled “blank” bins. The empty bins are your standard bins. The filled bins are for if you want to generate a bin, and add a recess to make a custom item holder.
So let's do a quick example.
Here we have a container:

First we need to measure the width (X axis, side to side). 97.5mm in this instance. You don't need to be hyper-accurate here, but the more accurate this measurmenet, the better all your bins will fit.

And now the Length (Y Axis, front to back). Also 97.5mm in this instance. Again, you don't need NASA precision. Being off by a mm or so won't be a huge problem, but aim to be as accurate as you can.

Also measure and note the internal height (bottom to top) of your container. You'll need to know this when you set the height of your bins to ensure you don't make them too tall. More on that later. In our example, the internal height of our container is 53mm.
The nest step is to open the customizer (click on the “Customize” button under the print profile section), and enter those dimensions (subtracting a bit for clearance - see below) in the “Container Internal Width” and "Container Internal Length" sections of the customizer. It's very important here that you don't mix up your width and length dimensions; just remember Width = X axis = side to side, and Length = Y axis = front to back. It's also very very important to give your self a bit of clearance here. If you enter the dimensions as measured, your bins will be too tight of a fit and it will be very difficult, if not impossible, to insert or remove them. You provide this clearance by subtracting 0.5-1mm from your container's inner dimensions, and then you enter that value in the customizer. In this example, I'm giving 0.5mm of clearance, so the dimensions I enter in the customizer will be 97mm Width, and 97mm Length. 0.5mm of clearance allows for a somewhat snug, “piston” fit. When in doubt, 1mm of clearance would be the safer option.
Now you need to decide on how many divisions you want for your container by setting the “Container Rows” and “Container Columns” values. This also determines the size increments of your bins - more on that in a bit. Rows are how many divisions in the width/X axis/side to side dimension. Columns are how many divisions in the length/Y axis/front to back dimension (again, just like a spreadsheet). In the example we're working on, I set the value of both Rows and Columns to 2, so I'll have a total of four divisions to work with; basically a 2x2 grid. This leaves us with a container that will be divided as such:

Since these values represent the size of the divisions, and thusly how small your bins can be, you can set higher numbers in the Rows and Columns to give yourself more flexibility in your bin sizes. In this example project, you could set the value of both Rows and Columns to 4, and then we'd have a grid that looks like this:

So now, instead of being able to fit a maximum of 4 medium sized bins in your container, you can populate it with up to 16 tiny bins. More on that in the next step.
So now it's time to determine the bin sizes you want to fill your container with. This is set in the “Bin Width Units” and "Bin Length Units" in the customizer. 1 unit = 1 space from the Rows and Columns values. For the sake of simplicity, we'll stick with the value of 2 for both Container Rows and Container Columns. This gives us a 2x2 grid to work with; 4 divisions. If we used values of 4 for both, we'd have a grid of 4x4 to work with, which means we can have 16 smaller bins, or size them to suit our needs (2x3, 3x3, etc.) by entering the appropriate values in the customizer. A grid with more rows and columns gives you more granular control of your bin size.
So for this example let's make a total of three bins for our container. One will span two rows and one column, and the other two will both be 1 row and 1 column each, totaling four divisions. To make this happen, for our first bin, we set the “Bin Width Units” to 1 in the customizer, and 2 in the Bin Length Units.
If you click “Generate” now, you can confirm your bin is the right size by clicking on it. The dimension for our example bin should be 48.5mm wide by 97mm long. But we still need to adjust the Bin Height and Bin Wall Thickness, which we'll do now in the customizer. Bin Height can be anything you want here. In the example, the container's internal height was measured at 53mm, so that's what I'll set the Bin Height value to in the customizer. Typically though, I'll set it to a mm or so less than the container's internal height dimension. This is for instances like making bins for a drawer; with a mm or so of clearance I know there won't be any interference with the drawer closing.
Bin wall thickness is just that; it sets the thickness of the walls. For regular bins, I like to use 1.5mm. For very small bins, 1mm is fine. If you decide you want really big bins, a thicker wall will make the bins sturdier, at the cost of printing time and filament use.
So now that we have the values set that we need for our 1x2 bin (Bin Width Units x Bin Length Units), we can generate the final print file, and then do the same for our two 1x1 bins. Just set both Bin Width Units and Bin Length Units to 1 and click generate. For downloading, there's two ways to handle it. You can download a 3mf or an stl file for each bin you generate. Personally, I like to just get the stl files, set up the project with my preferred settings in Bambu Studio, add the stl files and print a plate full of as many bins as I can fit, rather than a single bin per build plate.
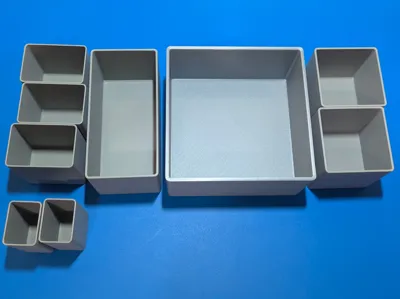
This is the end result:

I promise you, that took way more time to explain than to actually do; the process is fairly easy.
The Tl;dr version:
- Measure the internal Width and Length of your container subtract 0.5-1mm from each of those dimensions and enter it in the customizer. Measure an note the internal height of your container as well.
- Enter the number of Rows and Columns (divisions) you want your container to have in the customizer.
- Set your bin height in the customizer to anything equal to or lower than your container's internal height measurement. Or anything you want really.
- Set your bin wall thickness in the customizer.
- Set your bin width and length units for your bins.
- Generate and download your bin file for printing.
- Repeat steps 3-6 until you have all the bin files you need to fill your container with bins.
You can take this a step further if you want by following the same process for your freshly printed bins to make bins for your bins!
So let's take our 1x2 bin we printed out previously and divide it further with some smaller bins. The process is the same; measure internal width and length, subtract 0.5mm from each, determine how many rows and columns we want, determine our bin width units and length units, set the height and wall thickness, generate and print! In the example I decided I wanted three smaller bins to fill the 1x2 bin. So 3 Container Rows, 1 Container Column, 1 Bin Width Unit and 1 Bin Length Unit, Because these bins will be much smaller, we'll make the wall thickness 1mm. The height I set to 51mm, which is 0.5mm shorter than the internal highet of the 1x2 bin we previously printed.
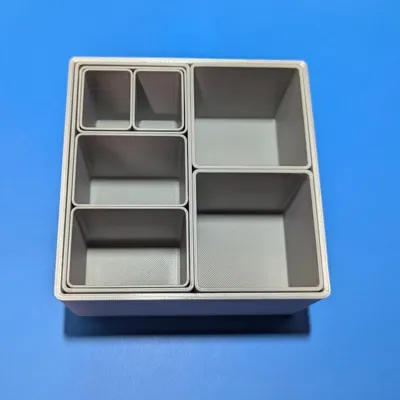
We end up with this:

And we can go even further by repeating the same process:

And there you have it! A system or bins to organize your containers!

Remember that in addition to the empty bins, you can generate filled bins that you can then add a custom recess to for a bin as a dedicated holder for an object.
I apologize if this was long winded, but again, the whole process is so much easier and quicker than this novel makes it seem.
I also apologize if anything is overly confusing; I did my best to explain as best I could, but I'm always open to feedback!
Thanks for stopping by and happy printing! 🍻
License
You shall not share, sub-license, sell, rent, host, transfer, or distribute in any way the digital or 3D printed versions of this object, nor any other derivative work of this object in its digital or physical format (including - but not limited to - remixes of this object, and hosting on other digital platforms). The objects may not be used without permission in any way whatsoever in which you charge money, or collect fees.
Comment & Rating (76)