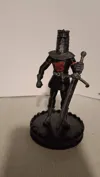
Black Knight


Print Profile(1)
Description
As the original model indicates, this one in turn comes from the one published by Argylefox.
In my case, the magnets I had at home and could buy in local stores are 6x1mm, so I adapted the model to that scale.
On the other hand, the black knight has a heraldic wild boar emblem on his chest, which is missing from the model. To make it easier to paint, I created and added it in relief on the chest.
The base also didn't do it justice, so I created a new base for the model. 3 different bases are included: one with the English text engraved “‘'Tis but a scratch” as in the original, another with the phrase from the Spanish dub “It's just a scratch”, and a plain one with nothing written on it (in case someone doesn't want text or wants to add what they think is best, such as “Black Knight”, or “You shall not pass” or “I will not move for any man” although I don't know if such a long text would fit around the base...)
Printed with Esun black PLA. 0.4mm nozzle, 205 degrees, 0.12mm layers.
Be careful when printing the torso; it is only supported by the leg cylinders, and supports are recommended for both that area and the shoulders.
As mentioned in the other model, the sword hilt is VERY difficult. I haven't found an angle that makes it easier, and the entire blade rests on supports. I've wasted a lot of filament on failed prints of that part. The grip, quillons, and arm position make it complicated. For those who don't want to take the risk, I include the left arm with the sword split in two, to print the three parts separately and then join the two sword parts inside the hilt.
6x1mm magnets (they hold the figure but don't have much strength).
It is suggested to alternate the polarity of the magnets so that the right and left arms and legs cannot be confused... I have done it exactly like that, so that legs and arms can be connected at any point. I think it is more appropriate to be able to do absurd things with the group's worldview.
Painted with acrylics. Although somewhat visible, it is advisable to paint the cut areas with some red ;) ). Ruff, gloves, boots, and grey belt dry-brushed, helmet with metallic silver, also dry-brushed. Sword hilt and guard black with a bit of metallic silver. Blade in metallic silver. Wild boar emblem and cuts in red. Slogan strip on the base in grey to highlight the letters.
NEW: AMS profile added, black, dark grey, metallic, and red. Print and done! :) Dark grey ruff for contrast between helmet and chest.
Don't trust my pictures, and try for yourself. I never sand mines after printing, and usually just use acrylic paints without priming it first, and print using probably a thicker layer than what I should because… I'm impatient LOL anyway, they look better in real life than in my pictures!
Boost Me (for free)
Do you like my objects? I would really appreciate a boost! My dream is to purchase a P1 or a P2 and any help is more than welcome ;D
Proudly tested and printed in an Artillery Sidewinder x4 plus S1

Comment & Rating (0)