Bender Animatronic


Print Profile(1)

Description
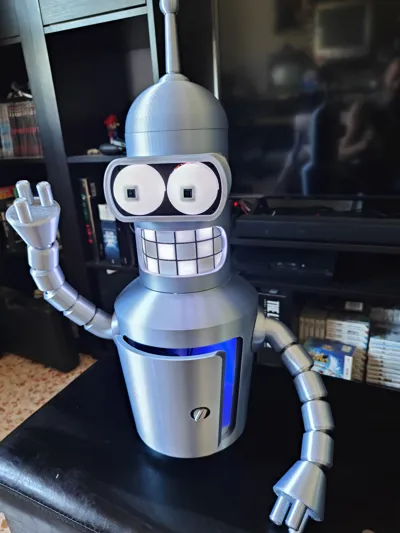
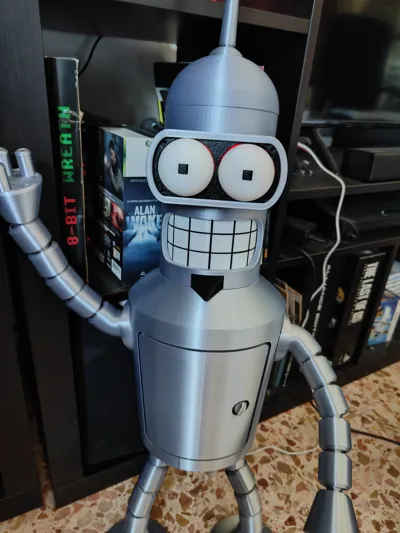
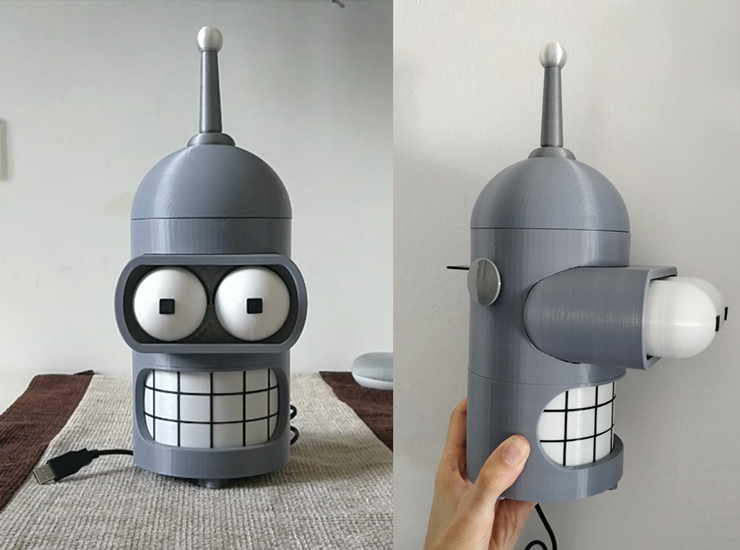
I present to you Bender Animatronic!
Premise:
The project started as a remix of several models, the first and most important is certainly Bender-ino V1 by MaKings2018 (https://www.thingiverse.com/thing:4565477) which in turn was a remix by xbost of this project https://www.thingiverse.com/thing:4384974.
As for the body, I drew from JHB's excellent model (https://www.printables.com/model/73094-articulated-bender?lang=de) scaled to 135% and with a modification to the torso part to create the interlocking joint.
Unlike the original projects, I abandoned the entire mqtt server part, making it a simple gadget for Futurama series enthusiasts.
Of course, I specify that I am not a professional and that all the work done was entirely amateur, using salvaged parts that are easily found.
Applied modifications:
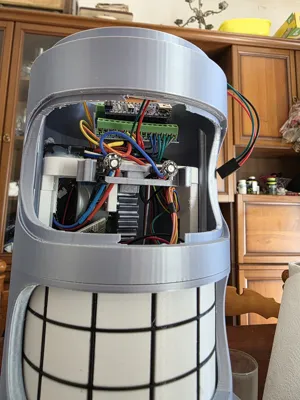
1) Use of an Arduino Nano microcontroller with complete code rewrite and addition of idle functions, new LED animations, and audio
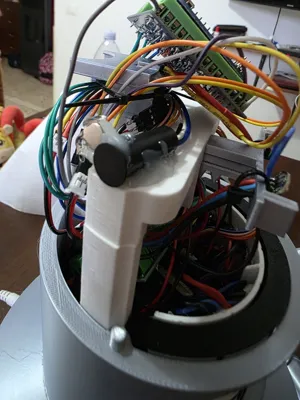
2) Modification of the switch that previously used an SD card reader, replaced with a simple tl2285ee e-switch recovered from an old model, and related modeling of the part where it is fixed as a limit switch
3) Modification of the body_shell_low part for the addition of a magnet inside the piece, to hold the goatee in place
4) Modeling of a new Flexo goatee more in line with what is seen in the cartoon
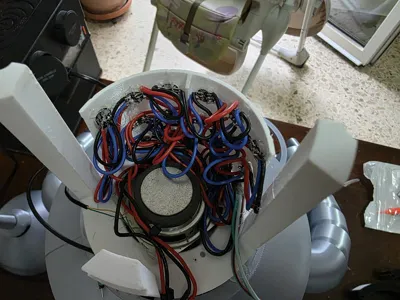
5) Modification of the internal-body_low part, with holes to better secure the LEDs and allow more light to pass through
6) Modification of the torso for head interlocking
Required parts.
Printable parts:
In the .3mf file attached to the project, I have prepared all the plates divided by color, with generic but functional settings. Feel free to modify the seam position, the orientation of some parts, or anything else you wish; I will be happy to host new profiles that can improve the aesthetics.
As for the filament, I recommend using a silver PLA Silk for all of Bender's external parts. Black for the pupils and teeth support, while for the other components there is no rule as they are all internal parts of the model.
Electrical/Electronic Components:
1 Arduino Nano Board
1 28BYJ-48 stepper motor with ULN2003 driver
1 tl2285ee e-switch to check the position of the "floppino"
1 arcade panel button (https://italian.alibaba.com/product-detail/30mm-Round-Button-Arcade-Button-Plastic-62213004601.html)
1 magnetic sensor, for example those used in anti-theft systems (I used one of these https://amzn.eu/d/5rMHNWG)
21 WS2812B 5050 LEDs (I already had some from other projects, usually sold in boxes of 100 like these https://amzn.eu/d/3ETPI62)
1 5W 8Ohm Speaker, usually found in PC speakers or some small disused/broken smart speaker
2 10x1mm magnets
1 DFPlayer Mini, module for audio playback from microSD card
Hot glue
Soldering iron
Electrical wires, preferably those with very flexible PVC sheathing. Personally, I found these very good https://amzn.eu/d/6fYfZRN also having heat shrink tubing, which is also useful
Recommended:
- perfboards of various sizes for creating homemade barebones PCBs :D
-shield for Arduino Nano, to avoid leaving "flying" connections
Assembly instructions:
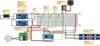
The electrical schematic is attached to the images.
The circuit is powered by an external 12V transformer, to which two step-down converters are connected on a perfboard, bringing the voltage to 5V on two distinct and independent lines, respectively intended to power the Arduino and the other the motor driver and LEDs.
Arduino PINs:
VIN and GND for 5V power
D2 -> IN1 driver
D3 -> IN3 driver
D4 -> IN2 driver
D5 -> IN4 driver
D7 -> Eye LEDs + antenna
D8 -> Teeth LEDs
D9 -> "SD" Switch
D10 -> Magnetic Switch
D11 -> "Antenna" Switch
D12 -> TX DFPlayer module
D13 -> RX DFPlayer module
Pay attention to the polarities and PINs of the DFPlayer mini!
Power the DFPlayer with Arduino's 3.3V output!
Apply a 1KOhm resistor to each switch, on the end connected to Arduino's GND pin, to force the "LOW" state and not falsify readings while the switch is not pressed.
Apply a 330ohm resistor between Arduino and the data pin of each LED strip.
Code:
The code is constantly being updated; occasionally, I add functions or remove bugs, so I invite anyone who wants to venture into building it to request it from me here on MakerWorld to obtain it.
For any other clarification, feel free to contact me with direct messages!
Have fun :D
Documentation (1)

Comment & Rating (5)