Search models, users, collections, and posts

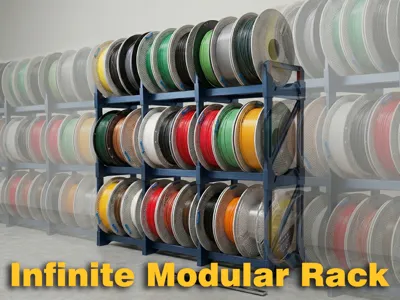
Infinite Modular Spool Rack

Print Profile(6)

All
P1S
P1P
X1E
A1
P2S
H2S
X1
H2C
H2D
X1 Carbon
H2D Pro
X2D
A2L
A1 mini

Start Module (including second floor)
Designer
9.4 h
1 plate
4.9(15)

for A1-mini
for A1-mini
Designer
7.4 h
3 plates
5.0(11)

each part on each plate
Designer
9.8 h
5 plates
5.0(8)

StartModule(for more than 3 stories)
Designer
10.2 h
1 plate
5.0(6)
Click to see more

Open in Bambu Studio
Boost
198
561
81
37
478
192
Released 

Description

Congratulations on finally discovering FunOrNothing :)


I looked at various types of modular racks, but I had trouble finding a design that suited my needs. So, I designed this one myself.
Most designs had the following problems, which I needed to address.


1️⃣ Inefficient printing workflow
To print just a single module, I had to do three separate prints — one for the base and one for each side wall.
Personally, I wanted to print multiple modules at once, ideally leaving the printer running overnight.
The original design wasn’t optimized for batch printing.


2️⃣ No wall contact = less stability
Most of the designs were fully symmetrical, the spools stuck out slightly from the back.
This meant the shelf couldn’t sit flush against a wall, which felt unsafe — especially if I wanted to stack the shelves higher.
I prefer to have racks that can lean slightly against the wall, both for space efficiency and stability.


3️⃣ Inefficient horizontal expansion
Each module had its own left and right walls.
So when expanding horizontally, walls were duplicated between modules — wasting both time and filament.
In my design, adjacent modules share side walls, eliminating this duplication.
This not only reduces material use and printing time but also makes the whole structure stronger, since the modules lock directly together without relying on extra coupler parts.


With these three problems in mind, I created a new modular rack design that’s:

  • Easier to print (multiple modules in a single print batch)

    One full module including upper base at one plate 
  • Safer and more stable (flush against the wall)

  • Stronger and more efficient when expanded (shared walls and direct locking)
  • Printable using A1-mini


Some pictures to help assemble. (Only Foot has Front & Back… But it's important)

There are two types of walls, and if you are building higher than 3 floors, using the strong wall type is recommended.


The tolerances are very tight to ensure a sturdy assembly. I assembled it without any tools, but depending on the print quality, assembly may require considerable force. In this case, use a rubber mallet or similar tool.


Hope you Enjoy this model.

As always, I welcome your feedback.


Click to Check out FunOrNothing's interesting designs.

Boost Me (for free)

Your boost helps me spend more time creating better designs. And don’t forget to check my other models — you might discover something useful! 😊

Membership

The best way to support my work is to join the FON membership. You can be my Supporter, Seller, or Partner. If you join the membership, you can communicate more closely with me through Discord.

Join


You can be a friend who encourages me by buying me a cup of coffee.

Comment & Rating (81)

(0/1000)

Pinned by Designer
This was the best storage rack I found! The tolerances on the filament bars are very tight but everything else went together great. My only problem is that I need to print more! I didn’t realize how much filament I had. The picture only shows half of my total filaments. Thank you for the great model. I printed on an Anycubic Kobra S1 and I would upload that profile here but they don’t allow other brands. If you want to upload to maker online I’ll send you my profile.
The designer has replied
designer
2
Reply
Nice print. Thanks for the words. :)
0
Reply
Boosted
I wasted considerable time and money searching for a suitable filament rack. Upon discovering your model, I immediately printed it, and the result is a remarkably sturdy rack. I increased the width by 1cm, printed it with PETG filament, and enhanced its strength by using four walls and 45% gyroid infill. Thank you for sharing this excellent model
The designer has replied
Show original
designer
5
Reply
You've made it far larger than mine Incredible 👍👍
Show original
0
Reply
Boosted
I tried a few different models and this one best suited my needs Excellent strength when printed with PLA thank you for sharing
The designer has replied
Show original
designer
1
Reply
Great modification. :)
0
Reply
A sturdy wall has formed
Show original
designer
2
Reply
Print Profile
5 copies of each component (for making large set)
Very helpful and easy to print. I printed the first set PETG and the rest PLA.
The profile uploader has replied
0
Reply
Thanks for the picture.
0
Reply
I created a file that allows you to print all the pieces you need on one plate for only ONE side of the rack. I see I can’t remix your design but can you please add it so others can print it out instead of having to print piece by piece?
The designer has replied
0
Reply
I don't understand clearly. Could you show me a capture image of the profile
Show original
0
Reply
Replying to @FunOrNothing :
A plate with ONLY the pieces that I placed a white dot on. Those are the only pieces you need to extend the rack laterally only on ONE side. The only option you have is to print each piece individually so I edited it where I can print the pieces that have a white dot on it all on one plate and those are the only pieces I need to extend laterally.
0
Reply
Replying to @Joelpluto :
Ah, I understand. But since there can be various additional situations, if you think about it that way, there might be cases where only the top part is needed, or you might want to extend only the top sides. I could create all the profiles myself, but I thought that users often want to configure the plates according to their needs. I also thought that providing profiles for too many different cases could actually cause confusion.
Show original
0
Reply
Print Profile
Start Module (including second floor)
10/10 exactly what I wanted (I still have to print the side panels for the top shelf)
profile
1
Reply
Print Profile
Start Module (including second floor)
I ran a prototype using PLA filament and it turned out brilliantly. Next, I’ll start a batch in PETG for the lower sections, and I might do two more in PLA for the top levels. Thank you!
profile
1
Reply
Very nice, I will keep expanding.
designer
1
Reply
Print Profile
each part on each plate
It can be infinitely expanded and is strong. Printed with Asa.
Show original
0
Reply
Really cool model! The best I've found. I've only printed one unit but I'll definitely print more. Thanks 👍
0
Reply

License

If you want to use this model commercially, please join my membership.
Join Now
This user content is licensed under a Standard Digital File License.

You shall not share, sub-license, sell, rent, host, transfer, or distribute in any way the digital or 3D printed versions of this object, nor any other derivative work of this object in its digital or physical format (including - but not limited to - remixes of this object, and hosting on other digital platforms). The objects may not be used without permission in any way whatsoever in which you charge money, or collect fees.