


Print Profile(4)


Bill of Materials


- 5mm Hole 2/4/6/12 Channels 2A Hollow Shaft 22mm Slip Ring x 1: $6.15 from AliExpress as noted in model description
Description
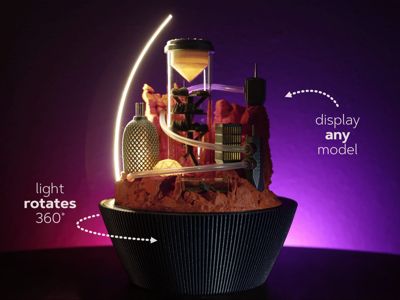
We make so many interesting objects in this hobby and this base is a way to show them off! The brightness of the light is adjustable along with speed of rotation - you can even make it stand still.
This base works well to display 3D prints or any objects d'art. This file includes a Martian city model that is sized perfectly to fit within the space for this base and includes lots of shapes and translucent elements to take advantage of the rotating light. For the city, I tried to imagine how certain areas might be open to the sunlight (parks, farms) while other areas are enclosed and connected by travel through tubes. See it in motion:
Components
All of the components for this project are available from Maker's Supply except for the slip ring - here's the specific one on AliExpress that I used.
- This build does require soldering 4 wires but it's definitely doable, even if you're not a master solderer!
- The Bill of Materials only includes components for the display base (as of 4/16/25). If you'd like to assemble the Martian city as well, you will need these additional components:
- 2x14mm Stainless Steel Dowel Pin (20PCS) - DA003
- 6x10x15mm Oil Impregnated Bronze Bushings (6PCS) - ED009
- 4PCS 18x14x40mm Clear Acrylic Rigid Round Tube - HC002
- Mini Waterproof RGB LED Tea Lights with Remote Control (6PCS) - KC020
- 2PCS 40x36x126mm Clear Acrylic Rigid Round Tube - HC003
- 3x5mm Transparent Silicone Tube - 1m (1PCS) - RC021
Assembly Instructions (Lamp)

Printed Parts
- Electronics Base
- Mid Base
- Top
- Collar
- LED Holder
- Gear
- Motor Holder
- Wire Clips
- Potentiometer Dials
- Power Switch
The images in the these instructions were taken after several parts were already assembled. Please disregard any components seen already installed in some of the initial steps - those components will be covered in later steps.
 | Press the bearing onto the core top. This won't go all the way to the bottom but should be a snug, level fit. |
 | Clip one of the SH1.0 wires in half and solder the connectors to the wires on either end of the slip ring.
|
 | Pass the wires from the bottom of the slip ring through the hole shown in the electronics base.
|
 | Attach SH1.0 wires to both potentiometers and the power switch.
|
 | Attach all cables to the power distribution board as in the diagram:
|
 | Attach the internal components. Note that you should try to use the loops in the base to ensure that wires will be contained. Because the gears will be exposed, this is important so that the wires do not get caught.
|
 | Pass through the potentiometer wires and attach the core top to the base with 4 screws. |
 | Starting at the top, press the COB led into the LED holder.
|
 | Attach the LED holder and the collar to the mid base.
Both pieces should be attached firmly with minimal to no gaps. |
 | Press the mid base down onto the bearing.
|
 | Attach the wire to the LED
The goal with this process is to ensure that no wire is loose to cause friction with (and possibly snag on) the top which will be added in the next step. |
 | Plug in the power and test the base to ensure that it's rotating freely without any friction or loose wires. |
 | Slide the 5mm dowel into the top piece. This should be a very snug fit and may require pressing the part against a hard surface like a table. |
 | Press the top down onto the base.
|
Assembly Instructions (City)
 |
|
Printing & Post-Processing Tips
- I have only tested these models in PLA using the filaments listed.
- For the trees in the 'farm' section of the City, I just used acrylic paint on top of PLA Wood filament although you could easily just use green filament.
- The textures in the model should print well with a 0.4mm nozzle - I haven't tested with other sizes. Quixel scans were utilized for initial rock textures.
- A smooth plate is recommended for the parts facing up on the base - this can help hide the border between the rotating light base and the stationary center.
Updates
- 3/22/25: Optimized part layout so that 1 fewer plate is required for both base print profiles and to default to the Smooth PEI plate.
- 4/16/25: Updated the Bill of Materials to remove the components needed for the Martian city & this caused confusion for some users. If you'd like to build this part of the project, you will need to order those components individually.
Boost Me (for free)
If you enjoy my models and would like to support me, please consider sharing a boost!
Membership
Want to sell prints of my models? This Commercial Membership grants you a license to all of my MakerWorld models!
I love creating models to share for free, personal use. If you enjoyed this model, please consider buying me a coffee or joining me on Patreon.
License
You shall not share, sub-license, sell, rent, host, transfer, or distribute in any way the digital or 3D printed versions of this object, nor any other derivative work of this object in its digital or physical format (including - but not limited to - remixes of this object, and hosting on other digital platforms). The objects may not be used without permission in any way whatsoever in which you charge money, or collect fees.
Comment & Rating (105)