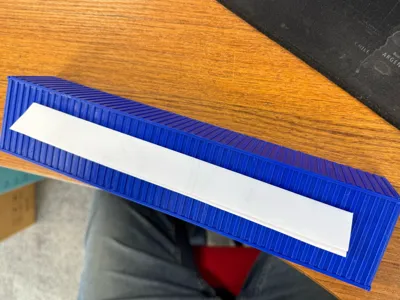
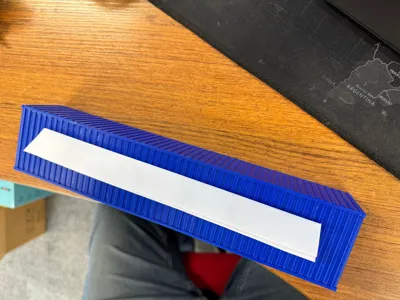
Customizable Shipping Container


Print Profile(1)

Description
I needed to print some custom container models but wanted flat panel versions to prevent issues with massive supports or infill. Also multicolor branding is much easier to print lying down.
This is a reupload of a model I found after a long search languishing in the bowels of the blue site. On there the customizer did not work so the model had to be manually loaded into OpenSCAD to be able to change anything. The default profile is a simple container in flat panel form, the main point is the Customizer which is now working. Below all original instructions and links to the remixer phrxmd and original creator gundyboyz.
-----------------------------------
Summary
This is a customizable parametric international shipping container. I needed this for some architectural modeling and made it as customizable as possible.
The model supports containers of different dimensions, different container and wall styles, different forms of assembly, as well as some supplemental architectural features, such as windows and interior walls.
It builds on an earlier model by gudnyboyz, from which it inherits the architectural features such as windows, internal walls and text. I completely rewrote the geometry, wall styles, infill and parts placement, added some finer geometry such as frame bars and ISO1161 corner castings, and made it customizable.
The reference version of the script is maintained on Github at https://github.com/phrxmd/container.
Usage
Use the customizer to generate the kind of container you want, which gives you a fair amount of customization. Or download the script into OpenSCAD for additional customization, such as architectural features like windows, internal walls, inscribed text, or cutaway side panels.
Some of the easily accessibly customization features include:
- Dimensions: length, width and height)
- Scale - standard is 1:100, set to 1:87 for H0 scale, 1:160 for N scale
- Thickness of walls in the model, so that it is scale-independent
- Wall style: flat, corrugated, doors, or no walls at all
- Fill style: hollow or solid box, tanktainer or internal architectural walls
- Assembly style: a box, a box with a separate lid, or parts that can be glued together
Basic customization
The script generates a standard shipping container with a frame and ISO
1161 corner castings. Most aspects of the container's appearance, such
as the container size and the wall styles, can be customized by changing
single variables in the script.
Measurements
The measurements of the container are specified by
CONTAINER_LENGTH = 6.06;CONTAINER_WIDTH = 2.44;CONTAINER_HEIGHT = 2.59;SCALE = 100;WALL_THICKNESS = 1.5;INTERNAL_WALL_THICKNESS = 1.5;ASSEMBLY_TOLERANCE = 0.1;
Here, the first four measurements refer to the container dimensions and
the scale:
- CONTAINER_LENGTH: Length of the container (in m). Standard lengths are
6.06 for a 20', 12.19 for a 40' container. - CONTAINER_WIDTH: Width of the container (in m). The standard width is
2.44. - CONTAINER_HEIGHT: Height of the container (in m). Standard heights are
2.59, or 2.90 for a High Cube container. - SCALE: The scale of the model. Standard is 100, tcommon scales
would be 87 for H0 scale, 160 for N scale and so on.
The other settings refer to the generated model:
- WALL_THICKNESS: The thickness of the container's external walls
(in mm). - INTERNAL_WALL_THICKNESS: The thickness of the container's internal
walls (in mm). For placing internal walls, see "Architectural
features" below. - ASSEMBLY_TOLERANCE: The tolerance between wall parts when generated as
separate parts. By default this is 0.1 mm.
Styles
The look of the container is determined by a set of style directives:
FRONT_WALL_STYLE="door";BACK_WALL_STYLE="ridges";RIGHT_WALL_STYLE="ridges";LEFT_WALL_STYLE="ridges";TOP_COVER_STYLE="ridges";BOTTOM_COVER_STYLE="flat";CONTAINER_INFILL_STYLE="walls";
Wall styles
All walls support the following styles:
- "none": generates an empty wall that consists only of the
container frame. - "flat": generates a flat wall without ridges.
"ridges": generates a corrugated wall with ridges.
The front and back walls (FRONT_WALL_STYLE, BACK_WALL_STYLE) additionally
support the following style:- "door": generates a simple door that is inset somewhat and has
a few ridges, hinges, a center divider and a horizontal latch.
The bottom cover (BOTTOM_COVER_STYLE) additionally supports the
following style:- "crossbars": generates a container bottom with a few wide
crossbars.
- "door": generates a simple door that is inset somewhat and has
Fill styles
The Fill style (CONTAINER_INFILL_STYLE) determines the container's interior.
Currently there are the following fill styles:
- "none": generates a hollow, empty container.
- "infill": generates a solid container that is easy to print as a
single object without overhangs. - "walls": generates a hollow container with walls placed on the
inside (see "Architectural features" below). - "tank": generates a tanktainer with a single tank on the inside.
Most useful with the walls set to "none".
Assembly
The container can be generated as a solid object or disassembled into
several pieces. This is governed by the assembly style directive:
ASSEMBLY_STYLE = "parts";DISTANCE_BETWEEN_PARTS = 3;
Currently the following assembly styles are supported:
- "box": generates the container as a single box
- "lid": generates the container as a box, and places the top cover
separately - "parts": generates all walls separately, face up, except the
bottom, which will be generated in place. This makes it easy to
print interior walls, but it also means that a container bottom with
ridges can be hard to print. - "faceup": generates all walls separately, face up. This assembly
style means that interior walls cannot be placed, as they would
extend below the Z plane. They will be ignored. - "facedown": generates all walls separately, face down.
- "custom": custom placement for every part, see below.
All wall parts are generated with 45° edges in order to make it easier
to assemble the container.
The part distance DISTANCE_BETWEEN_PARTS (in mm) specifies the distance between the
disassembled parts.
Custom assembly
If the standard assembly styles are not flexible enough (e.g. if you
have a window in a single wall that needs to be placed upside down for
printing without supports), you can customize the placement for all
walls individually:
CUSTOM_FRONT_WALL_PLACEMENT = "faceup";CUSTOM_BACK_WALL_PLACEMENT = "faceup";CUSTOM_LEFT_WALL_PLACEMENT = "facedown";CUSTOM_RIGHT_WALL_PLACEMENT = "faceup";CUSTOM_TOP_COVER_PLACEMENT = "inplace";CUSTOM_BOTTOM_COVER_PLACEMENT = "inplace"; // inplace = facedown
There are three placement options for each wall:
- "inplace": generates the wall in place
- "faceup": generates the wall face down. This means it can be
printed on the flat back side, with 45° overhangs (and some extra
overhangs for the frame parts) - "facedown": generates the wall in place. This means that it needs
to be printed on the ridged front side. This may be useful in some
cases to avoid overhangs.
Note that there is no sanity check. It's easy to generate a container
with all side walls placed separately, but with the top generated
"inplace" and hanging in the air.
Advanced customization
Architectural features
Advanced architectural features, such as openings, windows, interior
walls or text, can be placed individually.
In order to define such architectural features, find the FEATURES = [
list and add your desired features in there.
Whether architectural features are placed or not can be controlled
separately. Placement of windows (including openings) and interior and
exterior text can be controlled using the dedicated variables:
PLACE_WINDOWS = false;PLACE_TEXT_INT = false;PLACE_TEXT_EXT = true;
The placement of interior walls is enabled by setting the fill style of
the container to "walls".
Openings
An opening is a hole in the container from floor to ceiling, essentially
a missing section of wall.
Example:
opening(wall=RIGHT, x=0.5, width=4)
Here:
- wall: the wall you want the opening on: RIGHT, LEFT, FRONT,
BACK - x: the position (in m) where the opening starts
- width: the width (in m) of the opening
Windows
A window is a smaller opening in a container wall with a frame. Note
that window frames stick out at 90° angles, so they need some care when
3D-printing. Containers with windows are easier to print as separate
walls (using the "parts" assembly directive).
Example:
window(wall=LEFT, x=0.75, y=0.8, width=1.8, height=1.7)
Here:
- wall: the side you want the window on: RIGHT, LEFT, FRONT,
BACK - x: the position (in m) to start the window
- y: the height off the ground (in m) of the window
- width: the width (in m) of the window
- height: the height (in m) of the window
Note that there is no sanity check of the window's dimensions, so you
need to take care that your windows are not higher or wider than the
container wall.
Walls
Walls are placed internally in the container. Walls can be either be
placed lengthwise (in X direction) or across (in Y direction).
Example:
wall(dir="x", x=1, y=1.2, length=1.5)
Here:
- dir: the direction of the wall: "x", "y"
- x: the position (in m) to start the wall
- y: the position (in m) to start the wall
- length: the length (in m) of the wall
Interior text
Interior text is embedded in the floor of the container in the inside.
So far it can be placed only in X direction.
Example:
text_int(text="Robe", x=0.25, y=2.1, size=6)
- text: the text to show (keep it short!)
- x: the position (in m) to start the text
- y: the position (in m) to start the text
- size: the text font size. For the font, Arial is used by default.
Exterior text
Exterior text is embedded in the floor of the container on the outside.
This makes most sense with the "flat" bottom style, as other bottom
styles will interfere with the text. So far it can be placed only in X
direction.
Example:
text_ext(text=str("1:",SCALE), x=0.25, y=2.1, size=6)
- text: the text to show (keep it short!). In the example, this
prints the scale of the model into the bottom, using the OpenSCAD
str() function - x: the position (in m) to start the text
- y: the position (in m) to start the text +=size=: the text font
size. For the font, Arial is used by default.
Other customizable dimensions
Most dimensions of the container are specified through variables and can
be customized. Note that it is easy to break the model in this way.
Some of the more useful customization options specify the dimensions of
the container frame, and the orientation of the side panels and walls to
the container frame:
- FRAME_THICKNESS = 0.10: Dimension of the container frame (in m).
The default assumes 10 cm or 4x4" bars. - FRAME_INSET_X = 0.02: Offset of the vertical frame bars in X
direction (in m), default: 2 cm. - FRAME_INSET_Y = 0.02: Offset of the vertical frame bars in X
direction (in m), default 2 cm. - TOP_INSET = 0.02: Offset of the top panel below the top frame (in
m), default 2 cm. - SIDE_INSET = 0.03: Offset of the side panels towards the inside of
the container (in m), default 3 cm.
The defaults look good in a model. However, they can make the container
hard to print when the side panels or frame parts are printed on the
side. In those cases, it may be preferable to set them to 0.
Print Settings
Notes:
3D printing works best with ASSEMBLY_STYLE set to "box" or "lid. In that way, most of the container will be a single box, with only the top cover fitting in place. Top covers in turn are generated so that the corner overhang does not exceed 45°, which prints reasonably well on most printers.
It's possible to break down the container into separately-printed walls, by setting ASSEMBLY_STYLE to "parts" and other values. This may lead to some extra overhangs for the frame bars. On the other hand this is the only way to print containers with one or more walls set to "none" (frame-only). In those cases, check the placement of the walls (face up or face down), and consider setting FRAME_INSET_Y to zero; this will generate a frame that can be printed flat without bridges. See the examples.
Post-Printing
Assembly
The may parts need some assembly, depending on how you decided to generate the parts (as a single box, with a separate lid, or separate parts altogether).
All internal corners are cut at 45° angles to make assembly a bit easier. When printed as a box with a separate lid, the lid should fall into place.

Comment & Rating (0)