Heat insert press


Print Profile(2)

Description
Heat insert press
Vertical stand for soldering iron to press heat insert.
Update
In model files added base divided into two parts for printing on A1 mini.
- 21-base-bottom
- 22-base-top
You'll need:
- Linear rail MGN9H, lenght 150 mm (can be found on AliExpress),
- 24 psc heat insert M3*5mm,
- 8 psc M3*8mm,
- 14 pcs M3*10mm,
- 4 psc M3*16mm,
- 2 psc M3*20 mm,
- 18 pcs washers.
Main body
Press on 8 pcs heat insert for linear rail installation later:

Press on 4 pcs heat insert on the bottom for “01-base” installing later:

Press on 2 pcs heat insert on the back for the “03-wheel holder” and 1 pc heat insert for spring or rubber band:

Install linear rail with 8 pcs M3*8mm screw:

Moving assembly
Press on 2 pcs heat insert to "06-linear tooth":

Press on 2 pcs heat insert form one side and 1 pc heat insert to opposite side “07-spring tenser”:


Screw in M3*10 mm screw in “07-spring tenser” and place it with "06-linear tooth" in "08-holder1", don't forget to align heat inserts with holes for screw in "08-holder1":

Place this moving assembly on the linear rail and screw it with 4 pcs M3*10 mm screw, also use 4 pcs washers here:

Place soldering iron on “08-holder1”, on top install “09-holder2” and screw it with 4 psc M3*16mm, also use 4 pcs washers here:

Gear wheel assembly
Press on 4 pcs heat insert in “10-handle”:

Insert “04-screw” in the gear “05-wheel” and screw “10-handle” on “05-wheel” with 4 pcs M3*10mm screw, also use 4 pcs washers here:

Slide “03-wheel holder” on “04-screw”, line up holes for screws, place cable of soldering iron under “11-cable” and secure this assembly with 2 psc M3*20 mm screw, also use 2 pcs washers here:

Screw this gear wheel assembly on the “02-main body”:

Screw M3*10 mm screw on the top of main body and install spring or rubber band between it and screw of “07-spring tenser”:

Install “01-base” on the bottom, using 4 pcs M3*10 mm screw, also use 4 pcs washers here:

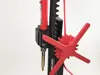
That's it! Congratulation to finish this Heat insert press.
Boost Me (for free)
Thank you for your support! ❤
License
You shall not share, sub-license, sell, rent, host, transfer, or distribute in any way the digital or 3D printed versions of this object, nor any other derivative work of this object in its digital or physical format (including - but not limited to - remixes of this object, and hosting on other digital platforms). The objects may not be used without permission in any way whatsoever in which you charge money, or collect fees.
Comment & Rating (39)