Search models, users, collections, and posts
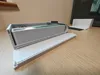
Slide Box with Customisable Inserts
IP Report


GIF


Print Profile(2)

Small Slide Box 0.2mm layer, 3 walls, 15% infill
Designer
1.3 h
1 plate
Large Slide Box 0.2mm layer, 3 walls, 15% infill
Designer
3.3 h
1 plate
Open in Bambu Studio
Boost
1157
2895
232
154
1.9 k
1.1 k
Released
Description
* This has not been tested on multiple printers by multiple people yet *
This box has a sliding lid mechanism and a customisable insert to house anything. Please download the insert .STEP file to remix your own custom holsters. I can add more sizes in an update if required.
Please see other models for the custom inserts.
Part of the reason there are multiple parts is so they can be printed without supports, but this also enables the ability to have an insert. Please see the photo below for the correct orientation.

Note: glue may be required if you want the box to be firmly sealed.
Please make sure you test fit the box before glueing, and be extremely
careful not to glue the sliding lid in place by accident.
To assemble:
- Place the slide (sliding lid) into the box and slide it down and around the curve, making sure it is set and square.
- If you have an insert, slide it into the box.
- Line up the lid pins with the box and press shut.
- Check if everything fits and moves where it should. If it does not, try shaving off some plastic with a sharp knife.
- Once everything fits you can optionally glue the lid (static lid) in place being careful not to glue the slide (sliding lid).
License
This user content is licensed under a
Creative Commons Attribution-Noncommercial-Share Alike
Comment & Rating (232)