RootRunner


Print Profile(1)
Description
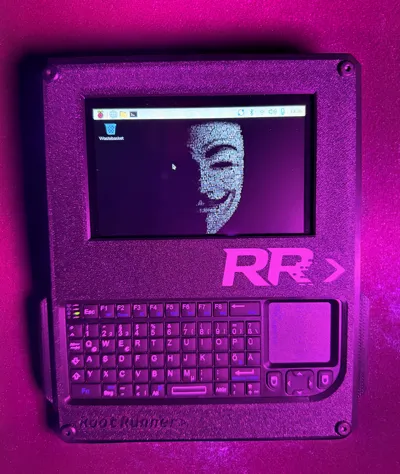
RootRunner
A Portable Raspberry Pi Console You Can Actually Build
No rare parts.
No long waiting times.
No supply chain drama.
Why RootRunner?
I wanted something like a uConsole — but without waiting months for hardware and without paying Hackberry Pi CM5 prices for similar performance.
So I built my own version.
The goal was simple:
- Use modern, widely available hardware
- Keep it reproducible
- Avoid exotic or disappearing parts
- Make it serviceable
RootRunner is designed to be built now — and still rebuildable later.
Build Overview
The system is mostly plug & play, but not completely solder-free.
Minimal Soldering Required
- Status LED → 220 ohm resistor → wires
- Sliding power switch soldered into the power line between the power bank and the Raspberry Pi
No custom PCBs.
No micro-soldering.
Basic tools are enough.
Everything else is modular and easy to replace.
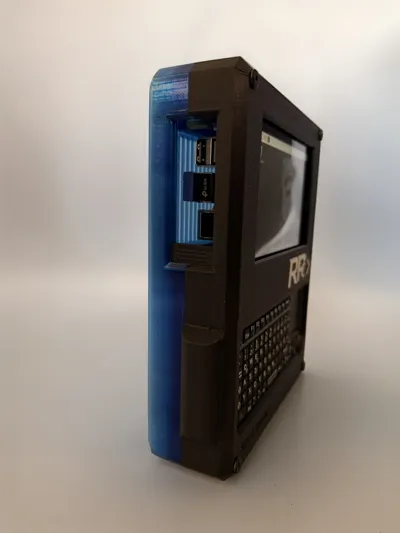
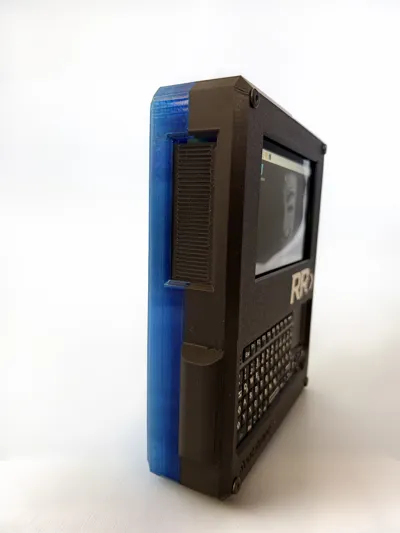
Hardware Features
- Sliding cover for USB & LAN access
- Physical power switch (fully disconnects power)
- USB-rechargeable battery
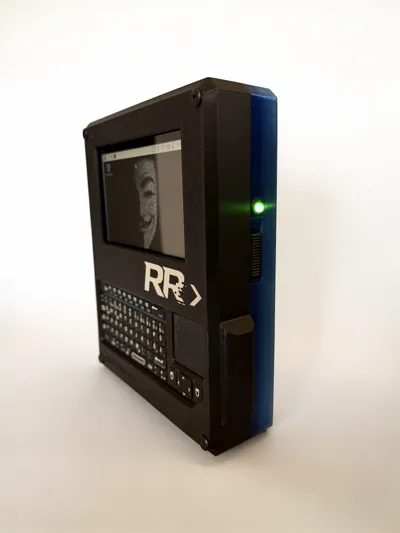
- Integrated keyboard
- Status LED
Designed for usability and maintenance — not permanently sealed shut.
Status LED Setup
LED Wiring
The status LED is connected as follows:
- GPIO17 (Physical Pin 11) → LED (via 220Ω resistor)
- GND (Physical Pin 6) → LED ground
Standard jumper wires can be used for the connection.
GPIO17 is used because it is stable, well-supported, and easy to configure.
Automatic LED Configuration Script
The project includes a setup script:
setup-status-led.sh
What the Script Does
- Installs python3-libgpiod
- Creates a Python-based LED controller
- Installs and enables a systemd service
- Configures LED behavior automatically
Kali Linux Docker Container
RootRunner also includes a helper script to install Kali Linux as a persistent Docker container on Raspberry Pi OS.
Script:
install-kali-container.sh
Why No Integrated Speakers?
This was a deliberate decision.
Bluetooth headphones work perfectly and skipping internal speakers makes the system:
- Smaller
- More power efficient
- Less complex
- Easier to maintain
As simple as possible.
As complex as necessary.
Final Thoughts
RootRunner is not a polished commercial product.
It’s a practical, reproducible, serviceable portable Raspberry Pi system.
You can build it now.
You can repair it later.
No rare parts.
No waiting months.
Just build it.
LED and Kali Installation
You can find the project and the shell scripts for installing the LED and a Docker setup for Kali Linux here:
https://github.com/SimonMoon23/RootRunner.git
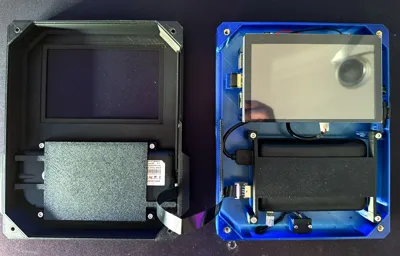
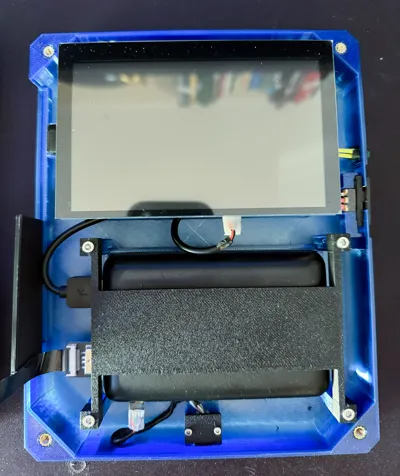
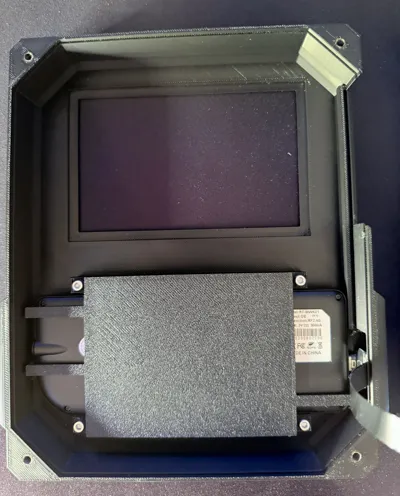
Internals
- 1 x Raspberry Pi 5 8 GB (https://amzn.eu/d/05tsPbH6)
- 1 x Waveshare 5inch Capacitive 5-Points Touch Display Compatible with Raspberry Pi, Support 800×480 Resolution with DSI Interface (https://amzn.eu/d/0afopIO2)
- 1 x Active Cooler für RasPi 5 (https://amzn.eu/d/0370nTzW)
- 1 x VEGER Power Bank 20000 mAh klein 22.5W (https://amzn.eu/d/0a4X7kvk)
- 1 x Rii X1 Mini Tastatur Wireless (https://amzn.eu/d/0dcVHa42)
- 1 x cablecc USB 2.0 Typ-A-Stecker auf USB-C-Stecker, flaches FPC-Kabel für FPV, Disk und Telefon, 20 cm (https://amzn.eu/d/01gtgpnU)
- 1 x Mini Kippschalter SPDT Schiebeschalter 0.5A 50V DC 3pin (https://amzn.eu/d/09lWF0BL)
- 1 x LogiLink CU0120 USB 2.0 Micro-B Verlängerungskabel (https://amzn.eu/d/0gceBeKZ)
- 4 x M4 x 40 mm Flachkopfschrauben (https://amzn.eu/d/06GmRs1I)
- 4 x M4 Einschmelzgewinde (https://amzn.eu/d/0dkmDIDr)
- 8 x M3 Zylinderschrauben (https://amzn.eu/d/0dnlprDQ)
- 8 x M3 Einschmelzgewinde (https://amzn.eu/d/0dkmDIDr)
- 2 x M2 Zylinderschrauben (https://amzn.eu/d/0dnlprDQ)
- 1 x LED Green (https://amzn.eu/d/0iN0p7xN)
- 1 x Widerstand 220 Ohm (https://amzn.eu/d/0iWp2ecQ)
- 4 x M2,5 x 15 Schrauben f. Raspi (https://amzn.eu/d/004vz6EW)
4 x M2,5 x 25 Abstandhalter f. Raspi (https://amzn.eu/d/04UZJjBG)
Assembly Instructions
1. Mount the Raspberry Pi 5 to the display
First, screw the Raspberry Pi 5 onto the 5-inch display.
2. Connect the DSI cable
Next, insert the DSI cable into the Raspberry Pi 5 first, and then into the designated port on the display.
Make sure the cable is fully and correctly seated, then lock the connectors in place.
3. Install the 25 mm standoffs
Now screw the 25 mm standoffs onto the display.
Make sure they are properly tightened, as they will support the assembly later inside the housing.
4. Assemble and install the power slide switch
Assemble the power on/off slide switch and install it in the designated position in the lower half of the housing.
5. Route and connect the LED wires
Feed the wires of the LED—with a 220-ohm resistor soldered to the long leg—through the hole in the side wall.
Then connect the jumper wires as follows:
• Red to GPIO 17 (physical pin 11)
• Black to GND (physical pin 6)
6. Mount the display and board into the lower housing
Now screw the display and board assembly into the lower housing part.
Use M2.5 x 25 screws for this step.
7. Install the Micro-USB charging port
Install the Micro-USB charging port in the designated location.
8. Insert and secure the power bank
Next, insert the power bank, connect the wiring, and secure it using the provided mounting bracket.
9. Install the keyboard into the upper housing
Take the upper housing part and the keyboard.
Plug the extra-slim USB-C cable into the keyboard, then place the keyboard into the housing so that the USB-C connector fits into the specifically reserved opening.
After that, screw the keyboard holder to the housing.
10. Join the housing halves
Finally, join the upper and lower housing halves.
Make sure that the sliding cover on the left side is properly inserted into the designated guide rail.
Once everything is aligned correctly, screw both housing halves together.
License
You may create derivative works based on this object, provided that all such derivative works are published exclusively on the MakerWorld platform and include proper attribution to the original creator. You may not share, upload, host, distribute, or publish this object—or any derivative work of this object—on any other digital platform, marketplace, or distribution channel. Commercial use of this object and any derivative works is strictly prohibited. This includes, but is not limited to, selling, renting, sublicensing, or using the object in any context in which you receive monetary compensation or other financial benefits.
Comment & Rating (4)