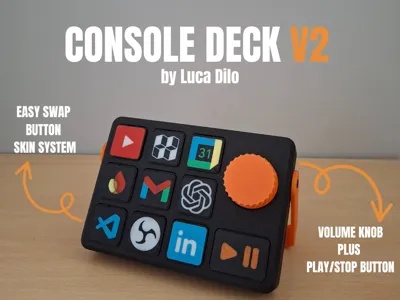
Search models, users, collections, and posts

Console Deck V2

Print Profile(5)

All
X1 Carbon
P1S
P1P
A1
H2S
X1E
H2D
H2C
H2D Pro
P2S
X1
A1 mini
X2D
A2L

Console Deck V2
Console Deck V2
Designer
5.5 h
5 plates
4.8(54)

Console Deck V2 Skins
Designer
3.4 h
6 plates
4.8(15)

Custom Skins
Custom Skins
3 h
11 plates
4.9(9)

All on one plate no buttons
9.3 h
1 plate
Click to see more

Open in Bambu Studio
Boost
2820
6561
282
179
1.5 k
606
Released 

Bill of Materials

Bambu Filaments
Select all
Black (10101) / Filament with spool / 1kg
Orange (10300) / Refill / 1kg
List other parts
  • Arduino Nano x 1: <= 5$ (link in description)
  • Tactile Switch 6x6x4.3mm x 10: <= 2$ (link in description)
  • Volume Encoder KY-040 x 1: <= 1$ (link in description)
  • Wires x 1: Standard arduino wires (22 awg)

Description

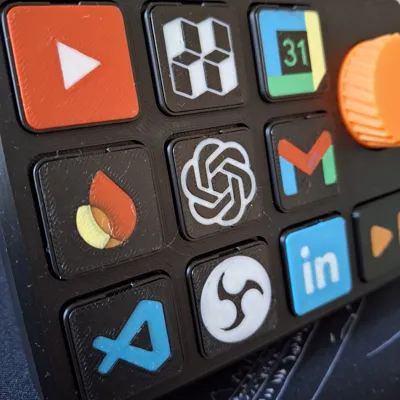
Why buy a Stream Deck for $150 when you can print one for $10?

Console Deck V2 is the free, open-source version of my modular desktop controller — Arduino-based, fully customizable, built by the community.

🚀 Ready for more? Console Deck PRO is now on crowdfunding.

Console Deck V2

*** UPDATE 14/02/2026 (see below) ***


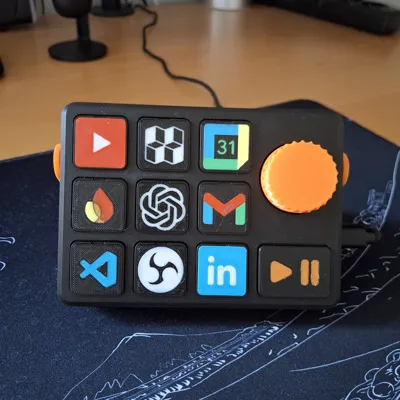
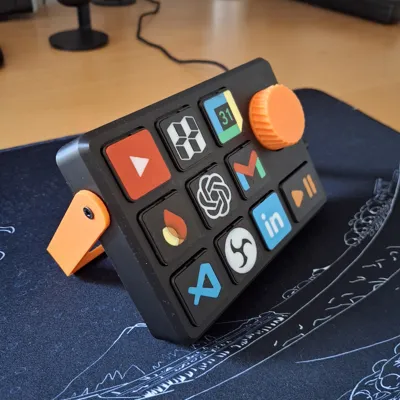
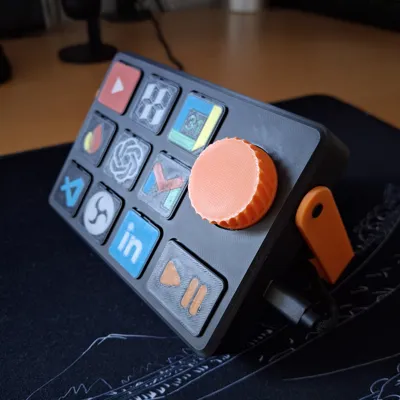
Hello everyone, I would like to introduce the improved version of Console Deck. In this version, I have improved the button skin change and added volume and media controls. I have been using it for two months now and am very pleased with it. I look forward to hearing your thoughts and suggestions for improvement. 🚀🚀

Boost Me (for free)

if you like it, support me by boosting this project 😁🚀

What do you need?

Below is a list of the components you need to purchase to complete this project. The total cost is around $10, but may vary depending on shipping and/or availability. However, don't worry, all of the components are easy to find.

Electronics Diagram

Scripts you will need

At this repo link you can find all the scripts you need. To install everything, follow the readme in the repo or the YT video below. 

Remember that you will need to install Python and the following libraries: pygame, pyperclip, and pyserial.

Want to create your own custom skin?

If you want to create your own custom skin, I have left the .step file in the STL section inside the “Custom Skin Files” folder, which you can import into your CAD and edit with the logo of your choice. Follow the video below for a custom button skin creation example.

Conclusion

In conclusion, I hope you like this project. It is proving very useful to me, and I use it every day on my desk. Let me know if you would change anything or if you need help. You can contact me here in the comments or on my Discord, in the dedicated “projects-help” channel. 🚀🥰


*** UPDATE 23/09/2025 ***

  • Added electronics diagram
  • Added software tutorial YT video
  • Added custom button skin tutorial YT Video

*** UPDATE 17/10/2025 ***

  • Added custom btn_large.STEP into CUSTOM_FILES directory

*** UPDATE 29/11/2025 ***

  • update tactile switch link

*** UPDATE 14/02/2026 ***

  • Fixed Main Print Profile with support and parts orientation
  • Added custom second_body_stream.STEP into CUSTOM_FILES directory
  • Added link to the PRO version on Makerworld Crowdfunding section

Comment & Rating (282)

(0/1000)

excelent model .. thankyou to @wyattgeorge1917 for educating me on how to do own buttons . thankyou both of you
The designer has replied
7
Reply
😍😍
2
Reply
I have just launched the new Console Deck PRO as a crowdfunding campaign. If you would like to take a look, here is the link below. By following the project, you can help me grow it, which I would greatly appreciate. https://makerworld.com/it/crowdfunding/86-console-deck-pro
1
Reply
Replying to @luca_dilo :
I will follow and participate!
Show original
0
Reply
Do you have software for mac users?
The designer has replied
2
Reply
not at the moment, sorry 😣
0
Reply
@Dabrom I created compatible code for my Mac, if you want I can share it, it would be a shame not to be able to use this cool thing he created ( @luca_dilo as soon as I finish it I'll give you a good review :) )
(Edited)
Show original
0
Reply
Replying to @zt.erblin94 :
Ooo, I'd be happy to use it
1
Reply
Awesome print! Only suggestion: it’d be super helpful to add a simple wiring diagram. The YouTube video works fine if you’ve got some experience, but for beginners it can be pretty overwhelming. A quick visual would make this project way more approachable. Other then that, good work!
The designer has replied
11
Reply
yes you're right, thanks for the advice
1
Reply
I would like to thank the developer for this excellent project. At this point, all the processes are complete, and finally I will apply the icons I designed. It has also been very satisfying to make it more usable with a well-designed application. A professional application was already necessary for a model like this. Some of the features of the application include: -Automatically detects the COM connection -Prepared in both my native language, Turkish, and English (I may share it) -The logic runs automatically through a single application -Buttons can be customized very quickly -You can see which buttons have assignments (indicated with a “Link” label) -Once it runs on Windows startup, no further setup is needed
The designer has replied
3
Reply
thankss take a look at the PRO version here -> https://makerworld.com/it/crowdfunding/86-console-deck-pro
0
Reply
Replying to @luca_dilo :
Unfortunately, in my country, international purchases are restricted by the government, so even if I want to buy it, I can’t. Which country are you in?
0
Reply
Super Modell!
The designer has replied
2
Reply
How did you make the rubbery surface?
0
Reply
Replying to @Prasselback :
With a layer of UV-curing resin
2
Reply
I have just launched the new Console Deck PRO as a crowdfunding campaign. If you would like to take a look, here is the link below. By following the project, you can help me grow it, which I would greatly appreciate. https://makerworld.com/it/crowdfunding/86-console-deck-pro
2
Reply
Alco remixed the support I will upload later if anyone wants. I wanted something a little more stiff than the included kickstand. Also chatgpt was great to program if you don't want to use discord
(Edited)
The designer has replied
2
Reply
I have just launched the new Console Deck PRO as a crowdfunding campaign. If you would like to take a look, here is the link below. By following the project, you can help me grow it, which I would greatly appreciate. https://makerworld.com/it/crowdfunding/86-console-deck-pro
0
Reply
@XscarfX could you please share the stand files?
(Edited)
0
Reply
Replying to @user_3361925683 :
i will next time i am in front of my fusion setup
0
Reply
I have taken the time to thoroughly review this file: I boosted this model because I think it's great. But I printed some objects of the print file face down on the textured plate, as well as the buttons, as they look much better that way. With the settings 0.1 mm layer height on the first layer, one wall on the first layer, 30mm speed on the first layer and 230c temperature. This results in a perfect surface. I would also add supports to the print file. Otherwise, the lid is perfect and works
The designer has replied
Show original
1
Reply
okok thank you so much for your advices
0
Reply
Man, I wonder what that bottom left could be..... Lol
0
Reply
Replying to @Wyman :
no program yet stored
Show original
0
Reply
Boosted
Hello, first of all great job for this design ! I have a few questions 1. Are you working on a version with a simple pcb or just clip cables? 2. Will you make a version with mecanical switches and/or several volume encoders? (1 for headphone, 1 for microphone)? 3. Is the python program compatible with linux (ubuntu specifically)? 4. Are the button skins non AMS compatible? If you want to discuss on discord i'll be open to do so. Thank You very much !
The designer has replied
6
Reply
Hi thank you so much 🚀😁 1) yes 2) yes 3) i can work on it 4) no if you want we can discuss it on disc 🚀🚀
1
Reply
Boosted
Replying to @luca_dilo :
Oh thank you very much for your fast response, i will write you directly once i'm level 7 on makerwold to send you my discord username.
0
Reply
Replying to @zlicer :
you can join with this link https://discord.com/invite/GwdqE4gQfy
0
Reply
Boosted
Only wiring is left. Discord is the only way to help you with the program.
2
Reply
how to get on his discord? i have questions to the software side of things...
0
Reply
Replying to @user_765960003 :
The discord link is included in the description :)
0
Reply
Thank you for the great design and the code, I noticed that there are unfortunately errors in the electronics diagram. Here is the corrected assignment Buttons (INPUT_PULLUP; LOW = pressed) ------------------------------------------------- Button 1 -> A1 Button 2 -> A2 Button 3 -> A0 Button 4 -> D11 Button 5 -> D10 Button 6 -> D9 Button 7 -> D2 Button 8 -> D6 Button 9 -> D7 Media -> D8Encoder (rotary encoder) ------------------------------------------------- CLK -> D5 DT -> D4 SW -> D3 (button = MUTE) I have also extended the code so that the comport is automatically detected and it is possible to record and play back key combinations. Let me know if you are interested in the code Best regards
(Edited)
Show original
0
Reply
can you share the updated code with the key combinations please
Show original
0
Reply
Can I get the code?
0
Reply

License

This user content is licensed under a Standard Digital File License.

You shall not share, sub-license, sell, rent, host, transfer, or distribute in any way the digital or 3D printed versions of this object, nor any other derivative work of this object in its digital or physical format (including - but not limited to - remixes of this object, and hosting on other digital platforms). The objects may not be used without permission in any way whatsoever in which you charge money, or collect fees.