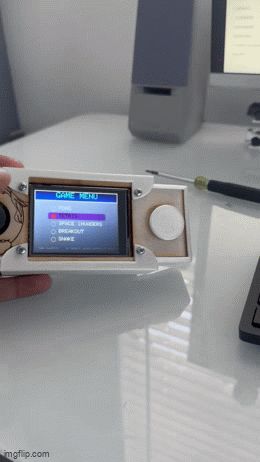
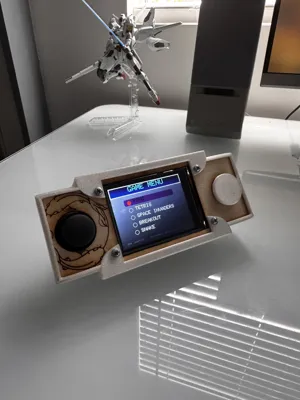
Handheld Wireless console!


Print Profile(2)


Description
Materials required*(Screws can be found at hardware store or online, and electronics can be found on amazon.)
esp32 CYD board
M2.5x14 (4 Pieces)
M2.5 nut (4 pieces)
#4 3/8in sheet metal screws Pan head (4 pieces)
KY-023 Game Joystick Axis Sensor Module
TS-DO16 Arduino Button Micro Push Button
Zip ties
Super Glue.
USB-C plug.
Wireless battery. Anything works for this part, as long as it outputs 5V. I ended up using an old portable charger for iphones that my parents no longer used or needed.
Total cost is only around 35$!!
This model was a personal project of mine, when I saw that Bambu lab was hosting an arcade competition, I saw no reason not to enter it. Assembly is straightforward, and little to no coding is necessary since all the code was written by me already! The console is also fully open source, so if you want to mod it/improve it, go ahead by all means !
Here's how you can put it together.
First find this wire on IO22. It should be red.

Next, plug it into this port on the joystick.

Next find the GND wire on the top wire plug.

Plug it into the GND pin on the joystick board.

Next find the blue wire on the second port IO22.

Plug it into the VrX pin on the joystick.

Next find the green wire on IO22 on the first port.

Plug this wire into t the VrY pin on the joystick.

next, youll need your button, usb-c plug, and super glue. Youll want to super glue onto the exact spot I have pictured here.

Then plug in wires on io27, and GND, onto the button. superglue those to the plug as well to prevent them from getting unplugged from the button.

Next, superglue the joystick onto the lid using the pegs. Pay careful attention to the orientation of the joystick in the image.

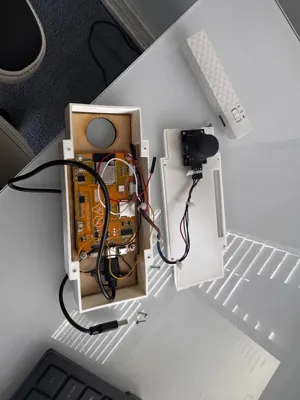
Plug the wires into the pins, and zip tie them together to keep everything tidy!

Next, grab your cover and case, and put them together like so. it will be tight. make sure to not snap the case.

Then push the screws though the cover and case.

Next. add the spacer onto the screws. this will prevent the screen from getting scratched.

Next, grab your esp32 board, and temporarily unplug the usb-c and plug in your usb to upload the code onto the board. The code will be in the documentation. You'll need to download the arduino IDE, and youll need to download the TFT espi, library onto the code for it to run. then simply hit upload. If the code works, you can move onto the next step. If not, please feel free to send me a message and I will happily troubleshoot with you at galugedinithgamage@gmail.com.
Next, youll want to plug the usb-c back into the board, and place the board onto the screws carefully.

after this, you'll wanna use the nuts and screw them onto each screw to secure the screen.

Once this is done, pull the USB-c cable through the gap in the top of the back cover, and put the #4 screws through the back cover in the holes. Make sure not to overtighten as you can strip the holes.

Once this is done, all you need is a battery. plug your battery into the back, and plug the USB in. Power the bank on and it should run! If you want to exit a game, simply power the bank off, and power it back on.
Documentation (1)
License
You shall not share, sub-license, sell, rent, host, transfer, or distribute in any way the digital or 3D printed versions of this object, nor any other derivative work of this object in its digital or physical format (including - but not limited to - remixes of this object, and hosting on other digital platforms). The objects may not be used without permission in any way whatsoever in which you charge money, or collect fees.
Comment & Rating (0)