This article is about starting to design and sharing a step by step tutorial for an easy project you can try to get starting with fast and easy results. Because nothing is as motivating to learn more about designing, as creating a working design in about 30 minutes.
This tutorial uses online tools that does not require any installation or payment. The only thing you will need to do is create a (free) account. If you are a minor, ask permission from your guardian befor you do.
Design tool used: Tinkercad
What is Tinkercad?
Tinkercad is a free, web-based 3D design and modeling tool created by Autodesk, primarily aimed at beginners and educators. It allows users to create 3D models using simple geometric shapes through an intuitive drag-and-drop interface.
Why would I use Tinkercad?
User friendly, ideally for beginners
Web-based and free, no installation is required
It supports STL, SVG and OBJ files. more on this later.
Why wouldn’t I use Tinkercad?
Limited in use: when evolving to more complex designs, you will come to know the limits of the software
Limited in size: the files you import can be max 25 MB and a certain amount of detail
Non-organic: organic fluent shapes, will be very limited.
What files can I import?
STL => basically about every design floating around on Makerworld
OBJ => about everything AI generated by Makerlab or other Makertools
SVG => images converted to SVG
What are the possibilities?
Well, here is the tutorial part!
I wanted to show a simple project that you can try yourself to set the first few steps into designing your own stuff with 100% free tools.
Project #1: earrings
Step 1: create an image using AI
AI used: Gemini
Prompt: generate a simple geometric image of the face of an animal, with thick black lines, no background, all the lines are connected with eachother, so you don't have to pull your pen up when drawing the drawing
Result:

Download the image in .jpg or .png format.
Step 2: Convert your image to SVG-file
Go to https://convertio.co/svg-converter/ and chose your image, to convert to svg.

Download the newly made .svg image
Step 3: import the file into Tinkercad
Go to Tinkercad.com, make a free account and open a new project
Select “import”
Choose your .SVG file
and press Import

Wait until the image is imported.
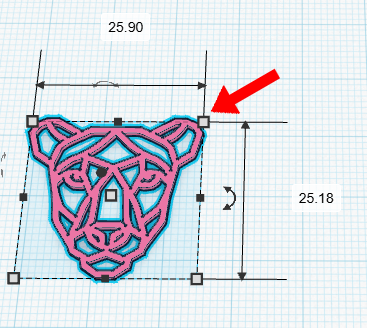
It will look something like this:

Step 4: change the design
Now - those would be some huge earrings. Lets make them smaller.
Like any other image scaling, you can select the file, and rescale them by standing in one of the corners and simply hold and pull.
For this design, which is quite round and bulky, I’m going for about 1 inch x 1 inch or 2,5cm x 2,5 cm for earrings.
Of course, if you change the scale, your design just got very very flat.
Your design will hang on someone’s ears. It. will. Break.
For earrings, I suggest a height of 1,6 mm (0,062992126 inch?).
Always use a multitude of the layer height you intend to use. I use a layer height of 0.2, so my height can be divided into 0,2. (That’s 8 layers - see math is usefull)
Select the middle cube and change it to 1.6 mm, when pressing enter, the design will change instantly

Now, we need something to put our earring hook in.
When testing I figured out that an opening of 2 mm is perfect to give it some room to dangle nicely when you walk around.
But, we have nowhere to put the hole in. So we add a ring!
A ring is basically a cylinder with a hole in.
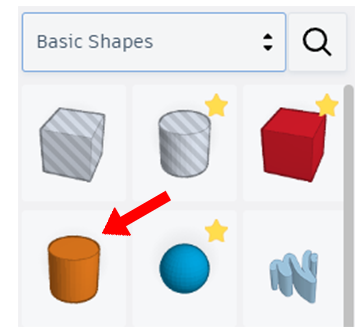
So with our basic shapes, we add a cylinder

To make it nice and round, you max out the sides.
But, it’s to big. So we make it smaller using the same technique as befor, or we type in the sizes manually.
Height: 1,6
Width (on both sides): 3,4 mm - we don’t want our ring to break when wearing the earrings
Now we need to make the hole.
Select your cylinder, copy it (control C) and paste it (Control V). Now you have 2.

Change the sides of one to:
Width: 2 mm

Now, we need to make it a hole.
Select the small cylinder, and tab “hole” on the top right corner


Next step: putting them together.
Select both cylinders (hold in control and click, or click and hold left mouse, and drag the selection over both cylinders)
Click the align tool
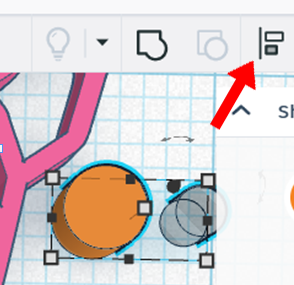
Select the middle boll on the bottom

and the middle boll on the left

See how they turned grey? That means they are 100% aligned

To merge the objects, click the merge icon
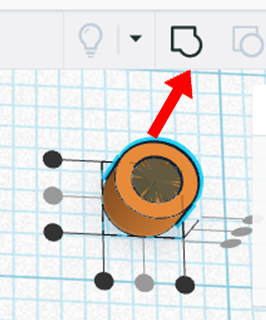
Click it, give it a few seconds, and your hole has been made:

Now to add the ring to the keychain, you can use the same align tool:


You will just have to move the cylinder ring a bit to the top, so you actually have a hole. You can use the arrow keys for this.
But notice how your cylinder takes big steps? We want little steps, so we can decide where to put it.
Change your snap grid to 0.1 mm

Now every step your object takes, is 0,1 mm instead of 1 mm.

Select both shapes, and merge/group:

Final result:

Step 5: Export the design into a STL-file
Now select your design and press “export” and STL

Give it a minute, and a freshly made STL-file is in your download map.
STep 6: print!
Add this into your bambu slicer and check if everything is printed well.
Too thin lines will not print.

Normally, I would just testprint 1 and change the design. But this will clearly be a success - so duplicate the design so you have 2 earrings. Otherwise you will waste more fillament purging then to actually print.
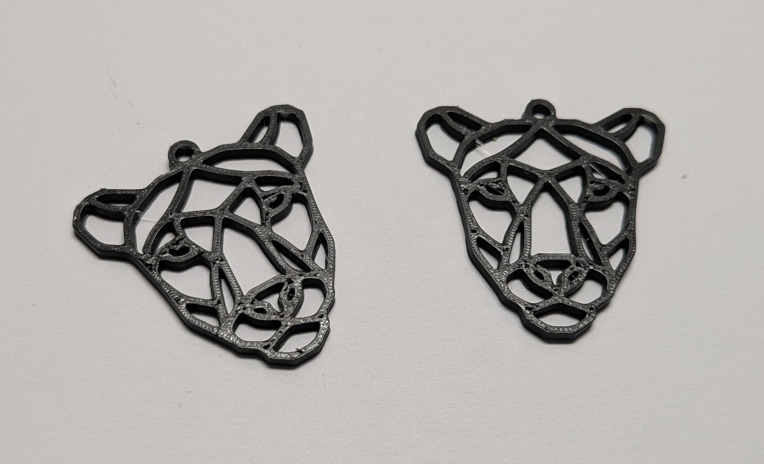
Final result
Finish your print off with an earring hook and tadaa! Your very own earrings.
Final notes
This is a tutorial to engage people into using designing software and this method uses (a lot) of short cuts to get a quick, motivating result.
This is nowhere near how 99,99% of the designs are made, this is a first small step on a road that is beautiful and fulfilling.
This is (obvously) not a design that can be an “exclusive model”, because it is:
- Flat
- Not particulary well designed
I wish you a lot of fun creating your own designs and seeing everyone grow as a designer. I am loving the journey I am on and wish you all the satisfying feeling that comes when you finally get a design how you want it, or learn a new skill in a designing software ❤️
Looking for a print profile? I have uploaded this design with every setting on free so you can use all the tools available.