Ironing test


Print Profile(4)


Description
Boost Me (for free)
Your support is my motivation
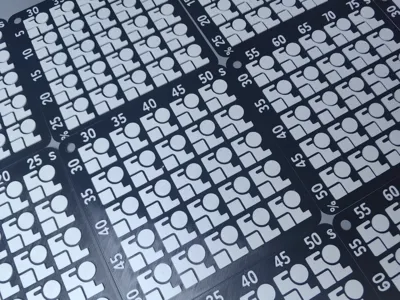
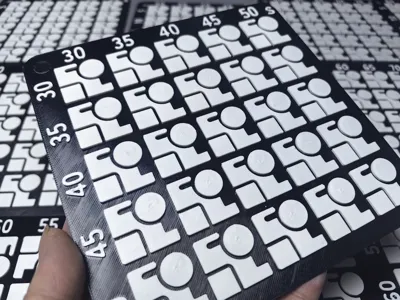
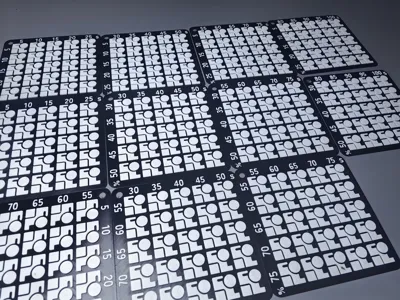
3D Printed Top Surface Ironing Parameter Calibration Model
Say goodbye to printing defects like top surface unevenness, over-extrusion, and under-extrusion this dedicated calibration model is suitable for beginners to tune and use It splits into two major test units: speed and flow each group has 5 settings with uniform and standardized gradient intervals The compact model has low filament consumption fast print completion efficiency It supports multiple common filaments like PLA and PETG and quickly helps determine suitable ironing parameter standards
Key Highlights
🔹Standardized Gradient Settings: speed settings difference of 5mm/s flow settings difference of 5% 5 parameter settings per group covering the common printing range🔹Visual Effect Comparison: Each module is marked with its exclusive parameter identifier allowing intuitive comparison of finished appearance and easy selection of ideal parameters🔹Easy Plug-and-Play Use: Comes with built-in parameter files one-click recognition and loading in slicing software enabling even beginners to quickly complete calibration The model uses a combination of concentric ironing and linear ironing for a simpler and clearer choice The size is 160X160 and A1 mini can directly print and use it
For detailed Print in Place →→→→→→→→ Ironing Test 15-50
Printing Tuning Guide
- Initial Printing Settings: Default for PETG filament 0.2mm layer height double wall thickness 15% infill
- Print as-is: Print using the tuned model parameters Check the surface flatness and extrusion molding status
- Apply Practical Parameters: Select the optimal setting data and directly apply it to your daily printing plan
- Adapt to Different Filaments: When using PLA or ABS materials switch to the corresponding filament
Test Results Below (for reference only)


Usage Tips
Before printing clean any residual material from the nozzle keep the heatbed surface level to reduce hardware interference with test results Filament characteristics may vary between batches parameters can be re-checked with multiple prints When printing high-temperature ABS filament ensure proper chamber insulation to prevent model warping and deformation The model supports scaling but the original size provides higher detection accuracy
Discussion and Customization
Parameter ranges and module sizes can be adjusted as needed feel free to share actual printing data and finished results and exchange tuning tips
Boost Me (for free)
Your support is my motivation
License
You shall not share, sub-license, sell, rent, host, transfer, or distribute in any way the digital or 3D printed versions of this object, nor any other derivative work of this object in its digital or physical format (including - but not limited to - remixes of this object, and hosting on other digital platforms). The objects may not be used without permission in any way whatsoever in which you charge money, or collect fees.
Comment & Rating (0)