Search models, users, collections, and posts

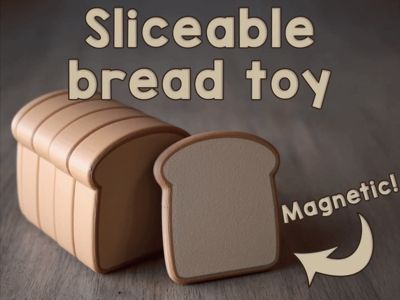
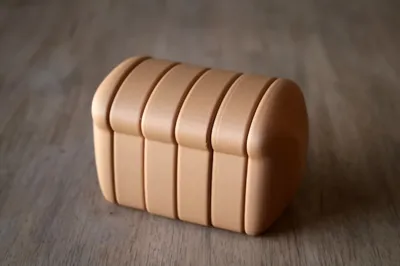
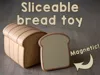
Sliceable magnetic bread

GIF

Print Profile(9)

All
P1S
P1P
A1
X1
X1 Carbon
H2D
H2D Pro
H2C
H2S
P2S
X1E
X2D
A2L
A1 mini

10x3mm magnets
10x3mm magnets
Designer
5.4 h
1 plate
5.0(10)

15x3mm magnets
15x3mm magnets
Designer
5.4 h
1 plate
5.0(3)

Scaled 80% - 10x3mm magnets
Designer
3.5 h
1 plate
5.0(2)

15x3mm magnets - A1 mini
Designer
5.4 h
2 plates
Click to see more

Open in Bambu Studio
Boost
1320
4649
55
51
709
351
Released 

Bill of Materials

Maker's Supply Kits and Parts
Select all
D10x3 mm Round Magnet (20PCS) - CA009
Bambu Filaments
Select all
Matte Desert Tan (11401) / Refill / 1kg
Matte Caramel (11803) / Refill / 1kg

Description

Description

Slice into fun with this kid-friendly magnetic bread! Designed for imaginative kitchen play, this toy splits into two halves, held together by embedded magnets. It’s perfect for pretend cooking, food-themed games, or teaching little ones about healthy eating.

Printing details

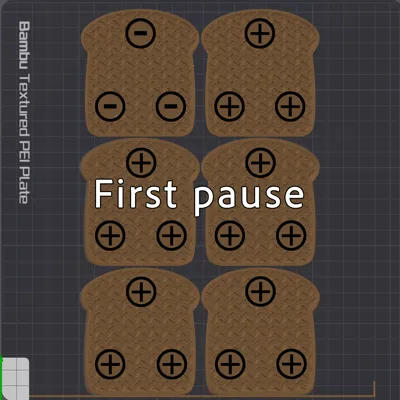
  • You will need 30 15x3 or 10x3 magnets for this model.
  • The polarity of magnets is important to get right for this model, see the images for a guide on how to insert them.
  • Not all magnets are created equal! You want magnets strong enough to hold the pieces together securely, but not so powerful that they'll pinch little fingers. Some 15x3 magnets may be too strong, while others work perfectly. There are two print profiles to accommodate different magnet sizes.
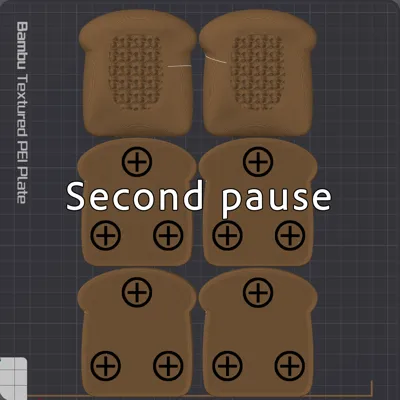
  • The print profile has two pauses to insert the magnets.
  • IMPORTANT: during the second pause, add a little bit of glue stick on the top of the magnets to help the next layer adhere, or the top layer may not print cleanly.

Filaments used

  • Caramel - Bambu Matte PLA
  • Desert Tan - Bambu Matte PLA

Check out my growing collection of sliceable foods!

Boost Me (for free)

If you like this model, please consider giving a boost! It helps me to create even more! 😄 Can't boost? Likes, comments, and shares are just as awesome and greatly appreciated.


Commercial licenses & support

  • I offer commercial licenses through Patreon, or through MakerWorld by clicking on the “Join” button below.
  • Want to buy me a coffee? Click below to show your support with the “Wooden Shield” membership tier!

Membership

If you enjoy my work and want to sell prints of my designs, consider subscribing to get a commercial license! ✨

Join

Comment & Rating (55)

(0/1000)

The 10x3 magnets version paused one layer late. Had to rip the layer off but it still caused some bumps. Can you fix the second pause?
The designer has replied
0
Reply
I think Bambu must have adjusted something because all the print profiles were off (I'm certain they weren't before!) Either way, it has been fixed now. Thanks for bringing it to my attention!
2
Reply
Much appreciated 🔥
0
Reply
Replying to @Hyrule_3D_Forge :
Yeah I noticed I had to go one layer earlier in all the models when printing on a A1 which is fine since I like to do it in bambu studio instead of the handy app.
0
Reply
I’m new to printing and having trouble with the bread slices cooling off and unattaching from the plate when I add the magnets. what am I doing wrong?
The designer has replied
0
Reply
What printer do you have? The bed should not be cooling down during the pause
0
Reply
Replying to @Hyrule_3D_Forge :
Bambu P2S. So dumb question, am I not supposed to be taking the plate out to put the magnets in? didn’t think I could get to the back ones. I may be over complicating things 🙄
0
Reply
Not a dumb question! We were all beginners at first 🙂. But the answer is no, you should not be removing the build plate during the pauses. The temperature drop is one reason, also that it will be nearly impossible to put it back in EXACTLY the same spot as it was before, which would cause it to have print defects. Just do your best to reach in there and place the magnets without removing the build plate.
1
Reply
Print Profile
10x3mm magnets
Such great creations!!
0
Reply
I love all your slicable foods. I’m looking forward to getting a printer and trying them soon! However, I just had to say that you’ve opened up a world of possibilities now that you have bread. You could do meat slices, cheese slices, lettuce slices, smaller tomato slices, etc and theoretically line up the magnet placement so a sandwich could be built with all the parts!
The designer has replied
3
Reply
That's a great idea, I hadn't thought of that. Thank you!!
0
Reply
I followed the diagrams instead of my science. All these positive magnets (with only one negative slice) cause my slices to repel, not stick. What am I missing?? Why would the diagram show all positives?
The designer has replied
0
Reply
The polarity should all flow in one direction, except for the single end piece. If it helps, you can use a marker to write the -/+ symbols on the magnets to help keep track of the polarity.
0
Reply
Replying to @Hyrule_3D_Forge :
Thanks. I thought I did that. just seems that positive against positive would repel - which mine do. I’ll be more careful and mark mine next time! Appreciate your reply.
0
Reply
Replying to @user_3967468297 :
Yeah it only works one way, so the positive-positive magnets repel, but if you turn the slice around, then it's positive-negative and will work properly
0
Reply
HOW DID YOU KNOW THE MAGNET POLARITY
The designer has replied
0
Reply
Use the last two pictures for a reference on which way to put then in. it can help to use a marker to write +/- on the magnets to keep track of which is which
0
Reply
Replying to @Hyrule_3D_Forge :
OK, thank you will do
0
Reply
can you scale it down to like half the size or even less using smaller magnets like the 6x3mm.
The designer has replied
0
Reply
I've added a print profile scaled at 50% and using 6x3 magnets
0
Reply
Replying to @Hyrule_3D_Forge :
the 6x3 magnet version , isn't accurate, it is smaller than that actually so the magnet didn't fit
0
Reply
could you put like a little whole to put velcro
The designer has replied
0
Reply
These have been designed to be an improvement over the velcro-based food toys. I recommend using the magnets 🙂
0
Reply
when do the pauses occur in the print?
The designer has replied
0
Reply
They're at 16 and 87 for the normal size
0
Reply
Boosted
I have made several of these models, they come out beautiful as long as you get the magnets right, which is not the fault of the model.
The designer has replied
0
Reply
Thank you, I'm glad you're enjoying them! If it helps, you can use a sharpie to write a +/- on the magnets to help keep track of which side is which
0
Reply

License

If you want to use this model commercially, please join my membership.
Join Now
This user content is licensed under the MakerWorld Exclusive License.

You may create derivative works based on this object, provided that all such derivative works are published exclusively on the MakerWorld platform and include proper attribution to the original creator. You may not share, upload, host, distribute, or publish this object—or any derivative work of this object—on any other digital platform, marketplace, or distribution channel. Commercial use of this object and any derivative works is strictly prohibited. This includes, but is not limited to, selling, renting, sublicensing, or using the object in any context in which you receive monetary compensation or other financial benefits.