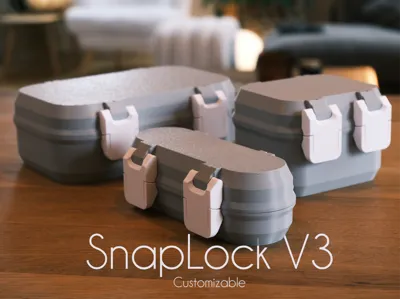
Search models, users, collections, and posts

SnapLock V3

IP Report
GIF

Print Profile(4)

All
X1 Carbon
X1
H2S
H2D Pro
A1
H2C
P1S
P1P
H2D
P2S
X1E
A1 mini
X2D
A2L

Smallest box for test fit 75x50x30
Designer
1.9 h
2 plates
4.9(93)

Thumbnail medium box 100x80x50
Designer
2.8 h
3 plates
5.0(59)

Thumbnail small box 150x50x25
Designer
2.5 h
3 plates
4.9(47)

Thumbnail big box 180x110x40
Designer
4.1 h
3 plates
4.9(101)

Open in Bambu Studio
Boost
4427
13578
573
496
10 k
4.1 k
Released 

Description

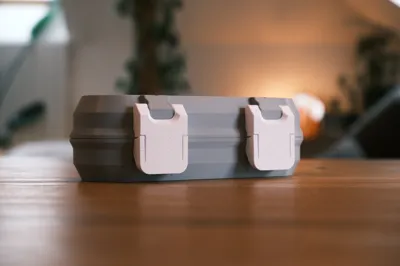
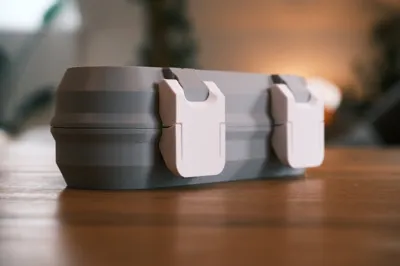
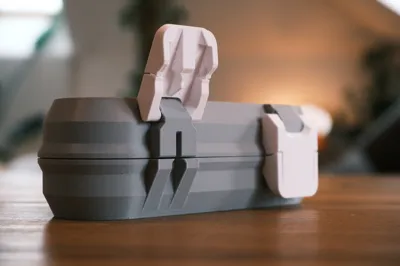
This new version of my Snaplock boxes was designed based on feedback from the previous two iterations. I moved away from the single-latch design of the V2 and returned to a dual-latch system for improved reliability. The latches still use the same idea of a flexing mechanism to lock into the box, but this time without any visible bumps on the enclosure, only the latches themselves.


They are easier to operate than V1 and cannot be assembled backwards this time. While the design has evolved, the spirit of the model remains the same, a fully functional solution that is 100% 3D printed.
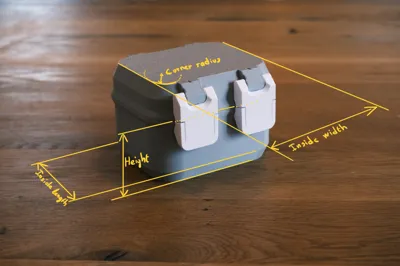
 

Customizable size

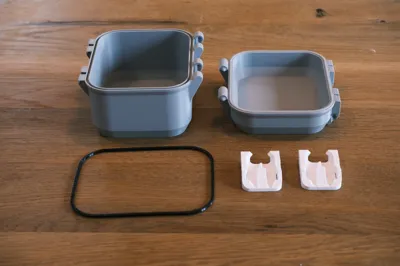
The model is fully customizable using four parameters: inside width, inside length, height, and corner radius. I also added a groove designed to accept an optional TPU gasket for improved sealing.


In this version, the parameterized dimensions correspond to the internal measurements rather than the external ones. As a result, the profile labeled 100×80×50 has an internal width of 100 mm, an internal length of 80 mm, and a bottom height of 50 mm.


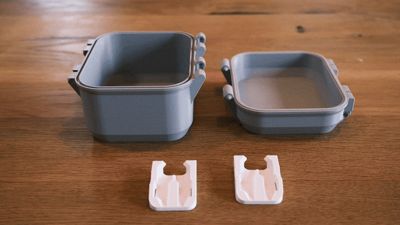
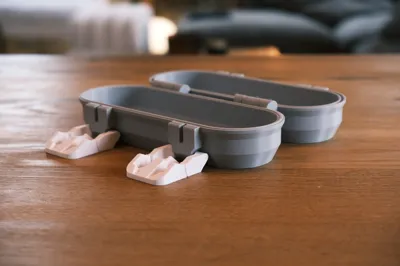
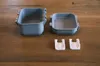
When you export the model from the “customize” tab, it will appear as a fully assembled box. In the slicer, you can right clic and “split to objects" as shown : 

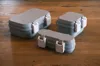
Then you can print the resulting parts like this :

(the TPU gasket is optional)

My favourite material for the latches is PETG but it works as well in PLA.


Assembly

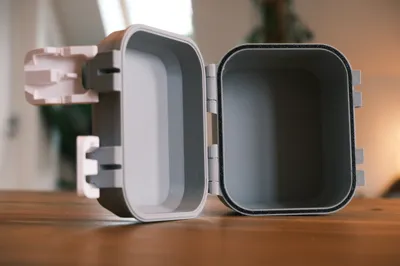
The assembly is fairly straightforward, simply follow the GIF. One important detail to note is that a groove is designed to define the correct orientation for assembling the hinges and latches. This groove guides the parts into their proper position, and once installed, the assembly should be secure and hold up very well.

Fusion 360 file

If you are looking for the original f3d file to modify it in fusion you can find it here :

A window will pop up where you can download the file.


Enjoy !

Comment & Rating (573)

(0/1000)

I’m just about done with a parametric option that makes a insert for these. You can change the size, corner radius and wall thickness. You enter the dimensions that were entered for the box and it can make a hollow, solid, hollow with dividers and even dividers up to the lid so things don’t spill over into other sections with dividers. You can do all this in Fusion but if you’re no comfortable in fusion, this gives you a somewhat no frills option for an insert.
26
Reply
awesome idea. how is that coming along? would love to try it out.
1
Reply
please let us know when you upload it. thanks
3
Reply
Hello, any Updates on this? I think it will be a huge Upgrade for this Boxes...
3
Reply
Maybe it’s a good idea to make a Community post because with the new Handy update there isn’t a Designers tab anymore. Otherwise many of your followers won’t see that you made an updated version I believe.
(Edited)
The designer has replied
designer
25
Reply
Ok thank you for the advice I didn't know about the designers tab 👍
1
Reply
Replying to @Hugo :
You’re welcome! 😊
0
Reply
Boosted
didn’t see it myself till today
0
Reply
Boosted
couldn’t help myself.
The designer has replied
designer
19
Reply
Haha nice !
1
Reply
Boosted
Replying to @Hugo :
what if you did one big latch with this buckle design?
1
Reply
Boosted
Print Profile
Thumbnail big box 180x110x40
Love the new latches! Great design!
profile
14
Reply
How cool, tell me where to find information on how to make a picture or text in this way
(Edited)
1
Reply
Boosted
Replying to @bearLIKEbeer :
Right click on the object -> add positive part -> SVG. Then select the SVG you want to add. Hope that helps. :)
(Edited)
7
Reply
Replying to @R420 :
very helpful :)
(Edited)
1
Reply
Using the Parametric Model Maker with the default settings (100x80x50x20) produced a box that was printable. But with the settings changed to 167x111x75x1, the design that was produced had one hinge fitting disconnected from the box bottom. This also occurred with the default settings when only the corner radius was changed to 1 (100x80x50x1), so it appears that changing the corner radius is what caused the design to break. Too bad, because with the corner radius set to one gives a box without the beveled edges, which is a feature that I liked.
(Edited)
The designer has replied
1
Reply
Thank you for the feedback, I will try to fix it as soon as possible. It is weird tho because I only use the mirror feature for the hinges..
1
Reply
Ok I fixed it, I just tried your exact dimensions and it works ! leet me know if you still have the issue
2
Reply
Replying to @Hugo :
I am still seeing the one hinge piece being disconnected. I ran some tests with all of the other parameters set to default (110x100x50) and then generating the box with the corner radius from 20 down to 1. For 20 thru 5 Bambu Slicer on my Mac split the box into parts correctly, but from 4 down to 1, the one hinge piece separated in each case.
0
Reply
Great model! I loved the Snap V1 but it can be a little difficult to open the snap. This model makes that much easier. I printed one box and made a remix for 3ml vials. I am working on one for 10ml vials and for phase10/uno.
The designer has replied
6
Reply
Cool remix ! I am working on a customizable one latch version at the moment 👍
4
Reply
Replying to @Hugo :
I waiting one latch version, do you know when it might be finished?
0
Reply
Boosted
Nice! Any tip to make quick and easy inserts in fusion?
0
Reply
Boosted
Print Profile
Thumbnail medium box 100x80x50
have all versions of the snaplock already, so was excited to see how v3 went. I didn't think it coold get this smooth! perfect angles all around on this one and tightly locked. love it! (printed in pla)
profile
8
Reply
Print Profile
Smallest box for test fit 75x50x30
(Edited)
Strength Issue:when I tried attaching the pieces it just snapped. I was making this for my sisters birthday and she was disappointed. The snap box v1 was better.
0
Reply
That is absolutely not the designer's fault and does not deserve 1 star. I have printed many of these with the default settings and changed settings, nothing has failed. Your issue is either choice of filament, incorrect print settings you changed, assembling incorrectly or your filaments are not calibrated correctly/ using generic filament settings. The one pic shows the hinge pivot nub is almost sheared off, that should/ would not happen if the file was printed and assembled correctly. He has loose tolerances built in for just this.
(Edited)
12
Reply
ig that is fair, but I was using branded Bambu lab filament. ratings are meant to show your own opinion, at the time I was mad so now I realize that 1 star is a little excessive but I have printed this twice with different filament and both time it has failed. for me, the tolerances weren’t that great and it was super tight whil attaching, then while assembling it snapped the pieces.
0
Reply
in the first step when you attach the two pieces and then fold them together, that was when it snapped due to friction
0
Reply
@Hugo The Gen2 had a 3mm thick bottom and top. Any chance the Gen3 could have the same option? It made for a slight stronger/ more rigid bottom when larger boxes were made. I somewhat recently got the Gen2 exactly how I liked it with changes and a bunch of custom sizes and you create a new one!!!!!
The designer has replied
designer
7
Reply
Hey, thank you for your message, I received a lot of requests for modifications on this model, I am working on making it more stable at the moment and then I will add parameters for more customization possibilities. I will add your request to the list !
1
Reply
Replying to @Hugo :
Please don’t take any of what I said as criticism. You make the best snap closure boxes and I greatly appreciate that you continue to refine the product. Will you be offering the CAD file as well? Thank you for continuing to provide great print files for us!
(Edited)
designer
3
Reply
Replying to @Prints_for_fun :
The F3d file is available to download ==> look at the end of the description to see how to download it !
0
Reply
It was not without difficulty that I got access to parametric models, for which I want to say a huge thank you to the author! But first of all, for such a wonderful model. I love drawers and boxes, but the need for pins has always been a problem for me (it's hard to find them in my area), so I'm always happy for models without metal pins- the ones that can be assembled right off the table. All I can dream about is having a carrying handle. Is it possible to have hope for version 4.0 with a carrying handle? My thanks to you!
designer
5
Reply

License

This user content is licensed under the MakerWorld Exclusive License.

You may create derivative works based on this object, provided that all such derivative works are published exclusively on the MakerWorld platform and include proper attribution to the original creator. You may not share, upload, host, distribute, or publish this object—or any derivative work of this object—on any other digital platform, marketplace, or distribution channel. Commercial use of this object and any derivative works is strictly prohibited. This includes, but is not limited to, selling, renting, sublicensing, or using the object in any context in which you receive monetary compensation or other financial benefits.