DuKangBox


Print Profile(1)

Description
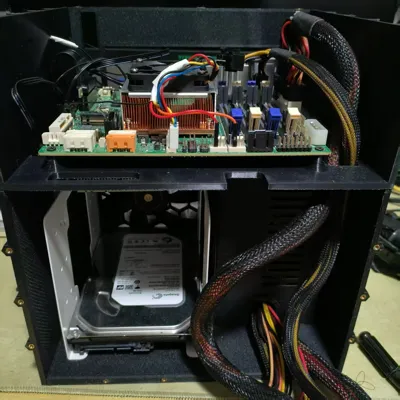
A low-cost NAS chassis supporting ITX motherboards, ATX power supplies, and four 3.5-inch hard drives. The cost is approximately 40 yuan without extension cables, drive cages, and fans.
Complete chassis configuration BOM and cost calculation (2025/6/5):
| Item Name | Quantity | Price |
| M3*10 countersunk cross screws | 100 | 3.19 |
| 6#-32*3/8 | 50 | 1.66 |
| M3*4*4 cage nuts | 100 | 5.29 |
| 3.5-inch 4-bay hard drive bracket | 1 | 22.9 |
| PCIE extension cable (*4) | 1 | 34 |
| Consumables | 1kg | 29.6 |
| TL-E12B fan | 1 | 23.41 |
| Total | 120.05 |
Table Notes:
1. In the table, the price of a few screws bought individually is almost the same as a package (50 pieces). If more than one package is needed, it's calculated as two packages.
2. The second row, the British standard bolts, only uses four to fix the power supply. If you have alternatives, you can completely skip buying this package of bolts.
3. Extension cables are also unnecessary if a half-height card is acceptable.
4. I will release a 3D-printed version of the hard drive bracket later. However, considering some users may not print frequently and would need to use extra consumables, an iron bracket is considered more economical.
5. Purchase a 0.1m long, 270-degree left-turn PCIE extension cable. The Taobao product images for the bracket and extension cable have been added to the model images; please search for them yourself.
Printing Instructions:
1. Printing settings: 4 top layers, 4 walls, 35% adaptive cubic infill. Tree supports are needed for the frame; no supports are needed for other parts. The estimated material consumption is around 980g.
2. Each part has a flat surface intended as the base. Please check that this surface is used as the base before printing.
Assembly Instructions:
1. Cage nuts need to be installed in each hexagonal inner hole.
2. The round holes are for bolt clearance, not for installing cage nuts.
3. Assemble from bottom to top, inside to outside.
4. Install the side panel, insert the extension cable into the graphics card, and then connect to the motherboard.
5. Please organize the cables that go from the bottom bay to the top bay before threading them to the top bay and securing it.
6. There isn't much space for cable management; please route the cables carefully.
7. 2.5-inch drives can fit in the gap next to the hard drive cage.
8. If a PCIE card is difficult to insert, tighten a screw on the baffle. Look carefully at the physical image, and you will understand how to assemble it.
9. If the board doesn't fit or the holes don't align, try rotating it or flipping it over. Have you accidentally taken the wrong board?
10. Praise Omniseia, and may your motherboard not fail (like mine did immediately after installation).
License
You shall not share, sub-license, sell, rent, host, transfer, or distribute in any way the digital or 3D printed versions of this object, nor any other derivative work of this object in its digital or physical format (including - but not limited to - remixes of this object, and hosting on other digital platforms). The objects may not be used without permission in any way whatsoever in which you charge money, or collect fees.
Comment & Rating (0)