
Table of Contents:
- Preamble
- Theory
- What is a 3d-model
- Different kind of meshes
- Special Meshes in 3d printing
- Creation
- General idea
- My process
- Side techniques
- Remarks
- Printing
- Common pitfalls
- Supports removal
- Relation to AI
- The Future
- Postamble
Preamble
A common question topic users ask me about is voronoi and mesh-models in general. This is related to the fact I already made more than 150 of such type of models (see this collection).
In the past I often have answered users in various places and to various extends but now I make this article here as reference for the future.
I will describe my understanding of the topic and my personal process over the 2 years I already did this.
Voronoi models are trickier than others to print and manage and this will also aim to help those who need it.
I will assume you aren't a total beginner in this article and that you have a basic understanding of 3d printing and that ideally you already read my first article (A look into my 3d printing setup) to have an idea of the tools and programs that can be useful to you.
Theory
What is a 3d-model
From a more technical point of view any model is simply a mesh: a group of dots(/nodes/vertices), connected by lines(/edges) which make faces.
We speak about a solid when the mesh is fully closed by faces, if there is a hole somewhere in the mesh it is only considered a surface.
While the mesh can only form straight faces, some tools interpret the location of the faces and give them a non-flat aspect.
You can consider the mesh to be the structure/shell of the solid.
Different kind of meshes
Similar solids can have different meshes.
A typical example can be seen when reducing a model (lower the amount of polygons inside of it):
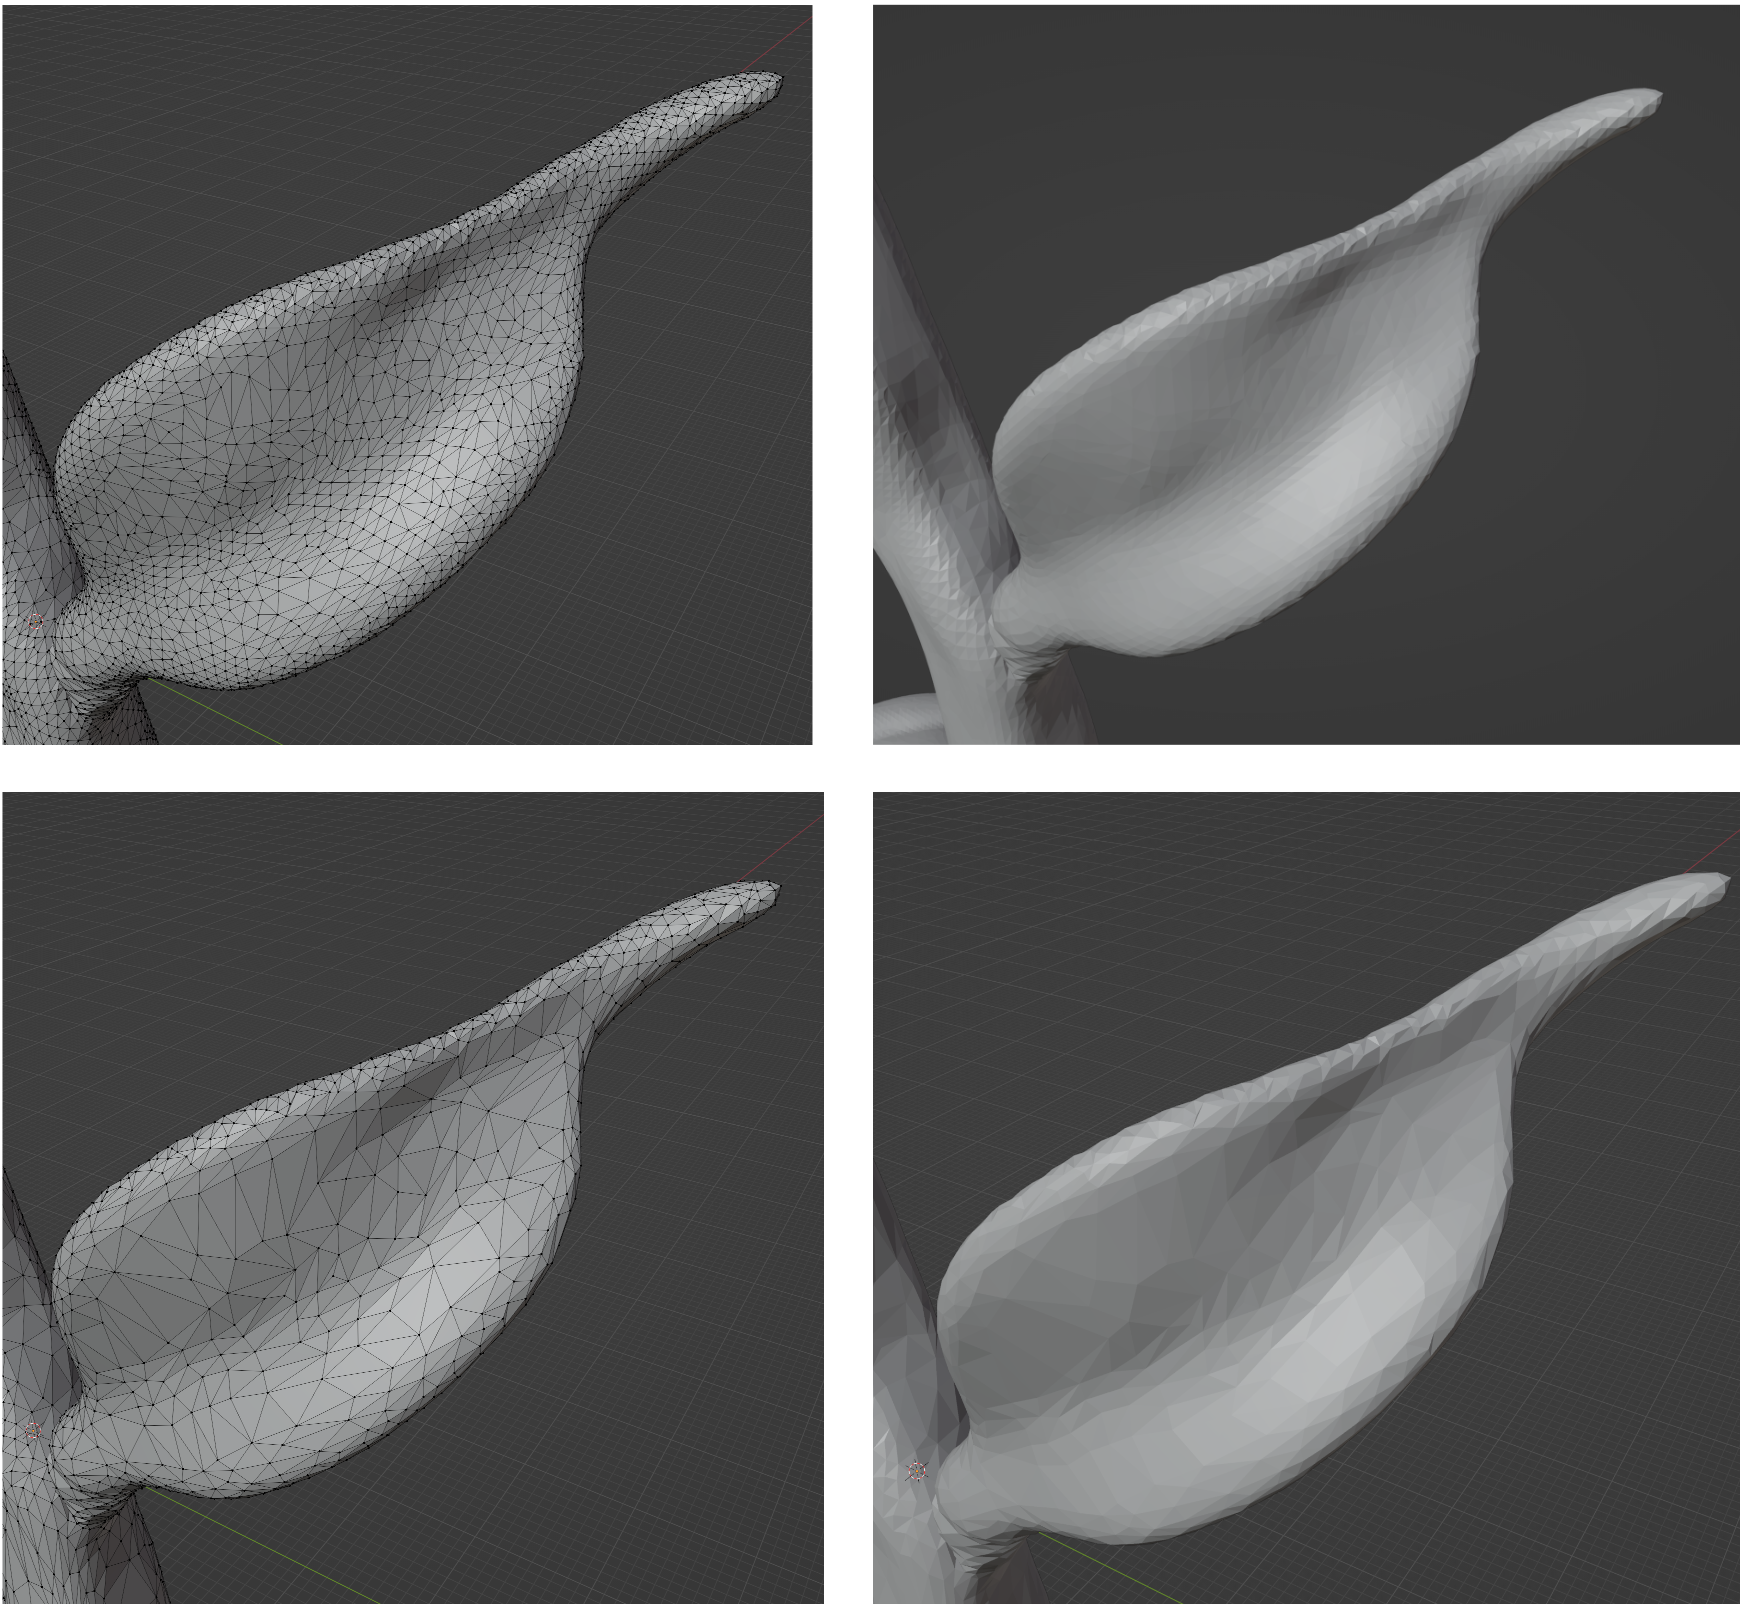
(Rose Decor by @29flo_2608524 "29flo")
We can see that while the overall shape doesn't change much, the number of faces from which the leaf is made has greatly been reduced, making working with the model much easier. Note that since your printer has a limit on how small details it can print, this will probably come out exactly the same, even if you see the faces more once decimated.
Of course there are also different mesh styles that can be actively chose like uniform meshes, very dense meshes, minimal meshes, ... but these depend on the given situation and the wanted result.
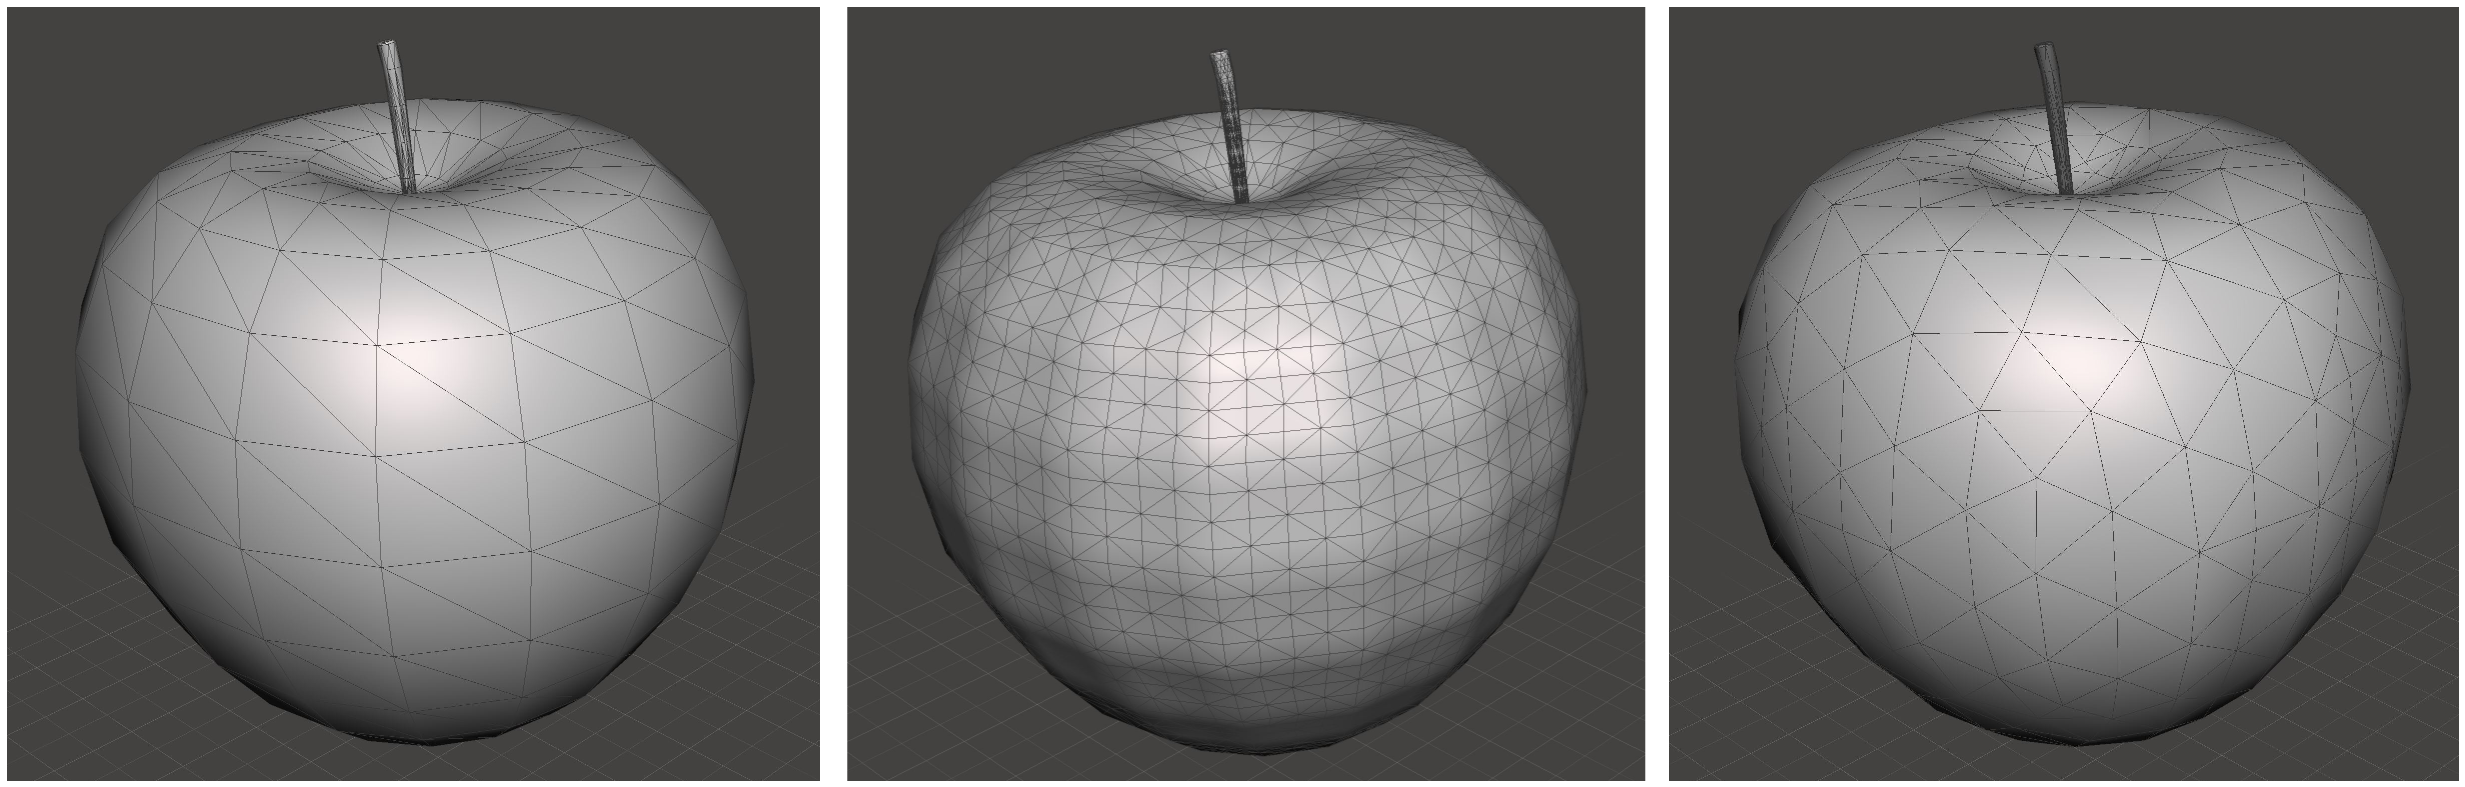
(Red Apple by RPSebb)
While not directly visible, sculpting has also usually a big impact on the mesh. Sculpting uses really dense meshes to be able to show/make lots of details, which can be visible afterwards by looking at the dense areas.
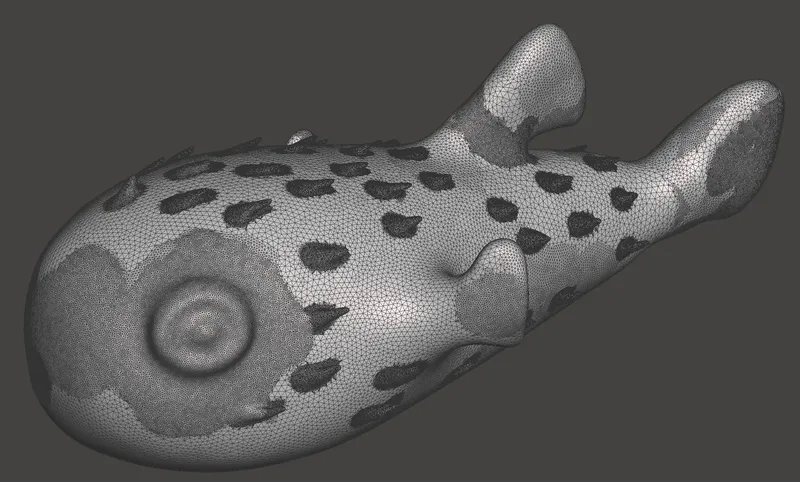
(Cute Pufferfish by @Ryan_1788814 "Hi")
You might think it's a bad thing to have this in your published model but it doesn't really matter for 3d printing. It also has the advantage of indicating that it was (most likely) hand-sculpted which in a world of Ai generated slop is always nice.
This variation in density also appears naturally in models as some parts require more detail to be represented and have thus denser meshes.
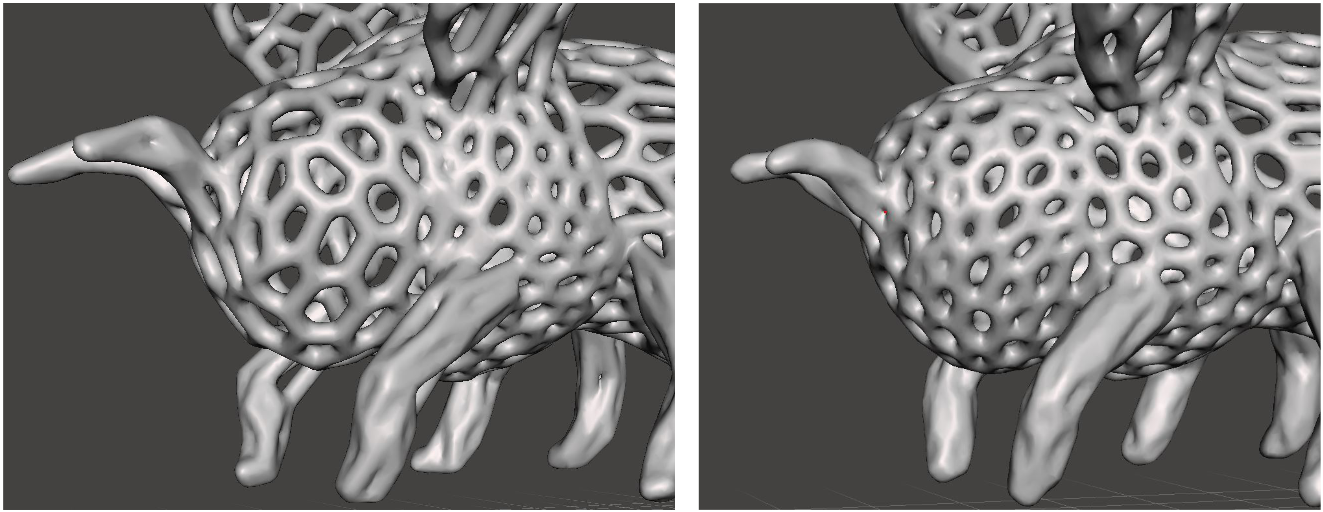
As mentioned above you can always remesh the model to obtain an uniform distribution or you can play on it to obtain more interesting mesh models. For example:

Bee by @SparkyFace5_298989 "SparkyFace5"
By keeping the density imbalance I was able to keep this ring effect after the head in my voronoi remix (left). Otherwise I would have obtained a more blended/uniform result (right).
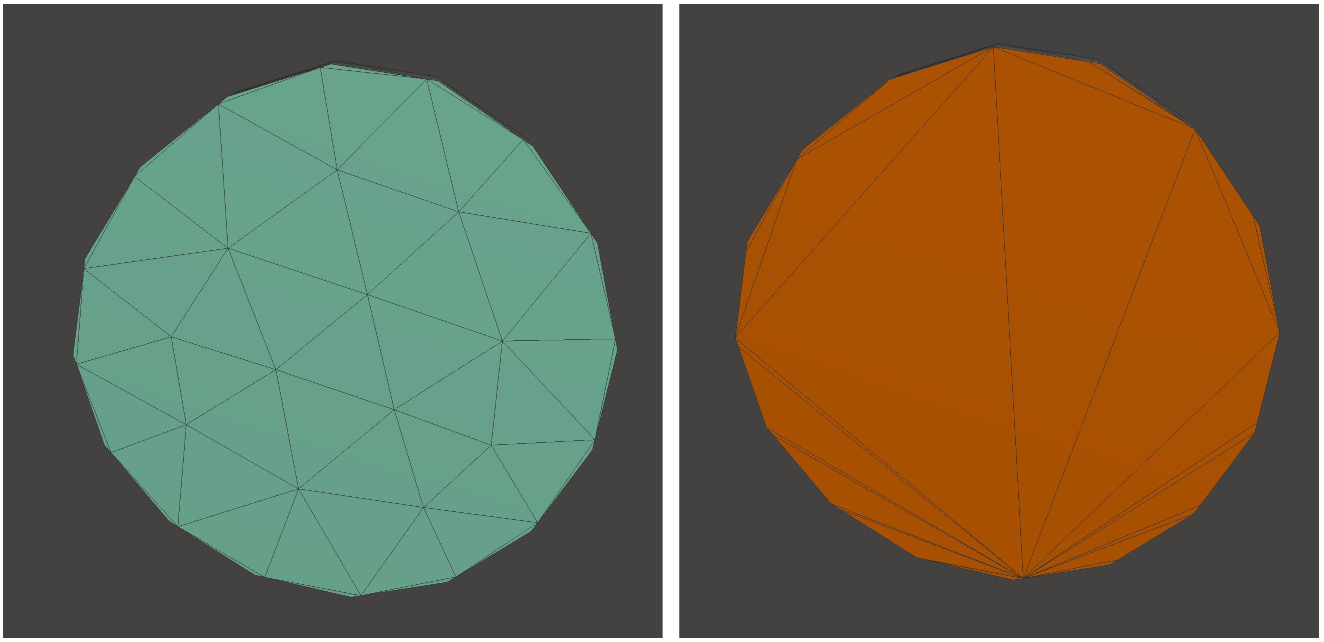
To generally represent the mesh in a computer it requires triangles (polygons in 3d). This means that in reality, even if your mesh looks like it uses (for example) squares, they are at some point transformed into triangles.
An easy example of this is to take the blender default cube, save it as STL and open it in another program, like meshmixer.
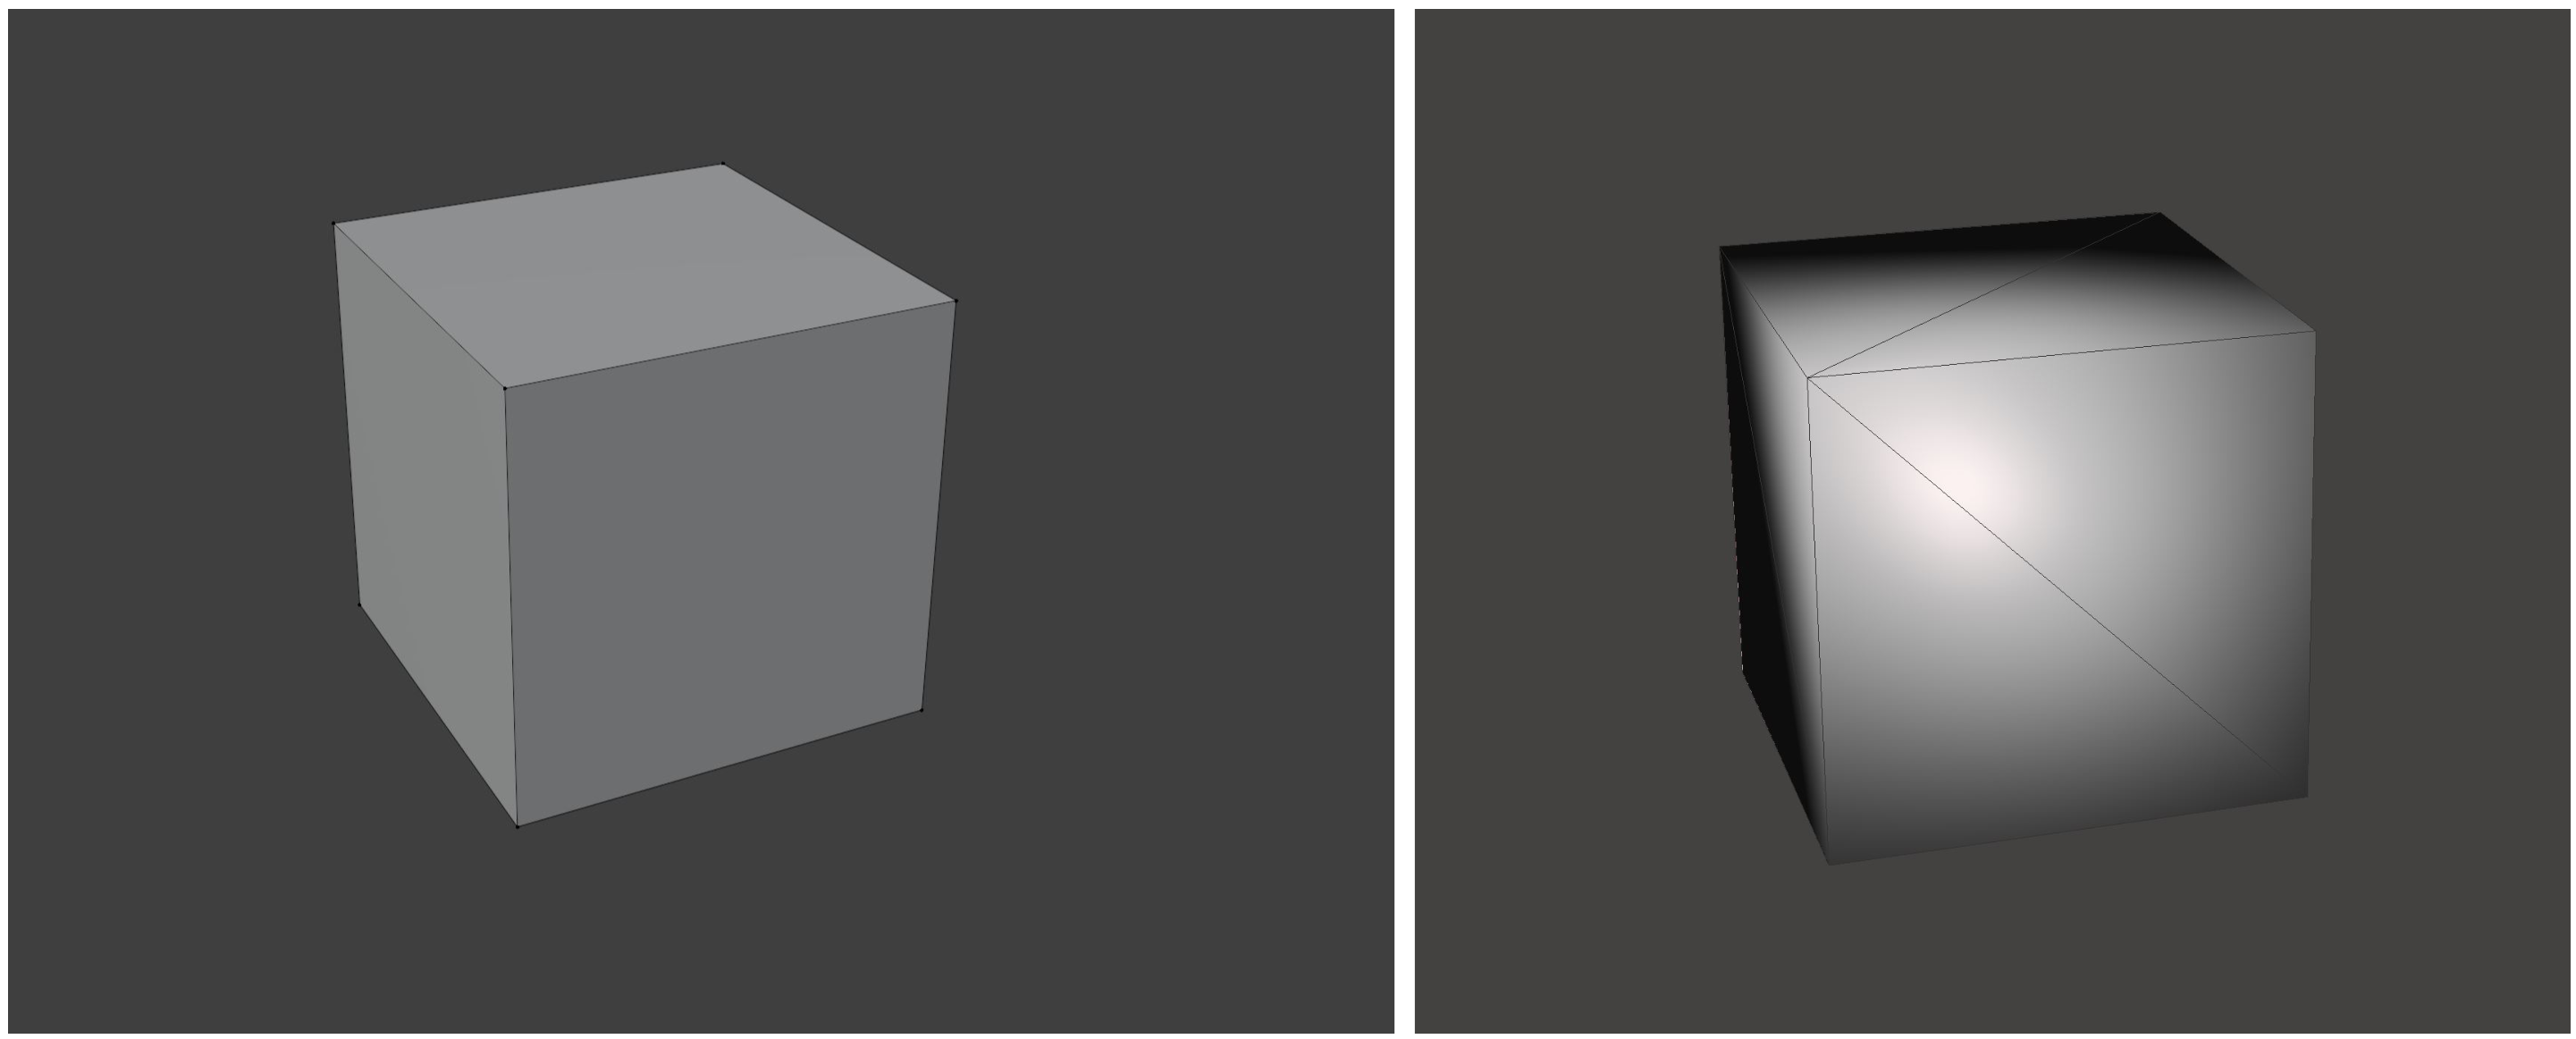
The square faces were stored as triangles and thus that's what meshmixer reads when trying to open the file. This also means that changing programs can alter your final result without you doing anything.
Special Meshes in 3d printing
Some mesh variations are the source of common 3d printing methods you see going by:
Low Poly: Means literally "Low Polygon". This is a mesh that has been really simplified to only keep a minimal amount of polygons while still being able to depict the idea of the model.
These models are typically simple looking with lots of straight faces as that's what happens when you reduce the number of polygons allowed. Simple but not ugly, the creator aims at stopping at a the right amount that balances the low poly look while being nice looking.

(Low poly dinosaur by @Olaf "Olaf")
Sometimes models only simulate the looks of low poly, without being low polygon. In that case it's best to speak about simili/imitating/fake low poly to avoid confusion and to limit misuse.
Wireframe: This is a technique that aims at showcasing the mesh itself. The original model's information gets removed and a new model get's made around the mesh it had. This is really a meta-structure as since a new model had to be made, a new mesh had to be made as well (a meta mesh being a mesh of a mesh).
Voronoi: A variant of wireframe is voronoi, generally it looks more organic but it can exist in a wide range of looks. From a creation standpoint it's really not that different as voronoi is simply wireframe but on a variation (it's dual) of the mesh instead of the mesh itself.
A typical example of voronoi is:

(Cat Stretch Voronoi Remix by @Peter "Peter")
The variation is called the dual of the mesh. The principle is that each point becomes a face and each face becomes a dot in the dual model. All the faces that were adjacent initially are connected with an edge in the dual graph.
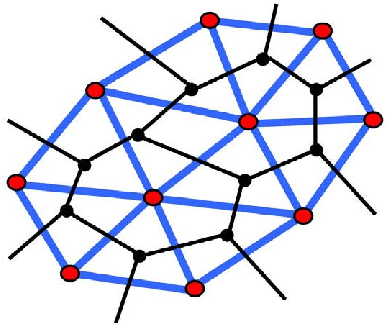
(Image from: Tang, Qian & Ren, Yu. (2020). Preliminary Discussion on the Refinement Mesh Generation for Adaptive Analysis. Journal of Applied Mathematics and Physics. 08. 1560-1567. 10.4236/jamp.2020.88121.)
On the images, the wireframe mesh is in blue while to voronoi mesh is in black.
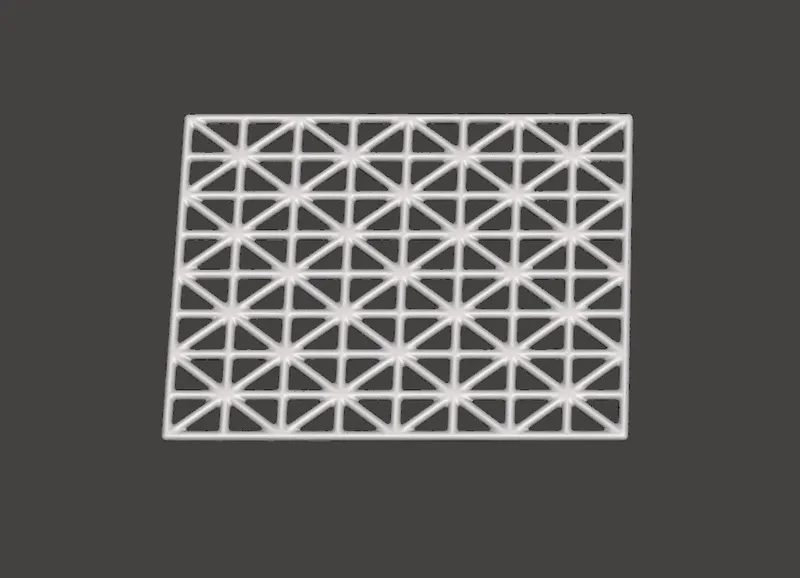
To illustrate the relation of wireframe and voronoi I had made this model in the past showing it in 2d. I also added an image of the similar idea on a 3d egg: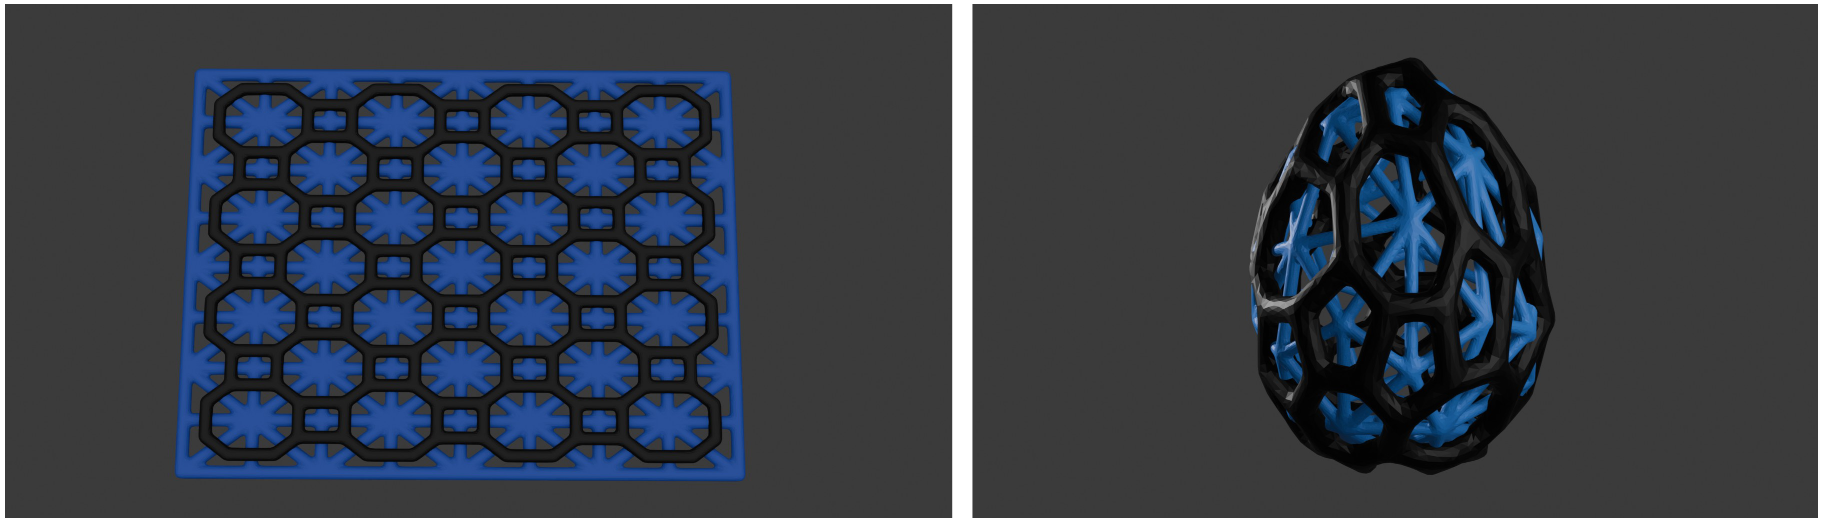
Creation
General idea
Applying the wireframe/voronoi/... transformation is quite trivial, the key to making interesting models is the pre-processing of the mesh beforehand:
- Base model:
To start the process you need to find a wished model. It might not be designed for 3d printing, so you will maybe need to solidify, fix, decimate, ... the model first to make it suitable for remixing.
- Sizing:
Think about the final size of your print already at this point, make sure to properly scale your model at this point to have a better oversight of the parameters later on.
Reducing & editing:
Once at the right size, you can start thinking about transforming the model into a mesh-model.
Begin by reducing/decimating the model a lot.- If your goal is wireframe stop at a low poly model. Note that the result will come out better than what the tool tries to render for the solid as the program might misinterpret the connections, some keep flat faces while it should be more rounded for example.
- If you seek voronoi however, don't hesitate to go beyond what is nice-looking when you decimate/reduce, the voronoi transformation will improve the look of the model at low polygons as it changes the mesh.
Ideally reduce as much as possible while keeping a good look for any style you plan to make. Note that there are different ways of decimating/reducing models that you can use.
Manually editing the mesh can also be nice to avoid bad-looking results or issues. You can also remesh portions of the mesh in the same idea.
- Applying the pattern:
Apply now the wireframe or voronoi pattern to you model. If your mesh was too dense the wireframe and voronoi patterns will be too dense as well. Remember that the mesh edges have no diameter at the start but once the pattern applied it will have one, which will have an impact on the holes. There is a direct correlation with the size as well, for the same wire diameter the holes will be bigger if the model itself is bigger.
My process
- Finding a model:
I start by looking in common 3d printing sites (printables,makerworld,...) for a suitable base model, I help myself also with search tools like yeggi that regroup the findings in most of the older sites as well. I will give priority to models with less restrictive licences as I prefer this kind of mentality, personally.
If I am not really satisfied, I look into 3d modelling sites like sketchfab,... . These models will require more work but at the same time can offer a truely new model to the 3d printing community which is always nice.
Finally if I really don't find my idea, I will try to make it myself with eventually the help of AI as I am not yet proficient in sculpting myself.
- Make the model 3d printable:
I mostly use blender and meshmixer to fix issues with the model but fusion360, the slicer and other tools can also be used sometimes as well. The main changes are solidifying, sculpting, remeshing, fixing holes, reorienting parts of the model, flattening the base, separate the model in multiple parts, ... .
- Resizing:
I consider that a good size for a decoration piece is around 10 cm in each dimension, I try to hover around these sizes for my mesh models. With a wire size of 2-3mm this gives usually suitable holes.
- Reducing
From this point I recommend keeping some backup file as this is really an experimental process, you might have to come back to decimate more or less after having tried your pattern later.
This can be as simple as going into meshmixer and reducing your model by 99%. Sometimes 99% isn't enough so you can do reduce a second time to refine it more.
A more complex strategy is to reduce the model till right before you see a visible change in the geometry itself, not the mesh. Then you can for example continue to refine this in blender as while meshmixer's reducing is better at preserving the shape, blender's tool does a better job a removing the smallest parts.
In practice you play around with the mesh till you have something that works for the next step. Going back and forth between these 2 steps (with eventually some edits in between) will allow you to find the best compromise.
Applying the pattern
I have used 2 ways in the past to make those kinds of models:- Meshmixer has the advantage of having a built-in pattern maker that blends the edges nicely together. It has become my main way of applying the pattern
- Blender (with geometry nodes) has the advantage that you can make wireframes on non-triangular meshes as well as having the wire being non-tube shaped.
Obtaining the dual mesh for voronoi is simply a geometry node to add in blender while in meshmixer is a parameter to toggle.
In meshmixer the whole process is done in a straightforward way, just select the tool, tweak the parameters and apply the pattern.
In blender you need to make a custom geonode system similar to this:
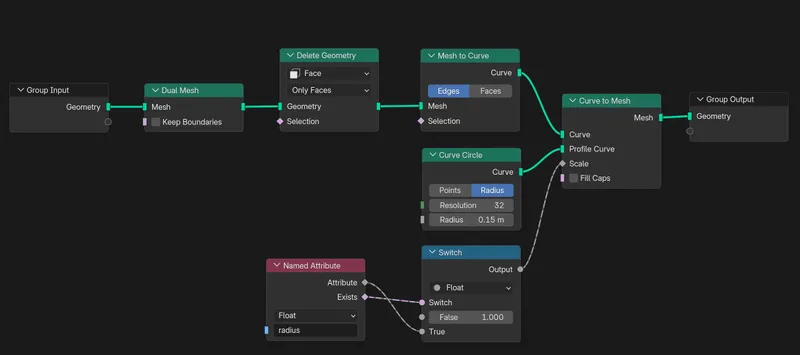
I use a thickness/diameter of 2mm for the mesh wire size by default as it's strong enough for printing while keeping the holes as large as possible. In case I want more strength I use a wire size of 3mm.
- Meshmixer has the advantage of having a built-in pattern maker that blends the edges nicely together. It has become my main way of applying the pattern
Side techniques
Voronoi works on planes, you don't need a fully closed model. This is great to realise as it can help you removing unnecessary voronoi structure where you don't want it.
- Extrude the bottom of your model by 1mm (for 2mm wire size) and make a hole at the end and you will obtain a nice hole in your final result surrounded by a thick rim, ideal for allowing supports to easily get removed.
- By using only a plane you avoid voronoi being doubled up on thin walls
You can combine your voronoi model with the model before you applied the pattern (eventually resized a bit) on it to obtain models that I called voronoi skin. These allow you to combine the look of voronoi but remove a lot of overhangs to make it much easier to print.

Contact surface with the printbed is already tricky in voronoi models, do yourself a favour and cut the bottom of the mesh flat. However, doing this after you applied the voronoi pattern will weaken the mesh. I recommend extruding before and accepting a thicker bottom mesh than a thinner one.
Remarks
The creation of mesh models seem to cause more negative comments/reviews than others due to being more difficult to print and to clean-up.
Be aware of this, be sure you can handle this before publishing such models. Personally it doesn't affect me and I even make this article to simplify the resolution of these issues.
In the same idea, be aware that some users also like to turn your models into trash-bins for printer waste.
It surprised me at first but no negative intent seem to come from this. I don't mind either but fear sensitive creators might be affected by seeing their art considered as a trash medium.
Printing
Common pitfalls
Printing mesh models (wireframe,voronoi,...) is trickier than your average model, the wirelike structures don't suit themselves to strength constraints for example, but it can certainly be made easier by avoiding these common issues:
- Don't scale mesh models down! While the creator isn't expected to handle all scales of his model, most models can be printed smaller than what the creator made available. Indeed, the current scale could, for example, simply have been chosen to ease printing. When small parts are involved however, this might also realistically be the smallest viable scale instead. This is the case for mesh-like models like wireframe or voronoi. The wire size is critical in those models, if it's too small they will simply break off either during printing or when removing supports. Simply scaling down the model will also scale down this wire diameter which will probably make it unprintable, a better way is look/ask for a smaller version directly.
- Supports are needed, don't neglect them! Ideally supports wouldn't be needed and in some cases it's true but usually supports are required for the print or at least really recommended for a good print quality.
Support will also often go inside of the voronoi model and thus be annoying to remove but it's a necessary evil to be able to print these kinds of models. The most frequent fails arise because user have simply turned of or reduced the supports suggested by the creator. While you usually can get away with small reductions as creators need/want to be extra safe, this is usually a bad idea in mesh models.
Note that multi material printers can already simplify this process by using different filament types for the supports like PLA with PETG or directly water soluble supports like PVA.
- Tiny wires make bad print bed adhesion. In voronoi there is usually not a lot for the print bed to grab onto. A brim is usually necessary, ignoring this can lead the print to get dislodged mid-print.
- Not all filaments are made equal. Certain filaments like silk PLA, matte PLA, ... exist for aesthetic reasons but have lost strength comparing to regular PLA for example. Of course weaker filaments are a worse choice for models with small parts that already are fragile in regular circumstances.
- A mesh model is like a regular model on steroids: common issues are amplified. Of course like all models the printing result can suffer from bad quality/too wet filament, over-due maintenance, an unclean printbed, bad print environment,... .
These issues are even amplified in mesh models as the wires are thin and the lea-way is small.
Supports removal
As mentioned previously, supports are not to neglect but they can nevertheless be annoying to remove. Supports difficulties are the main source of questions related to voronoi models for me. This is my usual method to remove them:
Before starting:
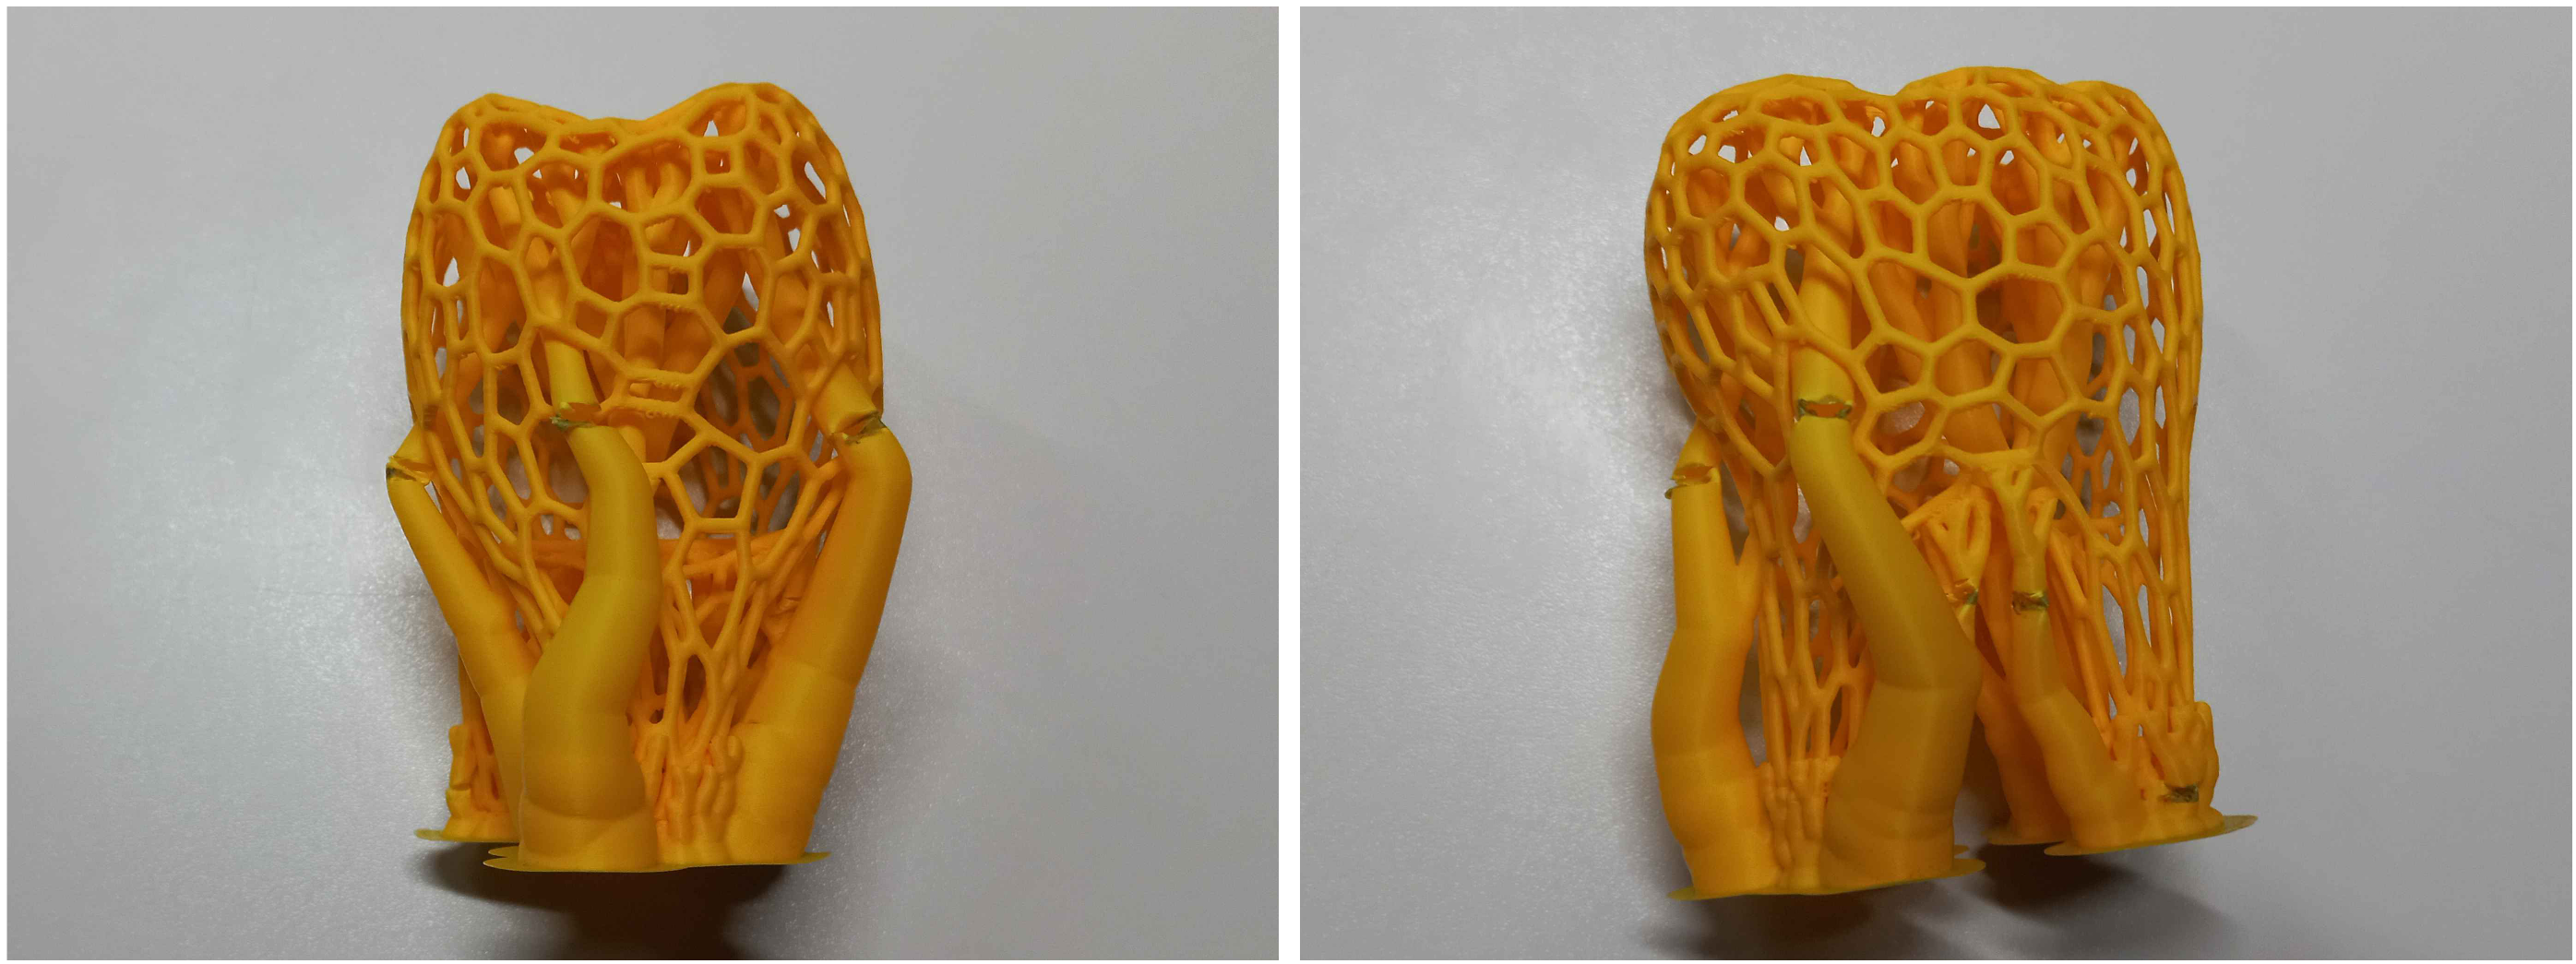
Please note that the supports were exaggerated for this demonstration.
I have drawn lines in black on my model to show future cuts, they are of course not a part of the real process.
You will generally only need a flush-cutter and a small screwdriver to remove supports

Thin tweezers and bigger cutters can be useful as well in some occasions.
The main idea is to avoid using force when possible as the mesh can be fragile, especially with weaker filaments like silk or matte PLA.The model is printed and removed from the print plate
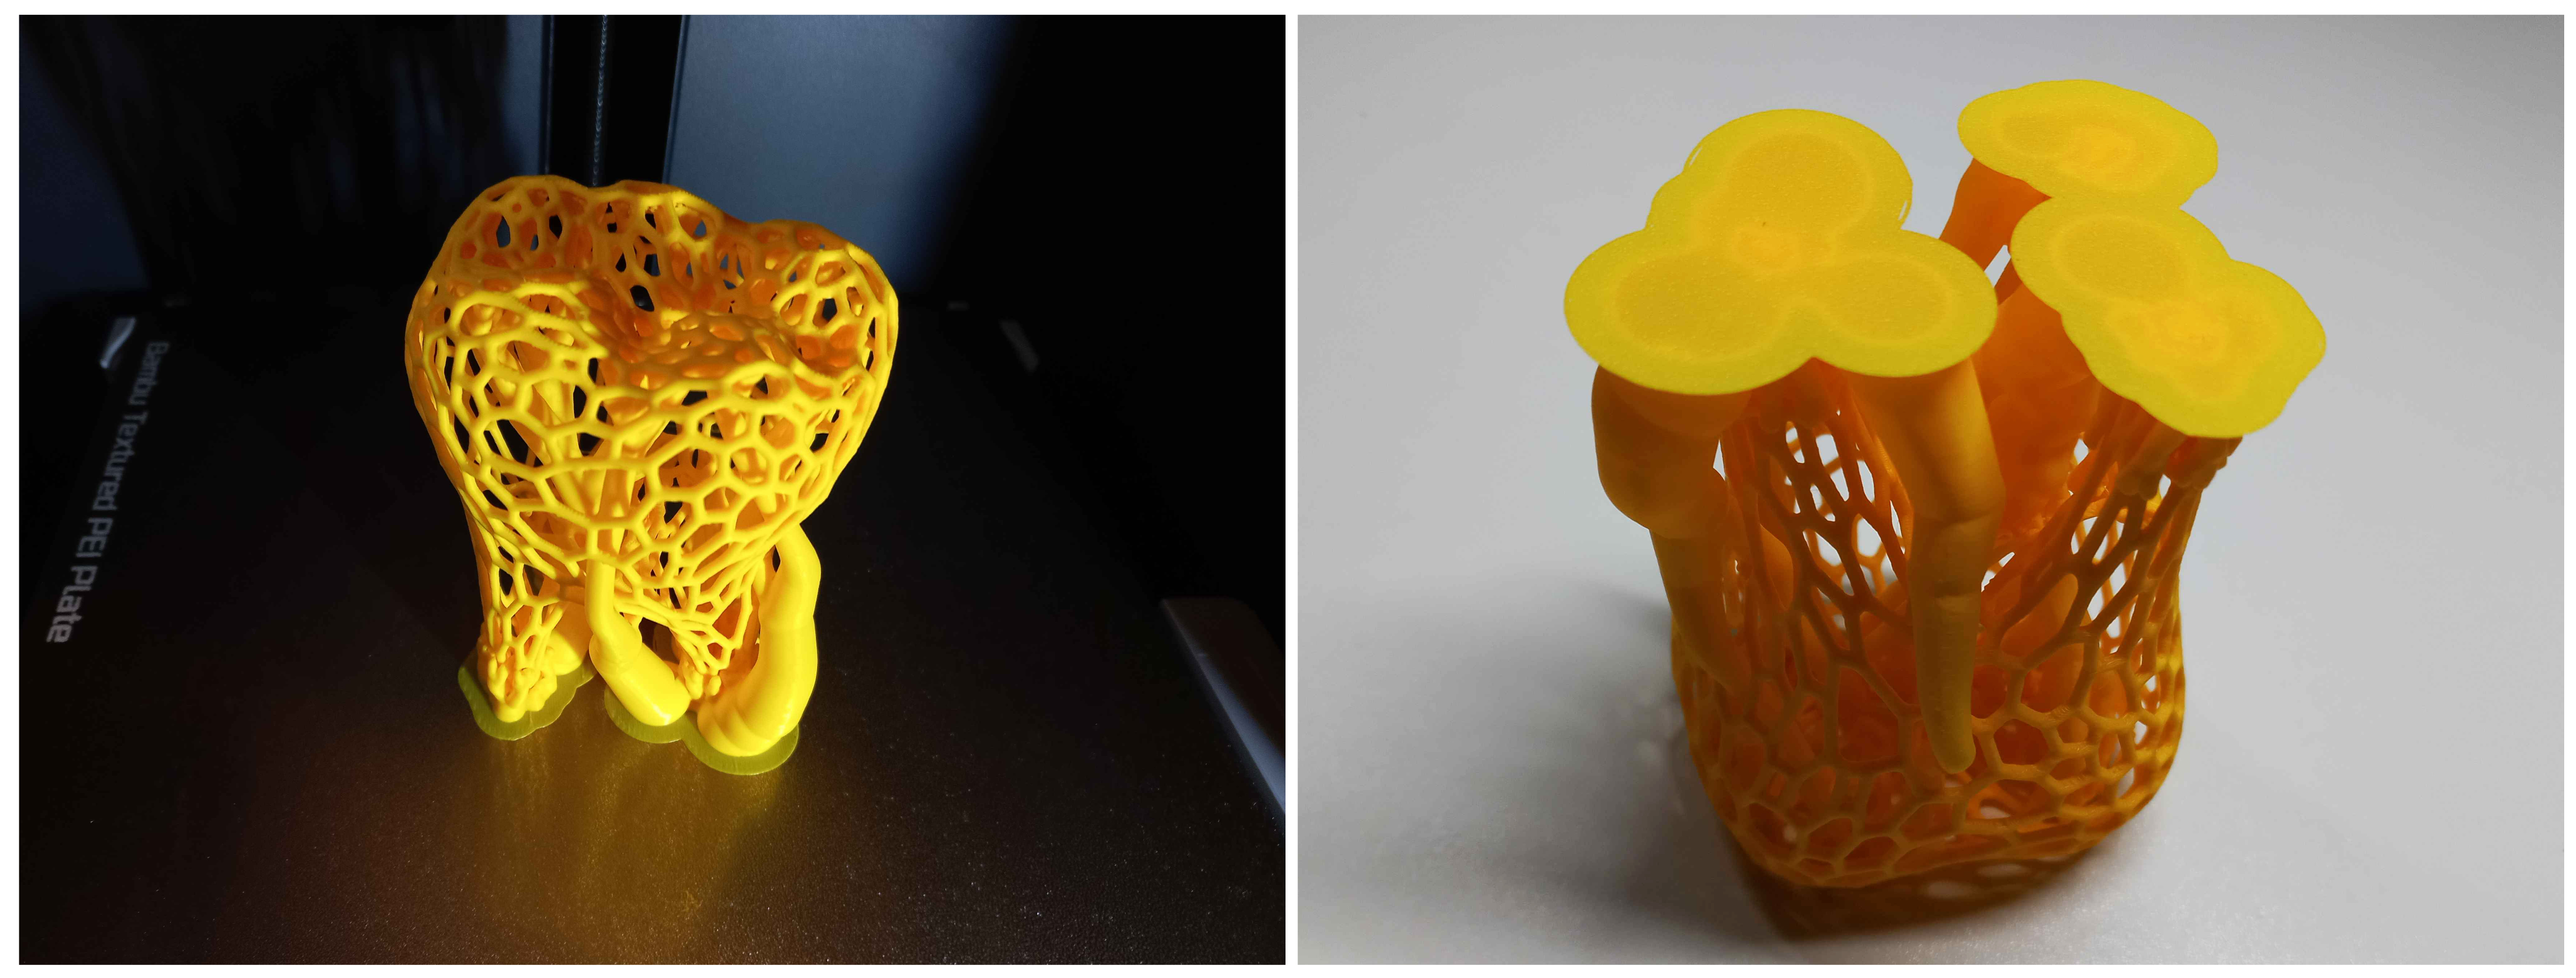
Cut the tree supports as high up as possible, don't pull yet
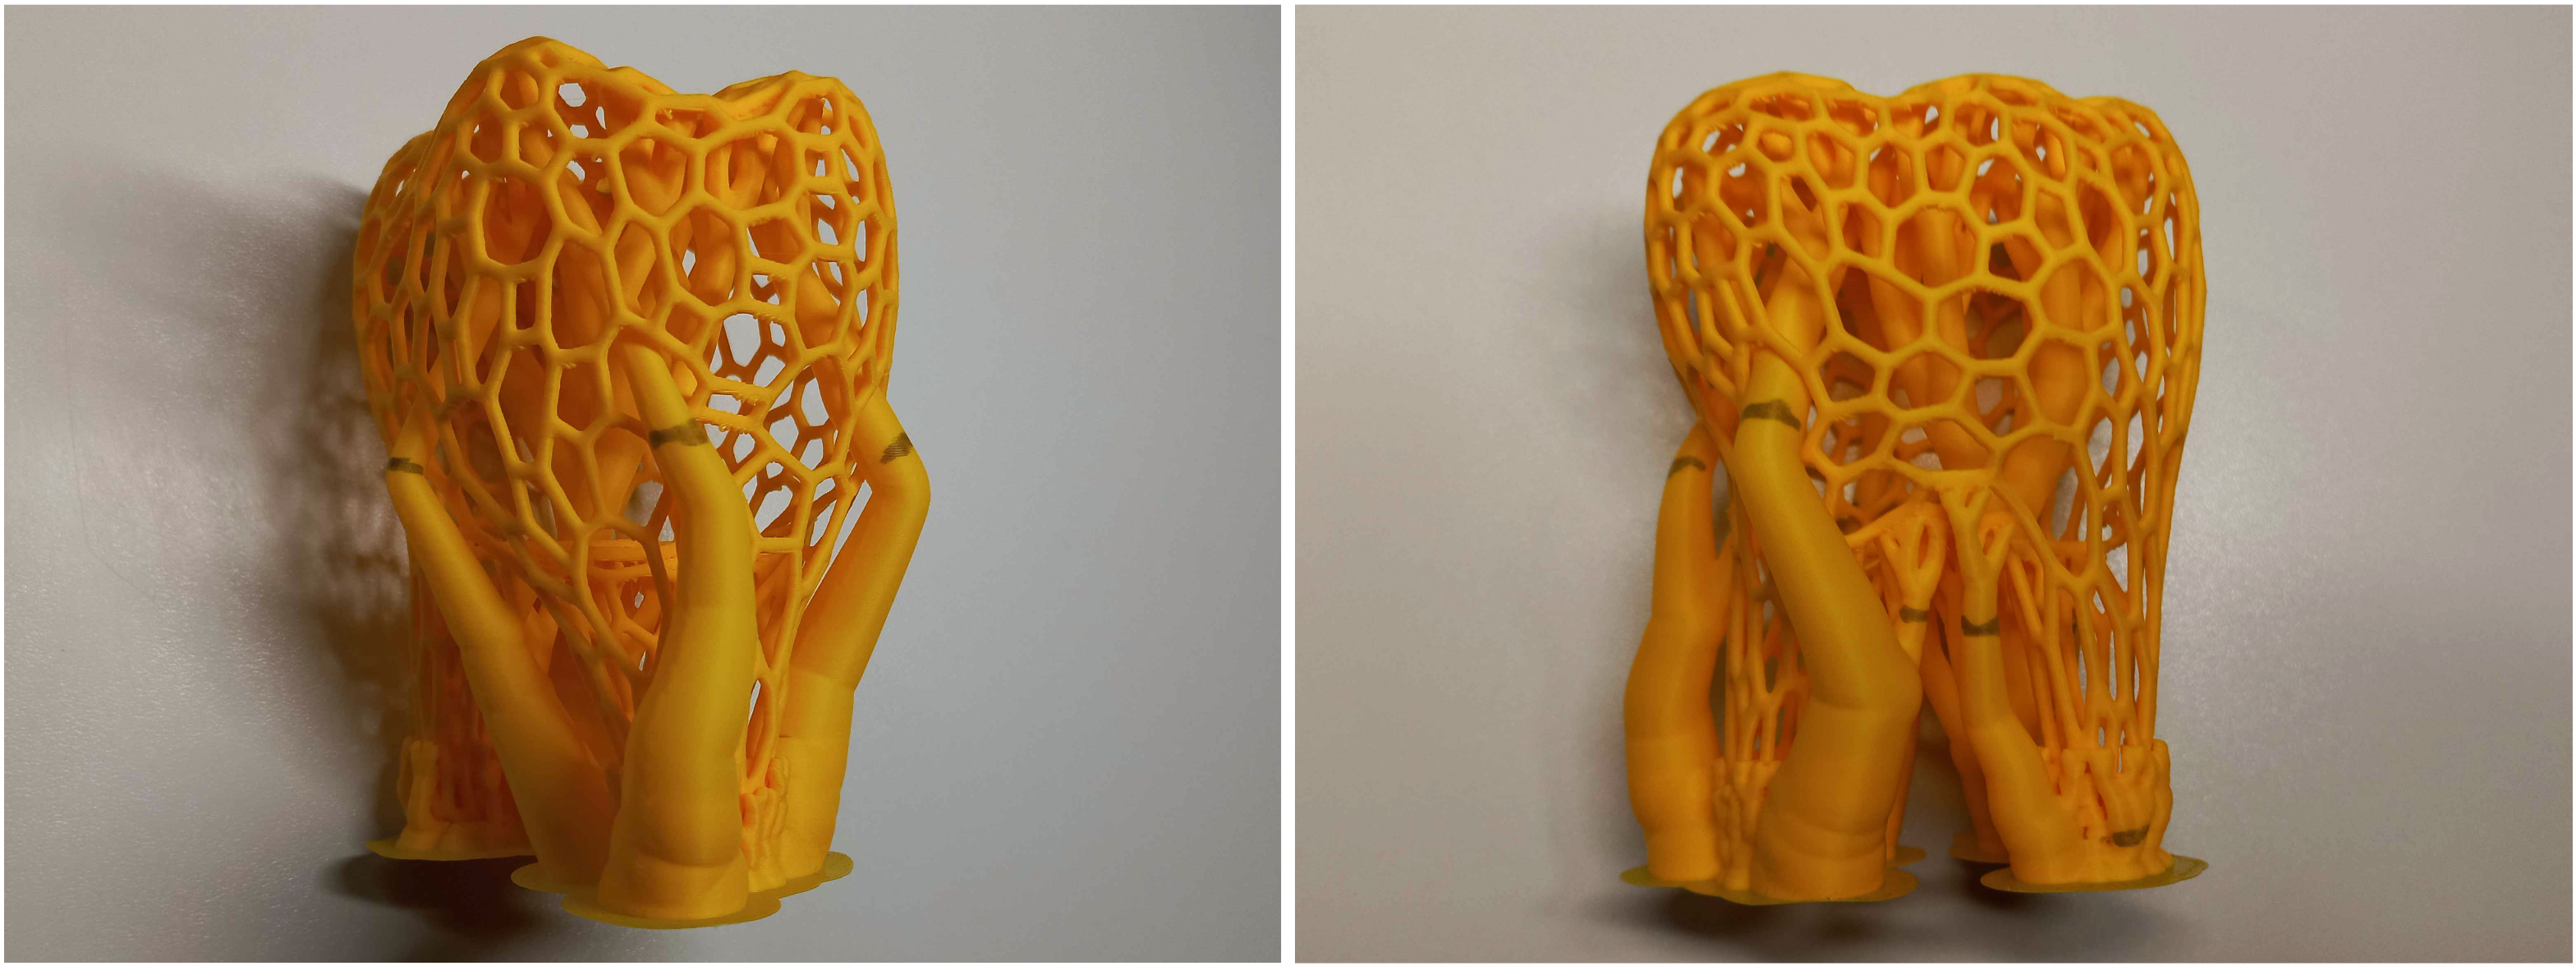
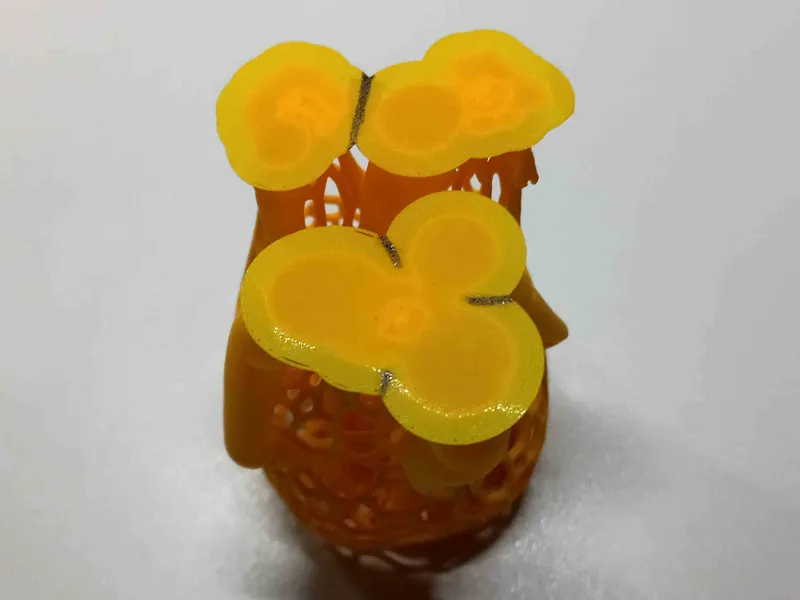
cut the brims and separate the bottoms of the trees
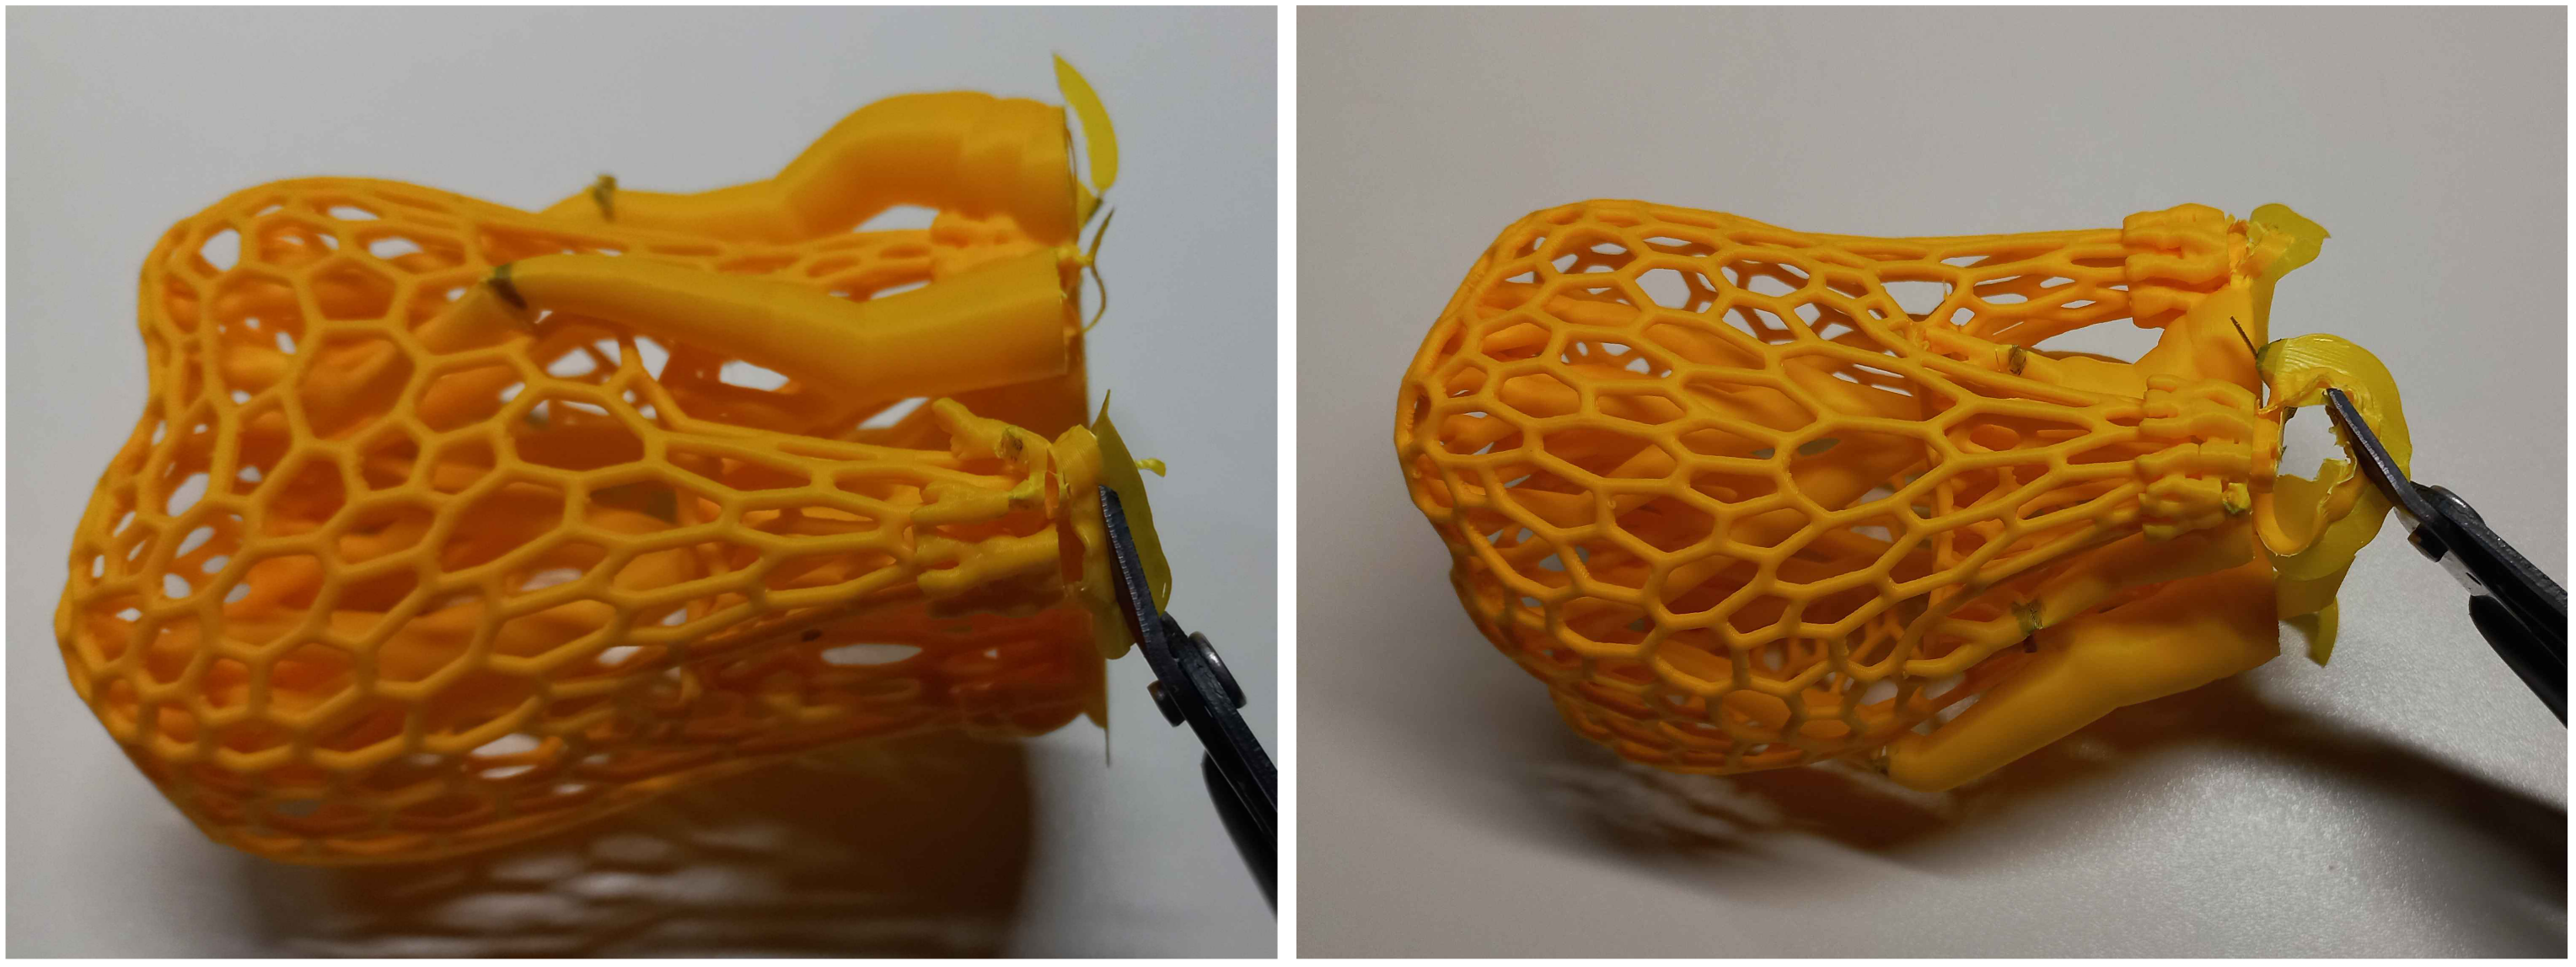

Continue the idea by cutting into the trunks of the trees to separate further.
Once a trunk is cut, you can pull away the loose parts.
Start with the one's on the sides and continue with the more in the center afterwards (repeat if needed).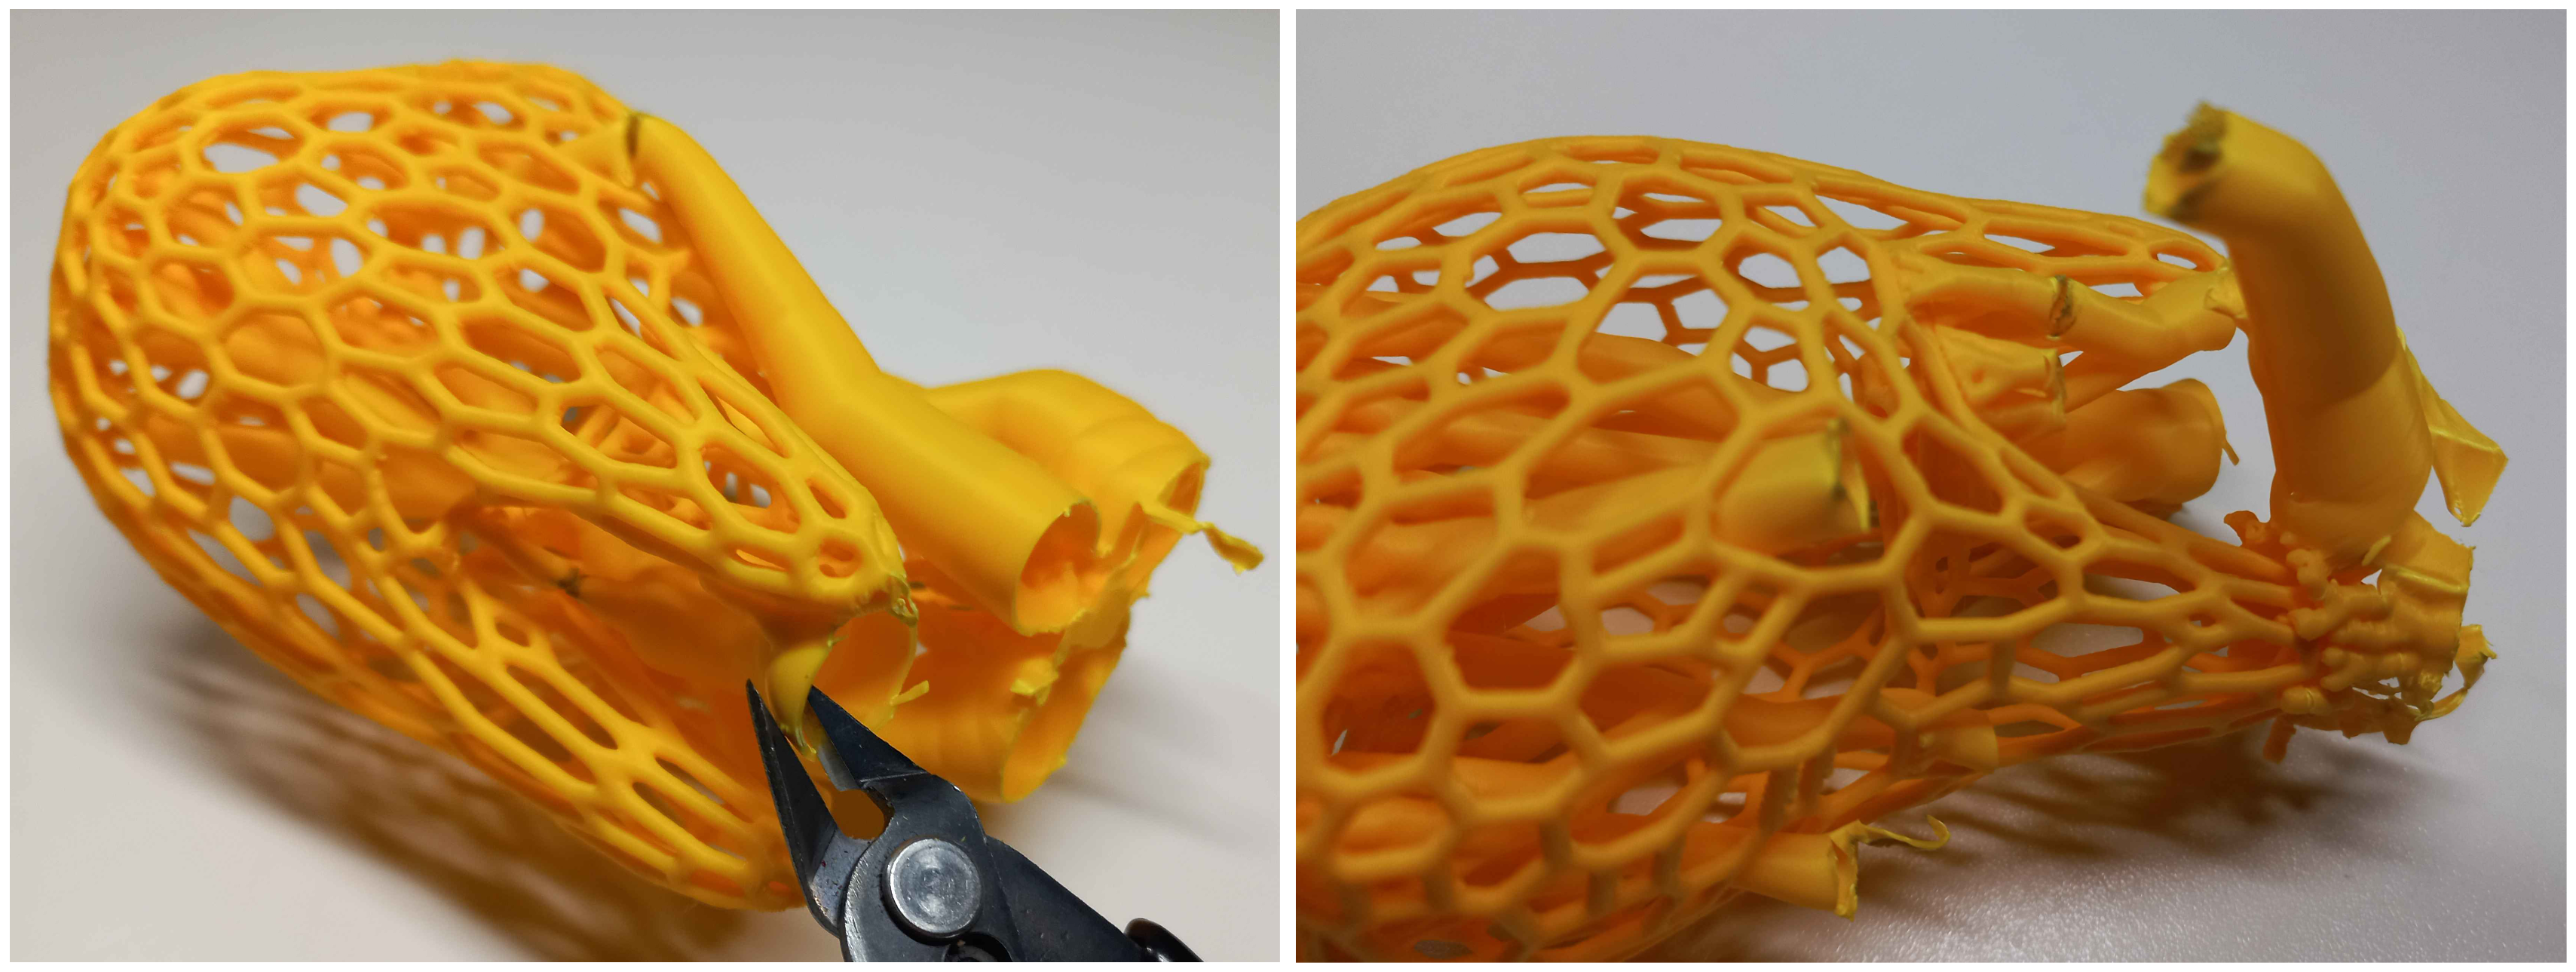
repeat until all external supports are removed
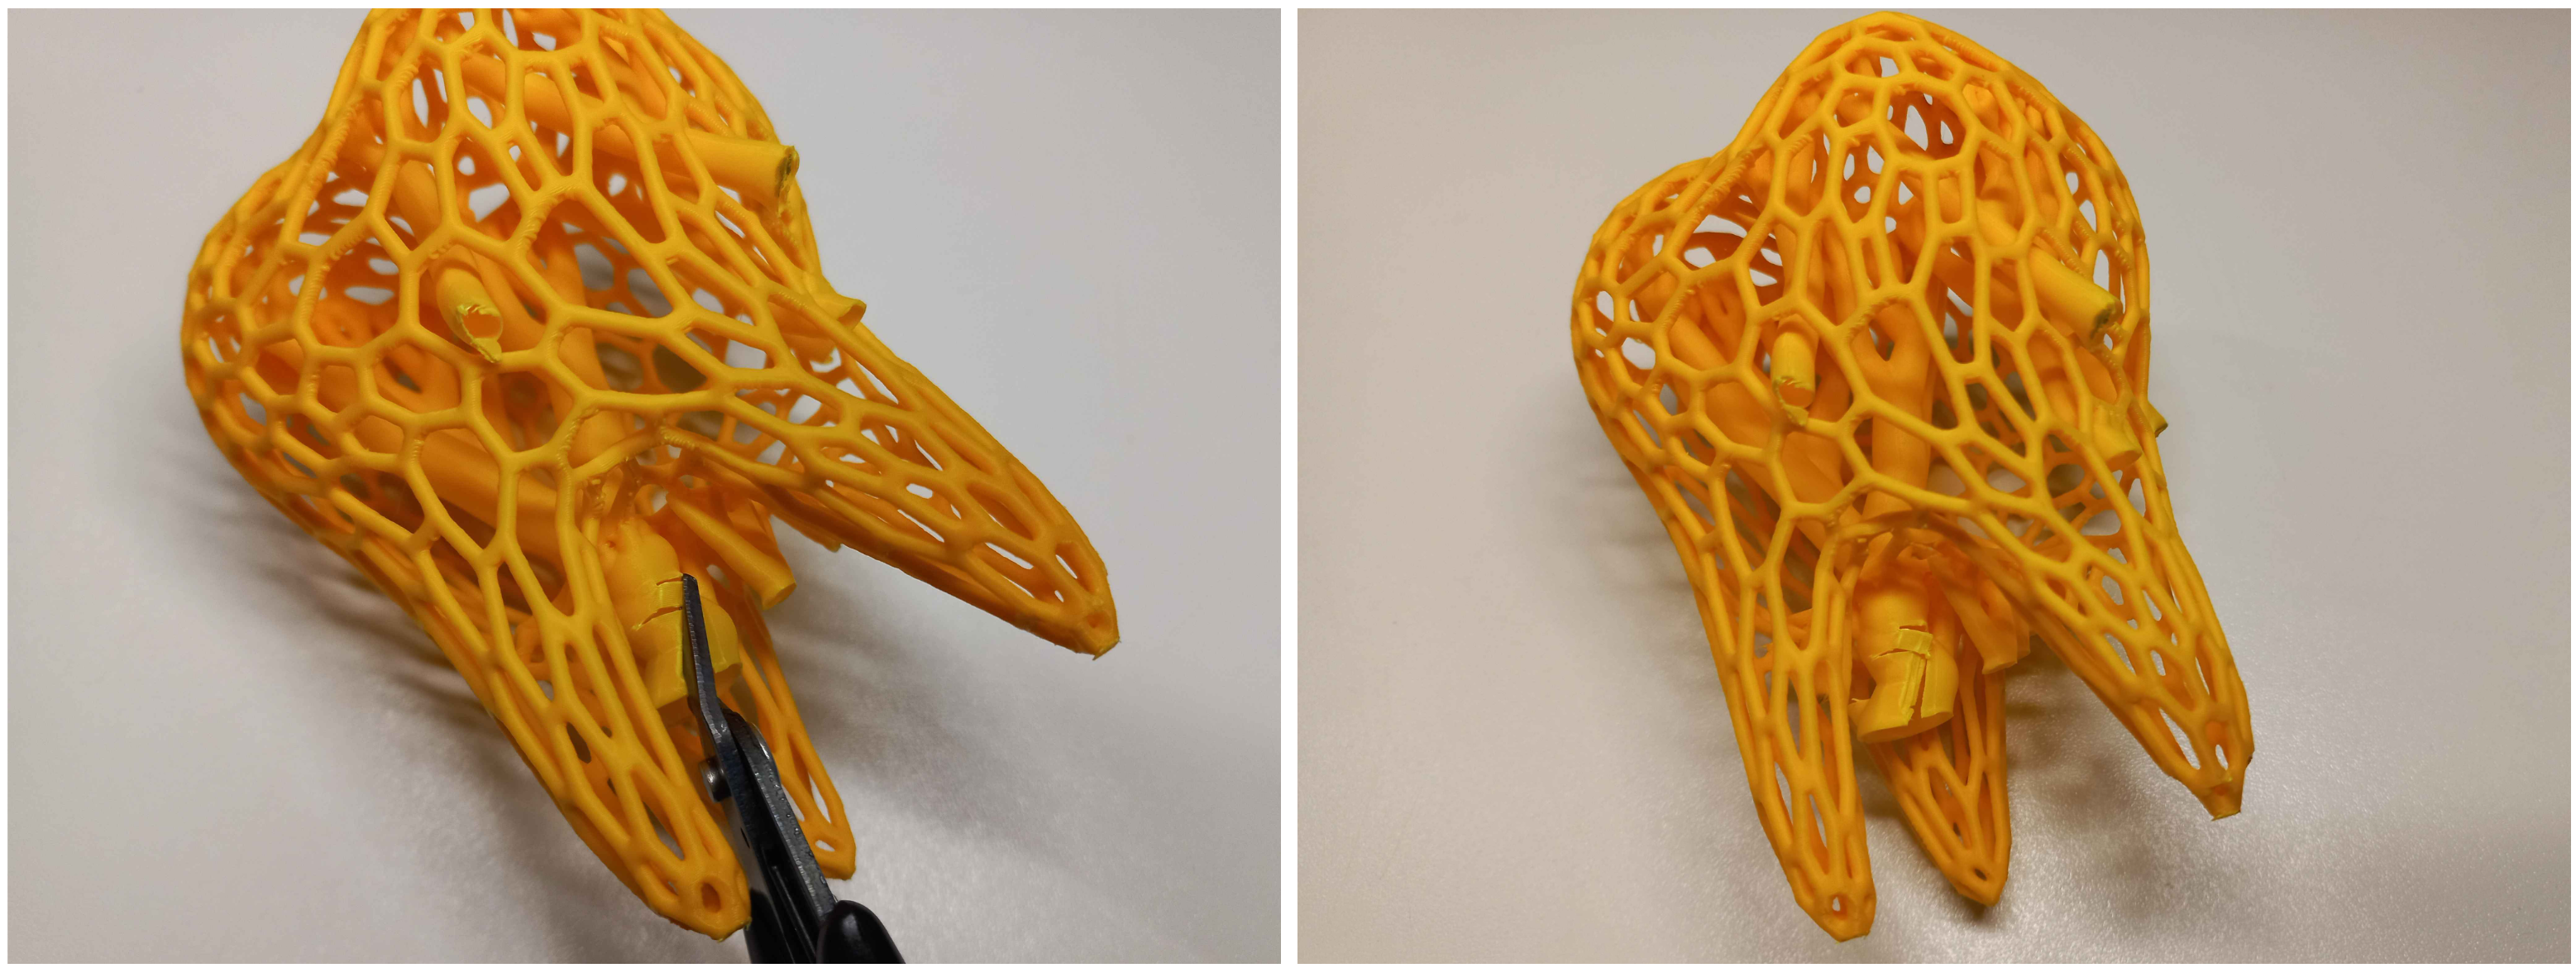
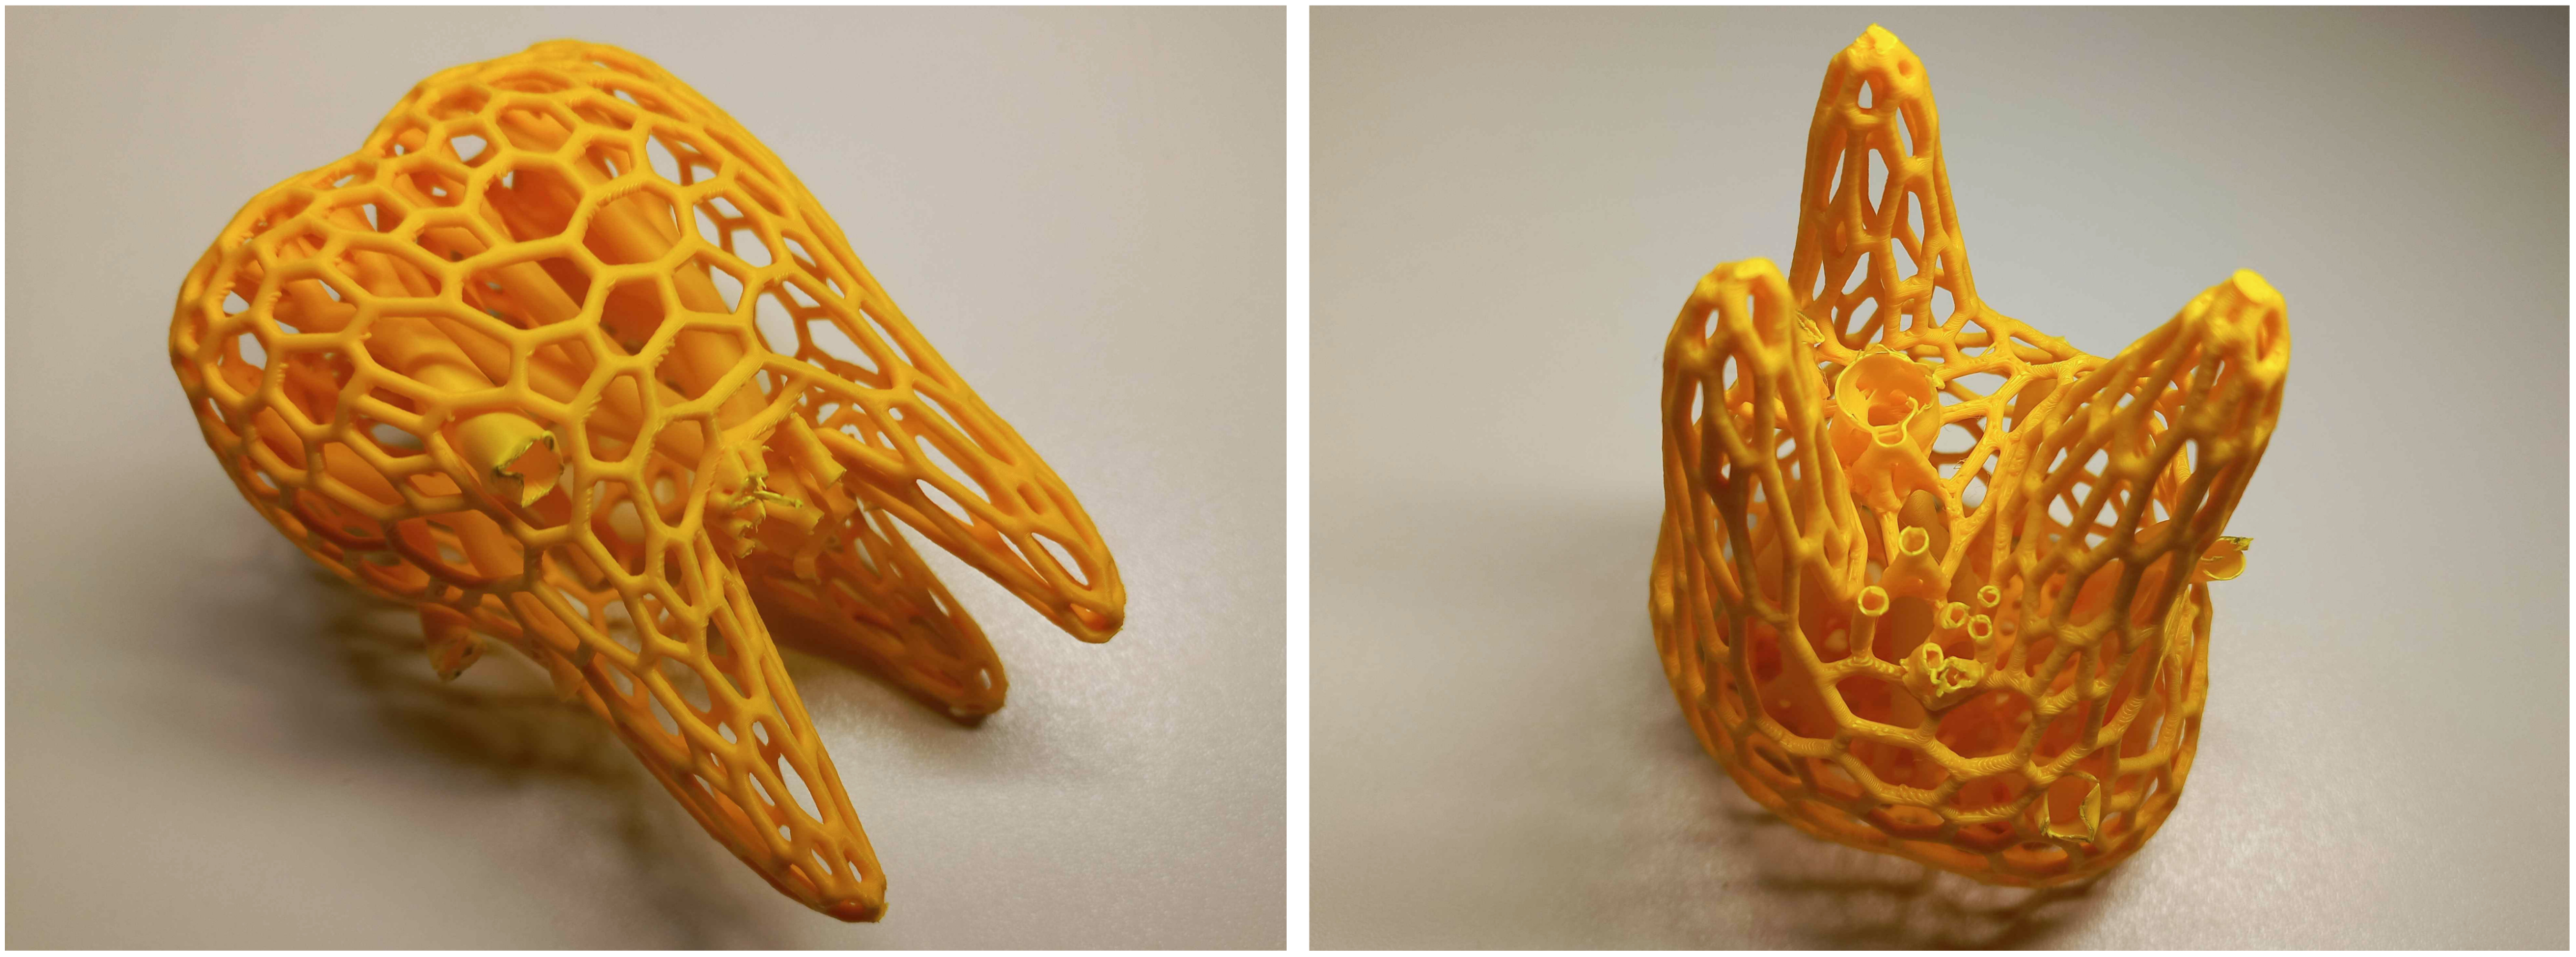
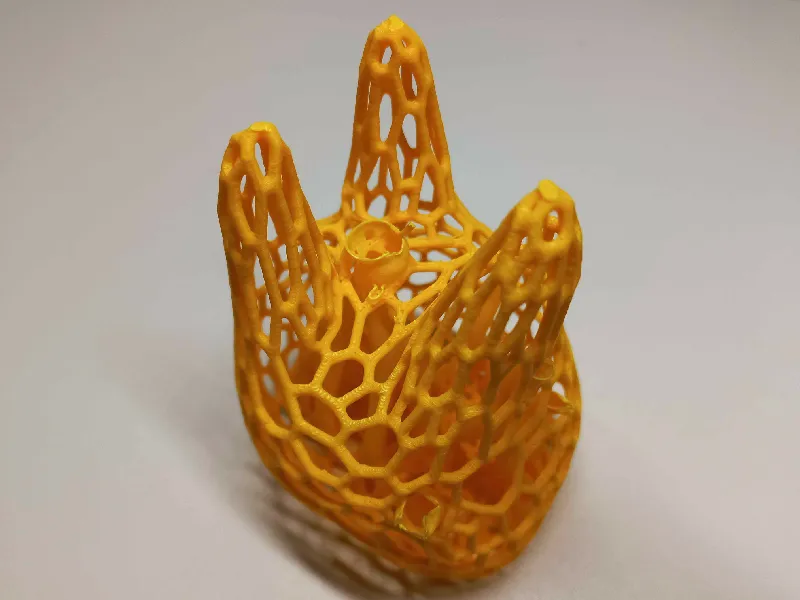
At this point you should only have internal supports left.
The main idea is to break them loose then to shake the model so that the loose parts poke out of the model so that you can cut them off bit by bit.

To get rid of them you can start by pushing at their lowest point in the hopes to break their top loose through leverage
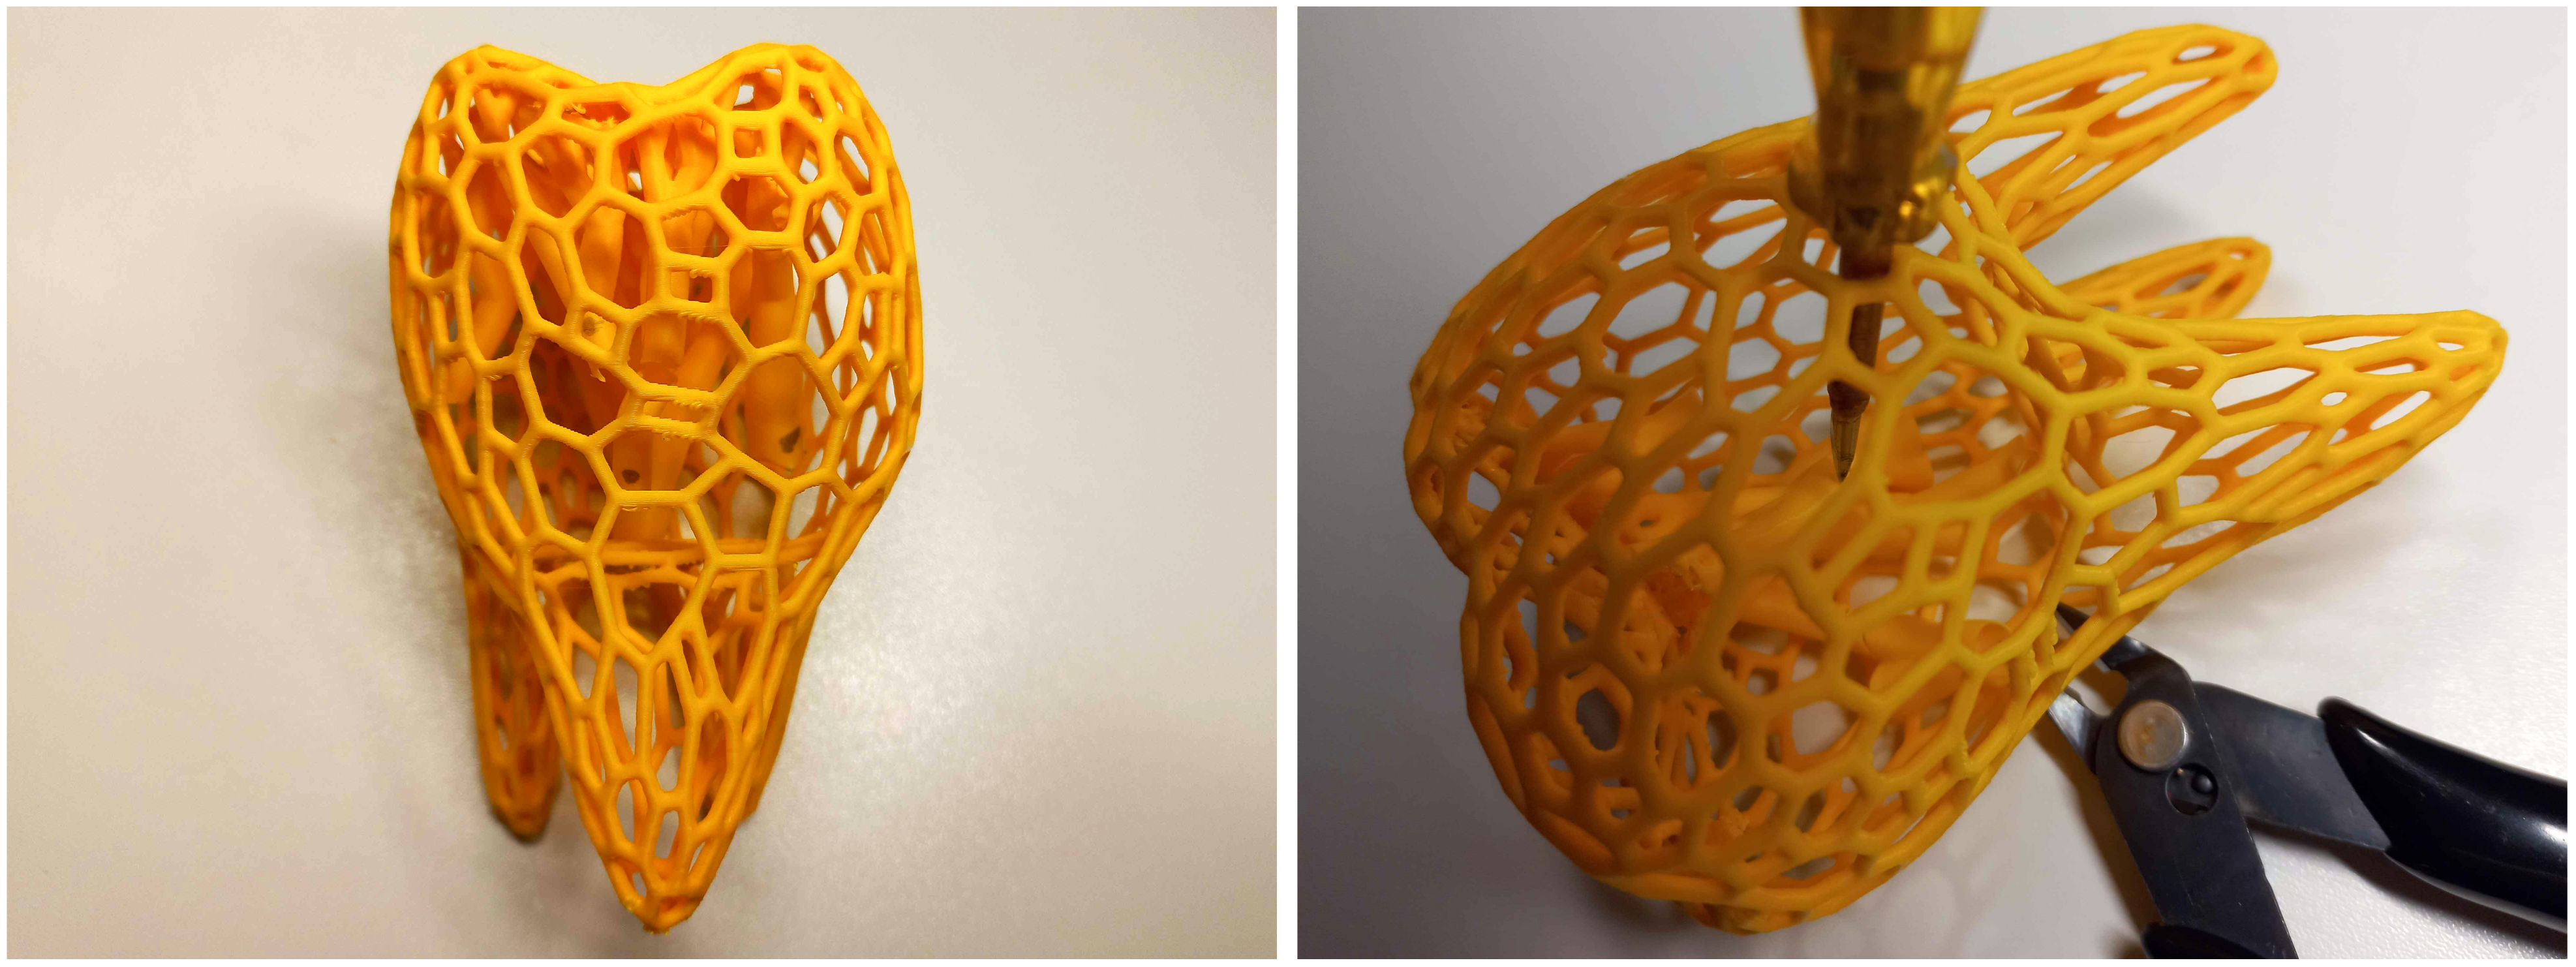
(ignore the flush cutters)
you can also push directly onto their tops and try to beak them loose from the mesh. Sliding in between the mesh and the supports will break them apart further.
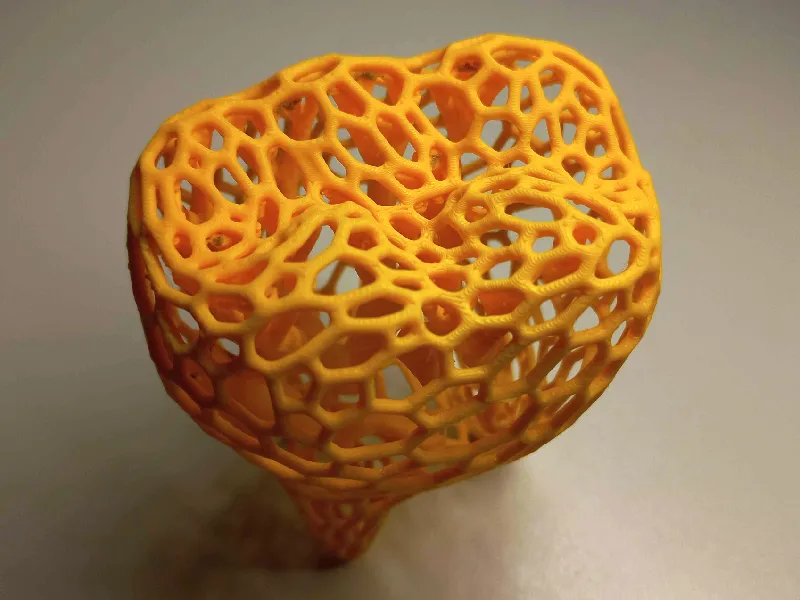
trying to break the trees sideways though leverage can also be a good method but try to then rest onto your other hand to avoid putting force on the mesh itself.

(doesn't rest on hand on this image [for the picture] but recommended & ignore the flush cutters)
Once some tree parts are loose and poking out, cut them, ideally separating branches to make them thinner.
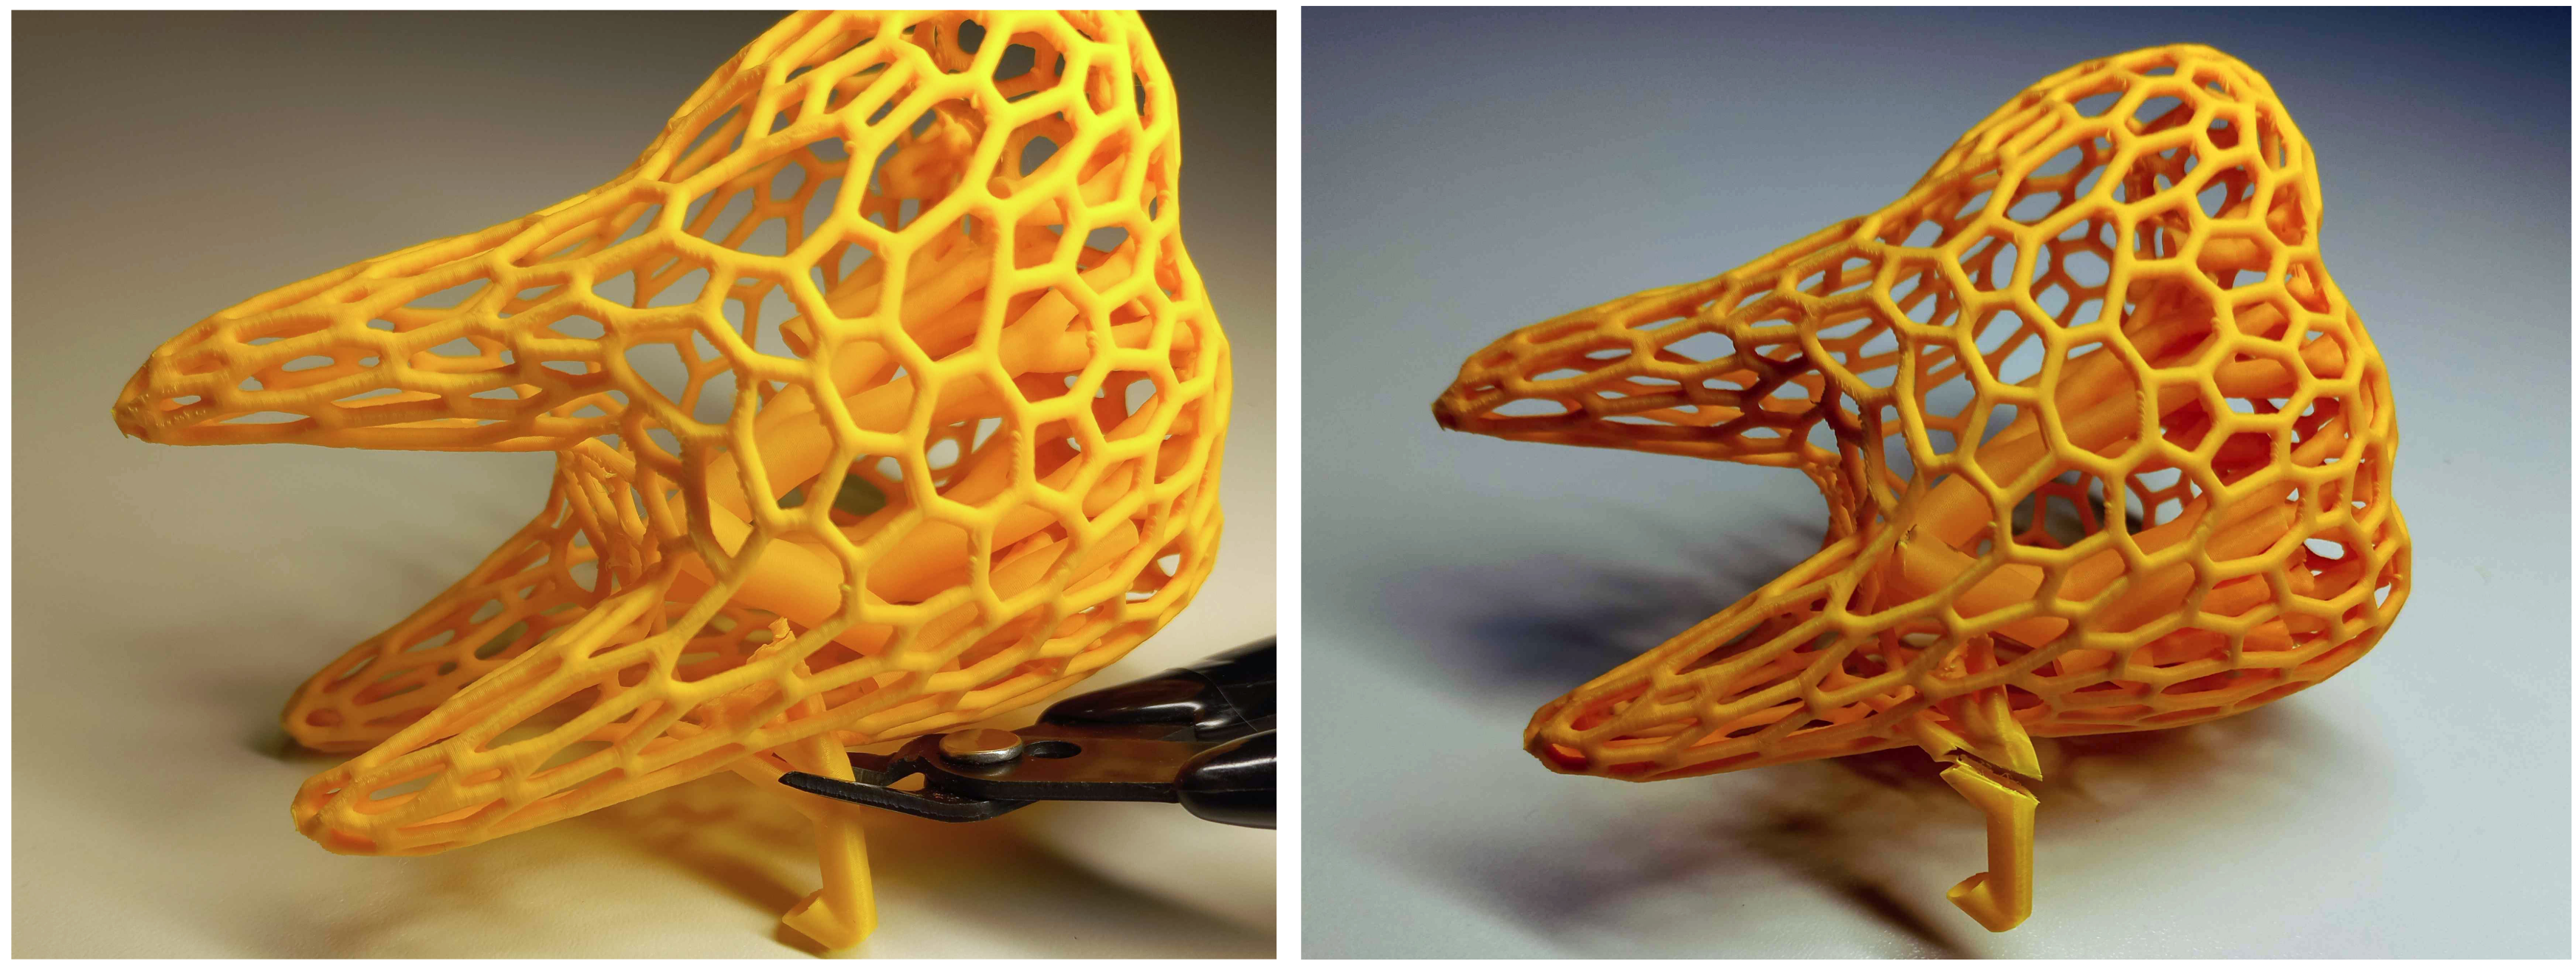
Of course you can use your screwdriver to persuade the trees to come out at the same time

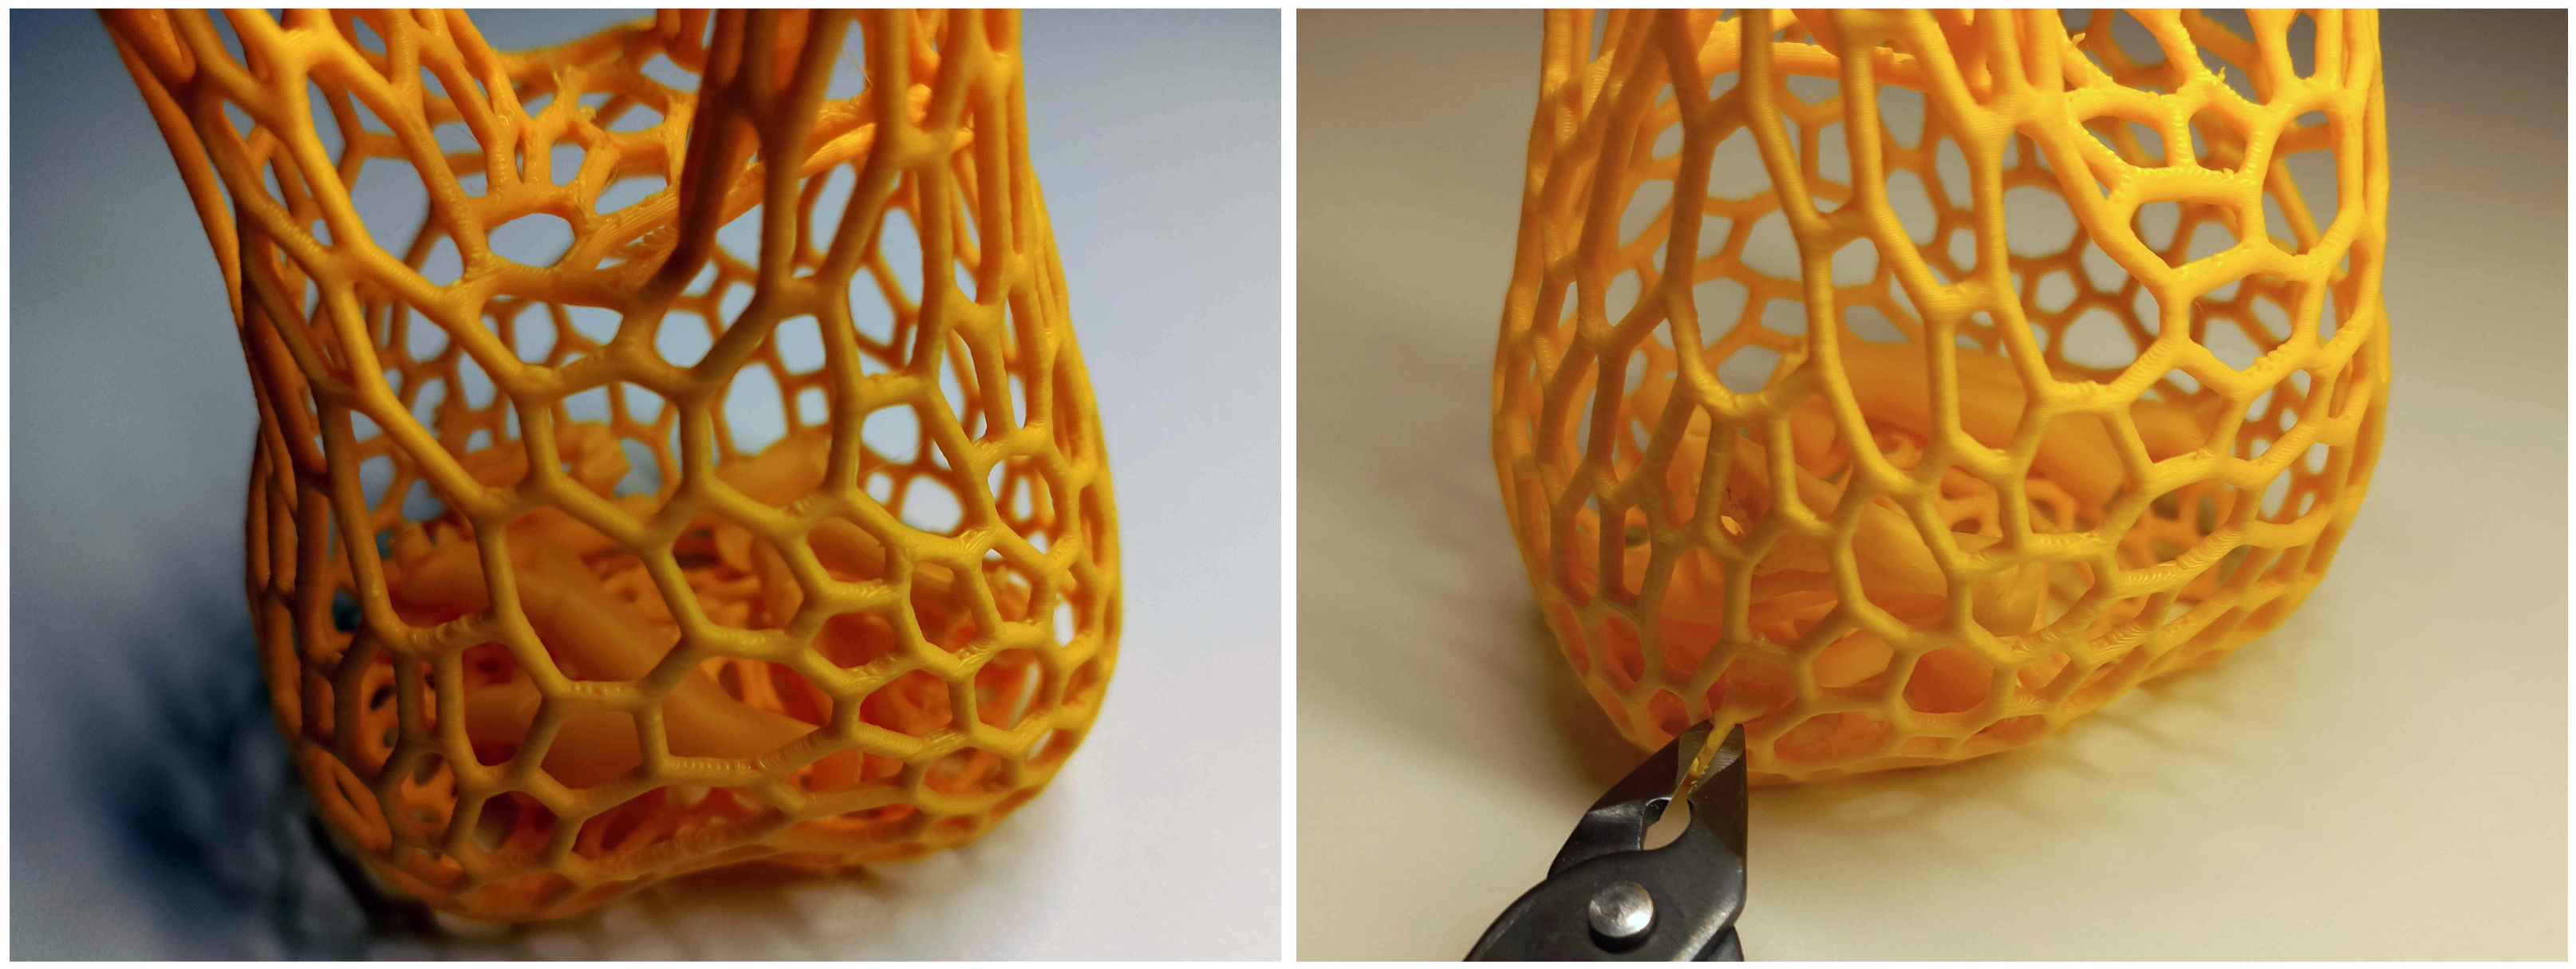
Do this till all supports are loose inside.
Once everything is loose you can focus on simply reducing the size of the parts (through the poking out technique) in other to get them out
Once done you should have a totally empty model and a pile of supports in small pieces
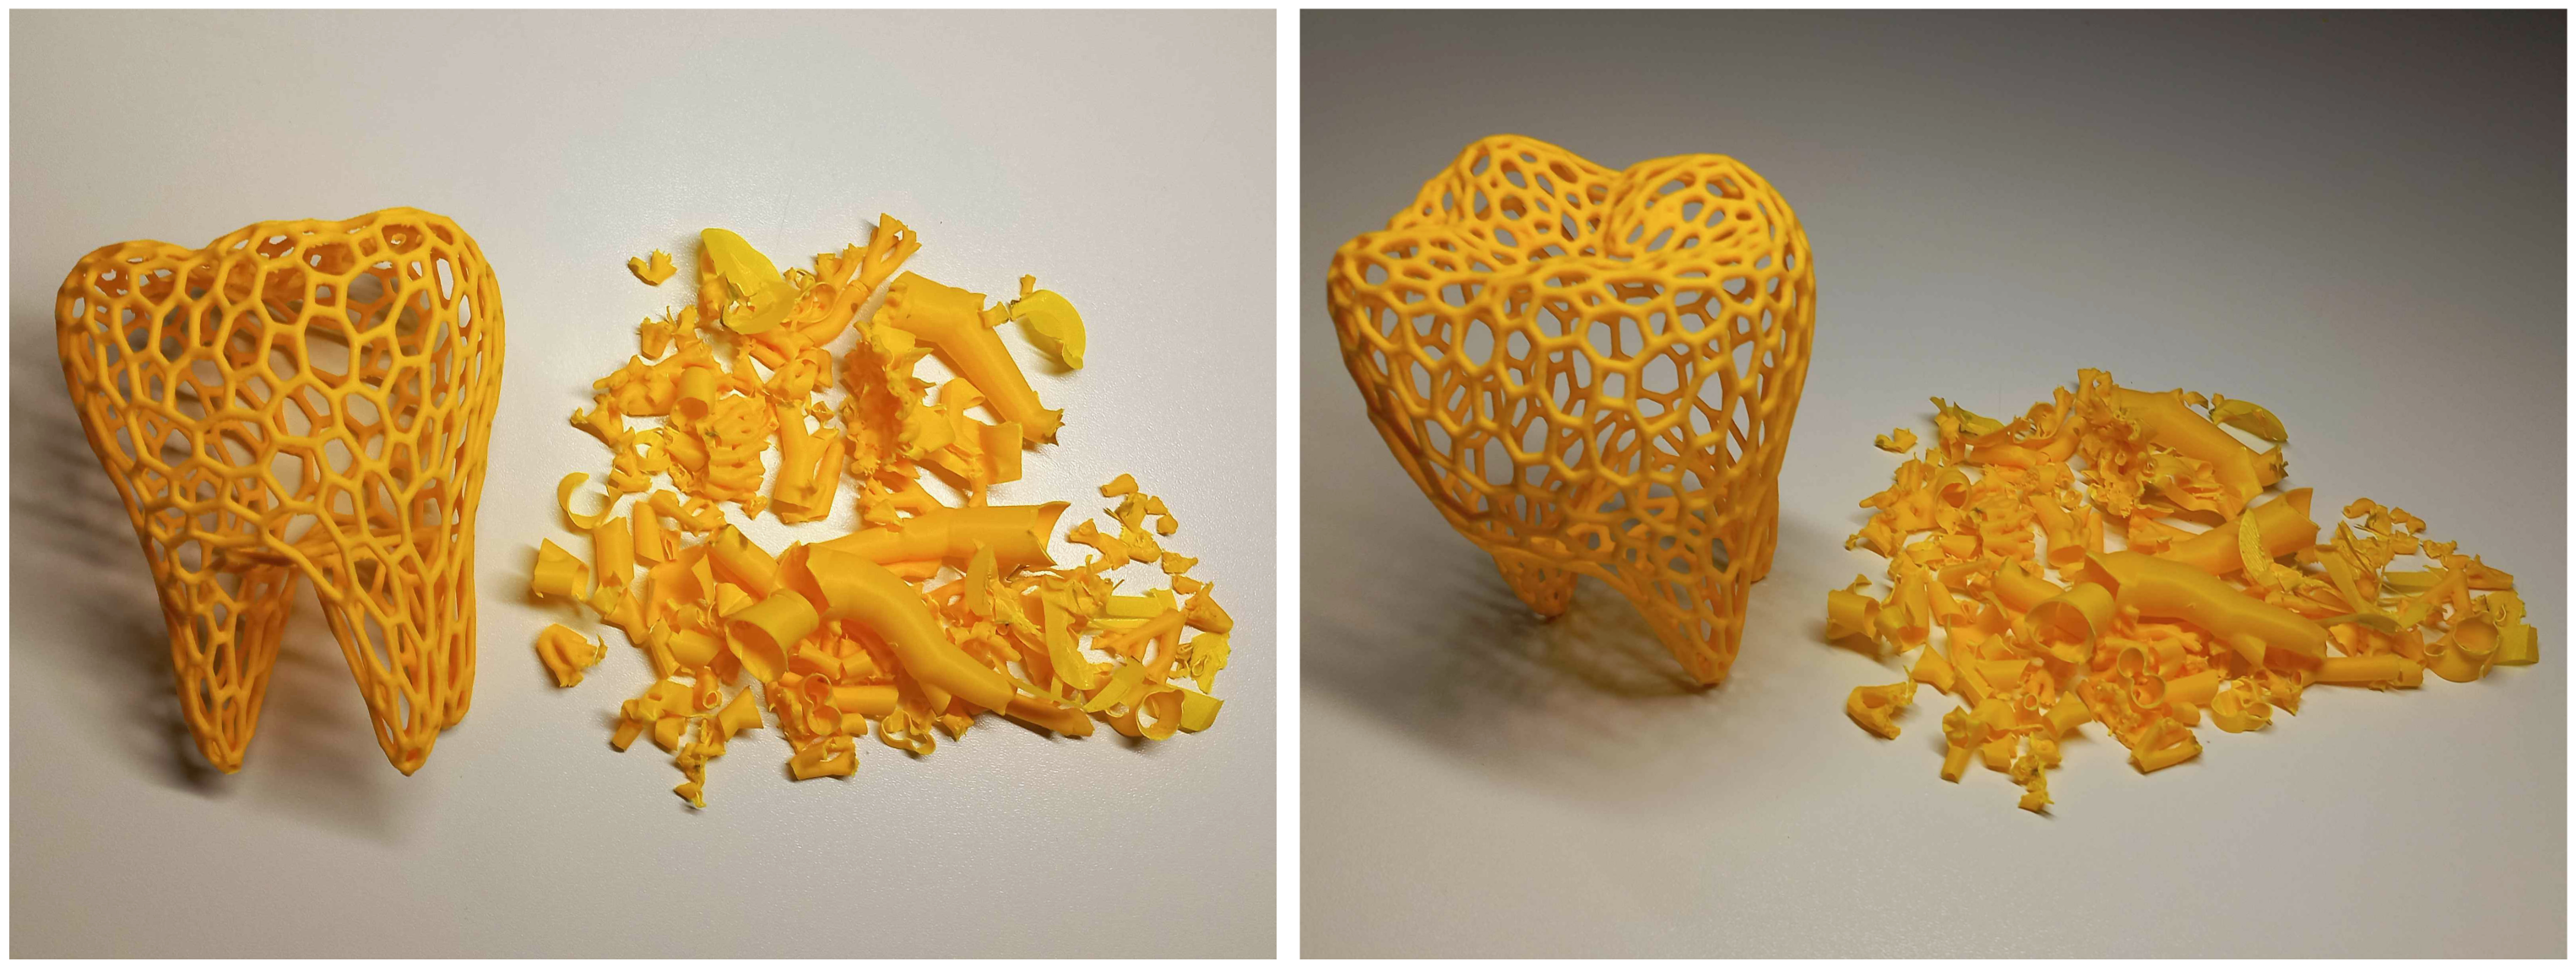
It's possible, it just takes a bit more patience than users expect. Practice with sparser models first or some with big holes in the bases to help remove the loose supports, once accustomed you can try dense voronoi which is just a trickier and longer variant (however denser might be stronger so maybe don't choose a really sparse model to begin with either).
Relation to AI
Artificial Intelligence (AI) is today a commonly misused word and idea.
Most commonly it gets associated with danger, theft, evil technology, ... by common people while in fact it's independent from that.
Basically Ai is just math and logic, but I won't go in too much detail here as it could deserve its own article if I need to explain this to you.
Labelling general Ai content in 3d printing is absurd as in practice I would say that 90% of it fits inside this category is some way, even before that Ai became a common buzzword. In short Ai is, at least, everything that concerns SEARCH, OPTIMISATION and TRAINING. Lots of things that are considered today Ai were called differently in the past, the Ai buzzword has however encouraged people to rebrand their technology to jump on the bandwagon. This means that lots of common techniques used in 3d printing could now be called Ai:
- decimating/reducing a model is an Ai technique as it searches some elements to remove (possibly in an optimal way)
- remeshing is literary trying to make a new optimal mesh following certain criteria
- sculpting is also using Ai as every time you add/remove material your program has to smartly connect everything back together
- triangulation is Ai, so every face you make that isn't a triangle (even those in fact as well ...) uses Ai to be easily understandable by your computer
- ...
Beyond techniques to make 3d models, there are lots of use cases for Ai around 3d printing. Slicing a model for example is also just Ai as it just tries to search for the best path to lay your filament in order to build your model in real life.
Of course since voronoi models use a lot of decimation, remeshing, sculpting, ... you could argue it's made with Ai. While this would be true in theory, this makes no sense to label it as such since like I said, so does 90% of all the models. 3d model sites have clearly leaned into a more populist approach, distancing themselves from reality to please unqualified and emotive people, however that doesn't mean it's valid.
Today there seem to be a will to mix everything together: Ai, generative Ai, made by Ai, made with the help of Ai, ... seem all interchangeable in the mind of those who talk about Ai without knowing anything at all but of course they are all different.
The Future
I think that it isn't far-fetched to consider that in the future a program will exist to make voronoi (& similar) models fully parametric in an user friendly way. Not necessarily with generative Ai either, but already simply with a tool that would just need to chain all the transformations required to go from a basic model to a mesh one. Would Blender have a decimate geonode or voronoi modifier, this would already be achievable (although not user-friendly), for example (parametric wireframe is already somewhat possible with blender).
A program that would visibly display the model as its mesh with a certain diameter size applied to the edges and that would allow access to a decimate slider and a wire size slider (that applies the changes directly) would be on par with some MakerLab tools that are available (like the flexi tool for flexible models), I think. It could even combine wireframe and voronoi creation together in one tool with a toggle button to see the regular or dual mesh for example. Changing the wire shape and mesh type/topology could also be perhaps possible but maybe more advanced to handle. Of course, doing it manually will probably always be better to have more control, but it would certainly make it much more intuitive and easier for casual users to transform their models.
Postamble
Thanks for reading through this article, I hope it was useful to you.
It's a vast subject, there is lots more to explore so don't hesitate to play around with the idea and see what you can make!