Search models, users, collections, and posts


Achievements
MakerWorld Guardian
Active more than 20 days out of last 30 days UTC time
Contest Winner
Won 4 model contest awards.
Featured Creator
2 models are featured by MakerWorld.
Popular Model
5 models more than 5,000 successful prints.
Popular Creator
More than 1,000 followers.
Stellar Reviewer
Rate or Comment 331 different models
Pioneer Maker
Print successful 165 different models and 1,778 hours
The Bambu Lab Magnetic Levitation DIY Kit just arrived, and I have to admit, watching this thing float is weirdly hypnotic. Right now, I’m just testing it with a few small prints and letting it spin while I think about what kind of project I could build around it.
#LevitationKit
Share
5
0
0
People often ask me which software I use for my models, or sometimes even: “How do you actually make this?” 🤔🤔🤔
To answer that question a little better, I documented the full design process of the PA Bolter NX in Fusion 360 and compressed over 25 GB of footage into a 6-minute video.
For you, it is only 6 minutes. For me, it was 4 days of CAD work. 😎🤙
In the video, you can watch the model come together step by step. I cut out most of the sketching phase and focused on the moments where you can directly see the model develop: extrusions, cuts, chamfers, fillets and all the small details that eventually turn into the final design.
I think this video gives some of you a good first impression of what goes into my functional designs and what my process looks like, from the first basic shapes to the finished model.
Transparency note:
The CAD workflow, video editing and lyrics were created by me. AI was only used as a tool for the thumbnail creation and the music generation. The songs were created with Suno AI, since finding good license-free music for personal video projects is not always easy.
Share
11
0
0
The first Add-On Pack is almost finished!
Here’s a small preview of what’s coming for everyone who already owns a PA Bolter NX... or is planning to build one😎🤙 The grips and shoulder stocks shown in this video are only the first Add-On Pack that will be released for the PA Bolter NX.
Once I’m done with this pack, I’ll either start working on the Sight Add-On Pack or the Pump-Action Grip. Both of these parts will also come with different variations to choose from.
But it won’t stop with those two Add-Ons.
There is still another interface on the Bolter that I have not fully explored yet.... and it is actually one of the main reasons why I redesigned the PA Bolter BBX16 and why we now have the PA Bolter NX
I’m talking about the Power Unit, the module at the front of the barrel where you currently choose between the Crossbow version and the Rubber-Band version.This part is modular as well and can be removed fairly quickly once the magazine is pulled out. I designed it this way on purpose, because it gives me the freedom to create completely new Power Unit modules in the future.
I spent a lot of time thinking about how to make the entire Bolter system as modular as possible, so I can always return to this little construction kit and keep expanding it.
And it will not only be for me.
I am also planning a Developer Pack that will include the main connection interfaces, making it easier for other designers to create their own attachments, parts, and expansions for the PA Bolter NX (future!)
Still cooking... 🔥🔥🔥
#PA Bolter NX #Workinprogress #DesignProcess #Fusion360 #tommy3dlab #t3dl
Share
4
0
0
Share
5
6
0
The BlueTit Pod is now mounted and ready for its first tiny pilots. Now we wait and see if the birds accept the new housing concept.😊
Share
23
17
0
The minigun for my birdhouse is finished and printing right now.
Already waiting for the first neighbor to ask why the birds need this much firepower 😎🤙
Share
4
20
0
I’m currently working on a birdhouse design at my daughter’s request.... something that does not look like a simple wooden box for once.
The idea started because spring has brought real life back into our garden. My daughter really enjoys watching the small birds at our feeding station, and at some point she wished that maybe some birds could actually move into our garden one day.
So I started designing my first experimental birdhouse.
Here is a small look at the V1:
https://www.youtube.com/watch?v=7wKvageG17g
For various reasons, including assembly and a few other design aspects, I decided to scrap the first version and start completely from scratch.
The new BlueTit Pod should now hopefully make every little bird heart beat a bit faster. ^^
For the most important dimensions, I tried to follow common nest box recommendations:
29 mm entrance hole
155 mm distance from the inside floor to the lower edge of the entrance hole
approx. 120 × 120 mm inner floor space
ventilation and drainage
protected roof overhang
removable backplate for mounting and cleaning
The shape is intentionally slightly tapered toward the front and kept as smooth as possible on the outside. This should make it harder for cats, martens, or larger birds to find grip or get direct access to the entrance hole.
The whole thing is still an experimental design, and I am definitely not a professional nest box builder. But I tried to implement the most important points in a sensible way.... proper entrance size, enough interior space, weather protection, ventilation, drainage, and a way to clean it later.
Most of it is already printed. Right now, only the backplate is missing, so the pod can later be mounted to a tree and securely locked in place.
And yes… the decorative MiniGun is still missing, but it will definitely return. 😄
#Birdhouse
Share
5
6
0
Small progress update on the PA Bolter NX 👀
The development of modular add-ons is moving forward, and here you can see the first prototype of a grip attachment for the PA Bolter NX.
After filling it, the grip simply slides onto the Bolter and is then secured at the back with the gray locking piece. More designs, surface details, and alternative grip shapes will be added later.
Development continues. 😄
Share
5
6
0
New model released: Pocket Gear Shift 🚗✨
A compact print-in-place fidget with a 5-speed + reverse layout. The lever stays in each selected position, and the shifting has a nice little resistance, especially when printed in PETG.
I also entered it into the Pieksekiste Design Contest, because I wanted to create something compact, colorful, easy to reproduce, and fun to play with.... without any complicated assembly.
Have fun shifting! 😁
#Pieksekisten(Edited)
Share
9
6
0
I’m currently working on the upload, and the assembly guide still has to be finished. But here’s a little preview of the final model - PA Bolter NX
Share
7
5
0
I tested the "My Statue" tool in MakerLab and honestly, I’m really impressed.
I’m not very skilled or experienced in sculpting, and to be honest, I probably couldn’t have done it better myself 🫡
Pretty cool to see how fast you can turn a simple portrait into something printable. 😁👏👏👏
#MakerLab #MyStatue
Share
11
17
0
Over time, a lot of feedback came in for my PA Bolter BBX16, and that’s exactly why I decided to revisit the whole concept and start fresh from the ground up.
Not because the old model was bad... quite the opposite. With almost 350 prints and a 4.9 rating, it has proven to work reliably. But thanks to the feedback from many users, I realized where I had left potential on the table. So first of all, big thanks to everyone who printed it and shared their feedback!
What’s new?
Improved handling, since everything has been scaled up slightly
Better trigger feel, now using 0.3 x 3 x 10 mm helical springs
Easier cocking and cleaner locking, thanks to slightly larger parts
Slightly increased power and accuracy, with more room for rubber bands and similar setups
The separate holding spring for projectile positioning is no longer needed (now integrated into the design)
Two additional mounting rails, now a total of 4, allowing more customization options
The front now features its own interface, opening up different ways to power and operate the system. At the moment, there are two options: a simple rubber band version, and a crossbow-style setup using extension springs.this front interface alone gives me a lot more flexibility than I had with the original PA Bolter.
What’s coming next…
Just like the previous version, there will be multiple attachments and variations. With two additional connection points in the new system, there’s a lot more potential to expand this platform.
A longer barrel and additional grips have been requested quite often. While the new interface makes those kinds of add-ons possible, a longer barrel is actually a bit tricky. Unlike in video games, it doesn’t automatically increase accuracy or range. In reality, it mainly adds friction, which results in energy loss. So visually it’s a plus, but functionally more of a trade-off.
In theory, this could work better if the projectile is properly guided from the very start and the barrel includes rifling to add spin. To realistically achieve that, the system would likely need to move towards something like compressed air or a similar mechanism.
The new PA Bolter NX is slightly larger and therefore a bit more powerful, but it still operates in the range of a low-power toy shooter, with an effective range of about 4–6 meters.
Share
5
14
0
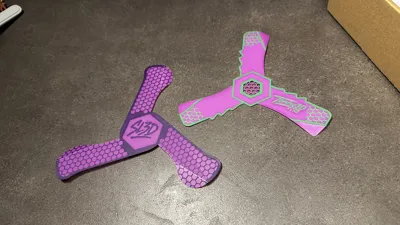
🌿 Indoor Boomerang - Ahorn Series
Once again I took inspiration from nature for this design.
This time I looked at the shape of a maple seed and used it as the base idea for a new series of indoor boomerangs.
The first design was very close to the natural form, but during testing I noticed that it had a tendency to climb upward when thrown with too much spin. From that original concept I created six additional variations, refining the shape step by step.
In the end, four different models worked really well indoors, each with its own flight behavior.
Some fly a tighter circle, some climb slightly before returning, and others behave more like a small fast-catch style boomerang.
I also recorded the design process in Fusion so you can see how the first concept evolved into the final models. As always, designing boomerangs is a lot of trial and error, but that's exactly what makes it interesting.
Which one is your favorite?
Share
7
7
0
Since December, a few models have been waiting to be tested. The weather is slowly getting better, and I thought today would be the perfect day to finally try them out... Unfortunately, the wind didn’t cooperate... it kept hitting suddenly, inconsistent, and from two directions, which made it impossible to properly observe the flight behavior and the throw.
I’ll probably have to wait a bit longer for the ideal weather. 😒
Share
13
6
0
Ich habe die Basic Version gedruckt und getestet... extrem gute Arbeit!
Das Modell ist ein idealer Einsteiger Bumerang, besonders für sehr wenig Platz. Sauberer Abwurf, 80–85° Tilt, lockerer aus dem Handgelenk, und er läuft konstant im 1–2 m Radius zurück. Sehr kontrollierbar und zuverlässig.
Was mir besonders gefällt! Er verzeiht viel. Das macht ihn perfekt für Anfänger oder für entspanntes Indoor Training.
Im Vergleich dazu habe ich gemerkt, dass unsere Modelle unterschiedliche Charaktere haben. Deins ist sehr zugänglich und konstant👏 meines braucht etwas mehr Spin und Kontrolle, bietet dafür aber mehr Dynamik und Variabilität im Radius.
Deshalb finde ich die Idee eines kleinen (Level-Systems) eigentlich ganz spannend🤔
IndoorVibe – Level 1
IndoorBee – Level 2
Boomerang Indoor V1 – Level 3
Boomerang Hexagon – Level 4
Würde mich interessieren, wie du das vom Schwierigkeitsgrad einschätzen würdest.
Zum Design selbst! 10/10 👏👏👏richtig stark umgesetzt. Weiter so! 🫡
Share
2
6
0
First print... success! Of course I couldn’t resist and immediately added small magnets to his paws. Now he can effortlessly climb metal surfaces 😁
Share
14
19
0
The wing just won’t leave me alone. I spent the entire weekend adding a small cable mechanism to the part, powered by a “0.4 × 3 × 20 mm Extension Spring” and a “0.4 × 4 × 6 mm 120 Degree Torsion Spring.” This makes the mechanism retract cleanly and open up beautifully again.
Next step... I’m planning a small platform with a servo unit so the wing can extend and retract automatically.
By the way, I got the inspiration for the cable design from @apumia thanks for the awesome idea!
Here’s the model that inspired me: https://makerworld.com/en/models/1327832-benchy-to-the-future-2025-10th-anniversary-ed#profileId-1365531
Share
12
15
0
When my wife looked over my shoulder and saw that I was about to give the dragon simple, rigid wings like the Hornet, she just said:
"You should put in a bit more effort.... moving wings would be way cooler."
So the folding wings weren’t part of the original plan at all.
I honestly wasn’t sure if I could make it work at this scale🤔
The basic idea is inspired by a Japanese folding fan.
The biggest challenge was designing it delicate enough to stay lightweight, but still function reliably.
This is definitely the most fine mechanical part I’ve built so far.
Printed with a 0.4 mm nozzle at 0.08 mm layer height so the tiny guide pins would engage properly.
The dragon was supposed to be the real highlight…
but now it’s the wings. 😅
Share
42
34
0
I’m especially curious about PLA Tough+ and how impact resistant it really is in real world use... particularly for my boomerang models.🤔
The CyberBrick hardware also opens up many new possibilities for future projects.😀
Share
4
16
0
Share
4
3
0