F-16 Plane Kit Card


Print Profile(11)


Bill of Materials


Description

Boost Me (for free)
Like this model? Boost it! Boosts help the designer create new models.
Membership
Join the commercial membership to sell physical prints of this model
Overview
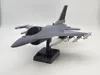
F-16 Kit Card with optional LED navigation lights & afterburner. Perfect for aviation enthusiasts that want to build and showcase their planes! Available in gray & camo paint with and without a frame. Build with a spliter camo or standard grey!
Check out the full airplane kit card collection → linked here!
For building the LED version, you will need the single LED magnetic switch lights are available from MakerSupply. See BOM below to purchase.
- 1 warm white LED for afterburner
- 1 green LED for right navigation light
- 1 red LED for left navigation light


Profiles
AIR FORCE GRAY PROFILES
- Kit With Frame (Gray)
- plane in a kit card format ideal for gifting to others
- Kit No Frame (Gray)
- plane without a kit frame ideal for assembly right off the printer with 3 color plane (dark gray, black, & light gray missiles/tanks)
- LED Kit No Frame (Gray)
- no frame format configured to use with magnetic switch LEDs from MakerSupply (red & green)
- Small Kit No Frame (Gray)
- Scaled 75% with 0.16mm layer heights to maintain resolution
CAMO PROFILES
- Kit With Frame (Camo)
- plane in a kit card format ideal for gifting to others
- Kit No Frame (Camo)
- plane without a kit frame ideal for assembly right off the printer with 3 color plane (dark gray, black, & light gray missiles/tanks)
- LED Kit No Frame (Camo)
- no frame format configured to use with magnetic switch LEDs from MakerSupply (red & green)
- Small Kit No Frame (Camo)
- Scaled 75% with 0.16mm layer heights to maintain resolution
Note: Afterburner is set to use PETG Clear Filament. Clear PLA should work also but not tested.
Filament
As shown:
- Gray Profiles
- eSun PLA+ Gray (airframe)
- Bambu Lab PLA Black (canopy & tail)
- Bambu Lab PETG Translucent Clear (afterburner only)
- Camo Profiles
- Bambu Lab PLA Cyan (airframe)
- Bambu Lab PLA White (airframe)
- Bambu Lab PLA Light Gray (airframe & missiles)
- Bambu Lab PETG Translucent Clear (afterburner only)
Documentation (1)
License
You shall not share, sub-license, sell, rent, host, transfer, or distribute in any way the digital or 3D printed versions of this object, nor any other derivative work of this object in its digital or physical format (including - but not limited to - remixes of this object, and hosting on other digital platforms). The objects may not be used without permission in any way whatsoever in which you charge money, or collect fees.
Comment & Rating (587)