Fully Printable Electronics Switch


Print Profile(1)
Description
WARNING: This is a "Proof of Concept" design, use at your own risk. I have no formal electrical engineering training, and this has not been tested at all for safety. This should only be used with low voltage, non-critical hobby projects. If you do something stupid like connect this to a wall outlet you will shock yourself and/or burn your house down.
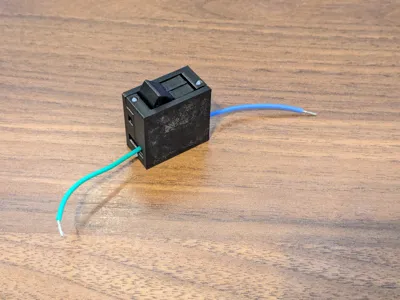
Ok, now the fun stuff. This is a small electronic rocker toggle switch that be constructed using only 3D printed parts, plus the wires that it connects. It also does not require any soldering. Most of the time you should just go buy some proper switches for your projects, but this can be used as a temporary solution while you're waiting for those to get shipped to you. It should work well with 20 gauge wire or smaller.
In addition to using a bit of extra hookup wire to create the metal contacts, this can use several alternative common conductive objects, such as:
- Paper Clip
- Aluminum Foil and tape/glue
- Copper tape
- Wire pulled out of bread twist-ties
- Any other small pieces of conductive metal, probably
Design Overview
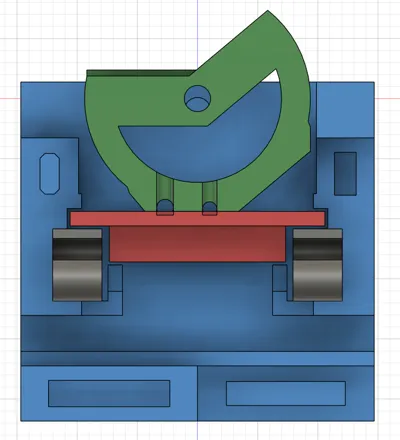
The switch consists of:
- an outer casing (two identical halves that snap together),
- a rocker switch that uses a piece of filament as an axle,
- an internal shelf that holds the wires that the rocker presses against to make electrical contact, and
- two printed springs that press the shelf (and wires) into the rocker.
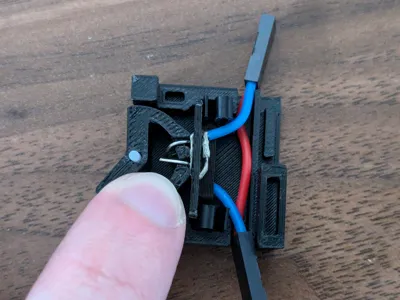
A piece of conductive metal is affixed onto the rocker, parallel to the axle. The wires that the switch will open/close are routed through holes in the shelf so that they run parallel to each other, and perpendicular to the rocker axle. When the switch is activated (by rotating the rocker), the metal on the rocker touches both wires on the shelf, closing the circuit.
Once assembled, 3 pieces of filament are used to "lock" the assembly in place, but they can be removed for disassembly if needed. Alternatively just superglue case together if you don't mind it being more permanent.
Printing
This can be printed in PLA, but I strongly recommend printing at least the springs in PETG because they will work better and hold their springiness for longer. PETG is also more heat resistant, which might be nice if you accidentally run a lot of current through the wires.
This has several small pieces (in particular the springs) so you'll want to ensure you have a clean print plate with good first-layer adhesion.
Assembly
Attach your preferred conductive metal material to the rocker. I'm partial to using paper clips, so I'll use that as an example.
- If using wire, a paperclip, or similar cylindrical object, put it in the grooves to help hold it in place. Just make sure the metal material is thicker than the groove or it won't be able to make contact with your wires later.
- If using something flat like tin foil or copper tape, you will probably have better luck attaching it to the side without grooves.


Trim 25mm of insulation off both ends of the wire that the switch will connect. It's usually easier to cut a little extra insulation off and then trim the wire ends later as needed.

Route the wire ends through the shelf piece as shown here. Twist each wire back onto itself, locking it in place and leaving as little slack as possible. Ignore the Dupont jumpers attached to the wires in these pictures, they're not part of the assembly process.


Place one of the case pieces on a flat surface, then put the springs in their place. Orientation doesn't matter.

Insert the shelf (with attached wires) into place above the springs as shown here. Route the wires (including your other un-cut wire if applicable) through the groves in the bottom of the case.

Cut a 13mm piece of filament and put it in the hole in the rocker.
Plan which direction to insert the rocker. The shelf holes are off-center because the middle of the rocker contact area is also off-center. Orient the rocker so that when it's “on” the metal on the rocker will be centered between the holes, and thus maximize contact area with the shelf wires.
Place the rocker in the case above the shelf, inserting the filament axle into the hole in the case. This will require you to slightly depress the shelf, putting pressure on the springs. Use your fingers to cover the springs and prevent them from popping out as you do this.

Carefully press the other case piece on top of the first one; if you're not careful the springs will pop out. You will probably have to push the rocker down slightly to get the filament axle to slot into place in the top piece as well. The case should friction-snap to itself.


Cut two 9mm and one 30mm pieces of filament and push them into the holes in the top and bottom, respectively. This will lock the case together, ensuring it cannot separate. They can be removed later with a small screwdriver, knife, or paperclip if needed. If you have issues with the filament falling out, bend it slightly before inserting it to increase friction.


Example of connecting two different colored wires wires that don't have JST connectors on them:

Boost Me (for free)
Like it? Leave a like.
Love it? Boost it!
Comment & Rating (21)