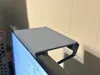
Adjustable Monitor shelf - Fits any display


Print Profile(7)

![[Seperate Files] Both Versions](https://makerworld.bblmw.com/makerworld/model/US80538347cfdcab/design/2023-12-13_8c35ffd49c1c1.png?x-oss-process=image%2Fresize%2Cw_100%2Fformat%2Cwebp)

Description
NEW VERSION AVAILABLE: https://makerworld.com/en/models/1579723
The new version does not need any support when printing separately (arm and shelf) and should work with PETG also.
------------------
Only print the “print-in-place” version in PLA and if you are certain of your printer and filament tolerances and that your filament is well dried. Otherwise, print the parts separately using printing supports on the shelf support part (Support_ONLY.stl).
Instructions to separate the arm:
--------------------------------------
Update 1: Added a version with a longer front lip that fits better if your monitor has curved or thick bezels and fixed the weird slicing bug that added strange lines on top of the model.
Update 2: I now recommend printing the “Shelf_ONLY” and “Support_ONLY” files separately using supports on the “Support_ONLY” file. Many people reported not being able to separate the parts on the print-in-place version.
--------------------------------------
A print-in-place shelf for the top of computer monitors and TVs.
- The support arm is adjustable and has a single contact point with the monitor, so it fits firmly and easily also curved-back monitors.
- Perforated to not block monitor cooling.
Instructions to separate the parts after printing (only takes 10 seconds):
No supports needed for printing, just slice and print in the orientation that the files comes in.
- Print in PLA!
If you want to print in PETG, print the parts separated and use supports, don't use the the “print-in-place” file, it will not separate!
It's strong! Don't worry about putting heavy stuff on it - but I wouldn't put any liquid…

STEP file included. Feel free to remix and share, but please use the attribution feature.
Comment & Rating (2085)