uniX-Wade Universal Extruder
uniX-Wade Universal Extruder


Print Profile(0)
Description
Summary
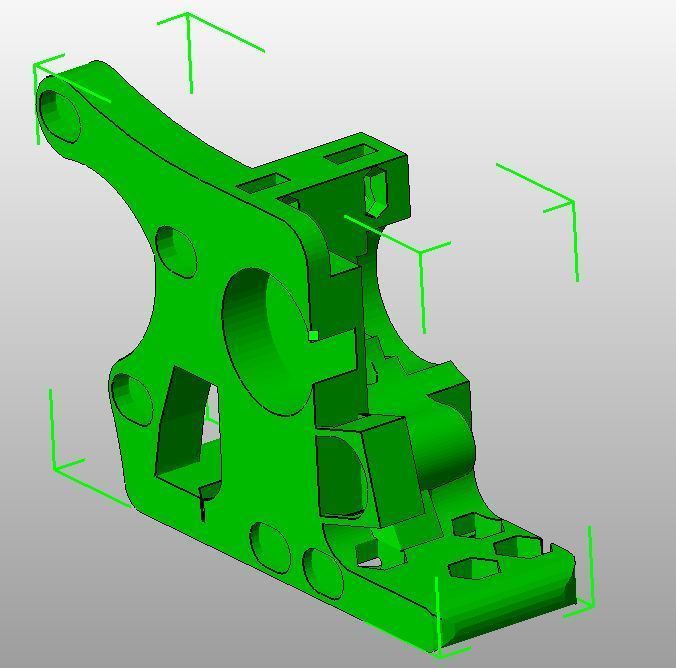
Complete redesign of our universal Wade with some Improvements.
Should fit all Printer with 50mm Mounting holes ( V9 Hotend only testet on uniX-Carriage and Orca)
Thanks to Daniel for ideas and testing :)
- Stepper moved to bottom
- Idler now has a Tubeholder
- filament Inlet closer to the bolt
- Optimized to work with uniX-Carriage http://www.thingiverse.com/thing:25420
additional Features
- 1,75mm and 3mm Filament Support
- compatible with J-Head/Groovemount/Reprapfab/Geeksbase/Mendelparts V9/10 and probably alot of other Hotends
Feature Removed:
- Lots of mounting holes - back to only 50mm default mounting holes
I made a Prusa uniX-Carriage for test purpose http://www.thingiverse.com/thing:25600
Update 01.09.2012:
- Minor Fixes and print optimization (v 1.1)
- Fanholder for direct mount on Extruder
- new V9 Inset, mount like shown on the picture, no Metal plate needed anymore !!!
Instructions
Shoppinglist Main parts:
1x M8x50/60mm hobbed bolt
5x M8 washer
2x M8 Nut
1x 8x20mm bolt (or a cutoff of a M8 bolt) for the Idler
2x M4x60mm screw
2x M4 washer
2x M4 Nut
2x spring for Wade (~ 5mm diameter and 10mm lenth, depending on its strengh)
3x 608 bearing
3x M3x30 screw (one for the idler two for the inset)
3x M3 washer
4x M3 nut
1x M3 worm screw (?)
4x M3x10mm Screw (for Stepper mounting)
2x M4 Nylock nut`s for mounting the wade
2x M4 Screw , lenght depending on the Carriage you are using.
Additional parts for Mendel-Parts V9 / V10:
1x 28x32x2mm thick metal plate, cut and drilled to fit into the printed "carrierplate" and then drill the holes
1x M6 brassnut
2x M4 Nylock nut
2x M4x15 screw
For 1,75mm filament printing you need a brasstube with d=2,4mm / D=3mm
Print all Extruder parts and the Inset of your Hotend.
there are two version of the insets, one with 16,7mm for well tuned printer, and one with 16,4mm for not so well tuned printer ;)
*I Uploaded pictures to show how it is assembled (would take me too long to write all down, sorry guy`s)
- the metal plate is only required for V9/V10 hotend, but give also stability with other hotends.
*For Reprapfab/Geeksbase Hotend you need to rasp the screws square and press them (from left to right) tight to the hotend when mounting.
the important corner is on the upside of the hotend (Pictures show only the lower side !)
For Mendel-Parts Hotend on the original plate you have just to print the inset.
First mount the Hotend on the carriage (use a additional screw beneath the plate) and then put on the Extruder.- For mounting the Extruder to the stock Orca V40/42 metal plate you need to drill one additional hole ( www.thingiverse.com/image:136320 ) and change the Screws on the back to countersunk screws.
* For Mendel-Parts Hotend on uniX-Carriage you have to make a small iron(or steel) plate (28x34x2mm).
-Print the "carriertemplate.stl" and put the plate into it to mark where the holes should be drilled at.
Make the middle hole about 7mm and the outer 4,5mm.
Iron Plate is not needed anymore, just print the new short V9 inset (maybe a second time for filling the hole on the upper side) and screw it tight between two nut`s (like shown on the picture)
ensure that the indentation of the inset stands in the right direction- If you want to use 1,75mm filament you need a brasstube with inner diameter 2,4mm and outer 3mm ( http://www.conrad.de/ce/de/product/222337/ )
- First put the Extruder with the hotend all together then measure how deep the filament hole from the middle of the bolt to the hotend is and cut it a little bit shorter.
Now rasp the upper end sharp as shown on the picture.
IMPORTANT smooth the edge of the Upperside or the filament will cut into the insert !
additinal pictures can be found here: http://imageshack.us/g/6/unixwade15.jpg/


