Versatile PC Speaker Stand


Print Profile(1)

Bill of Materials

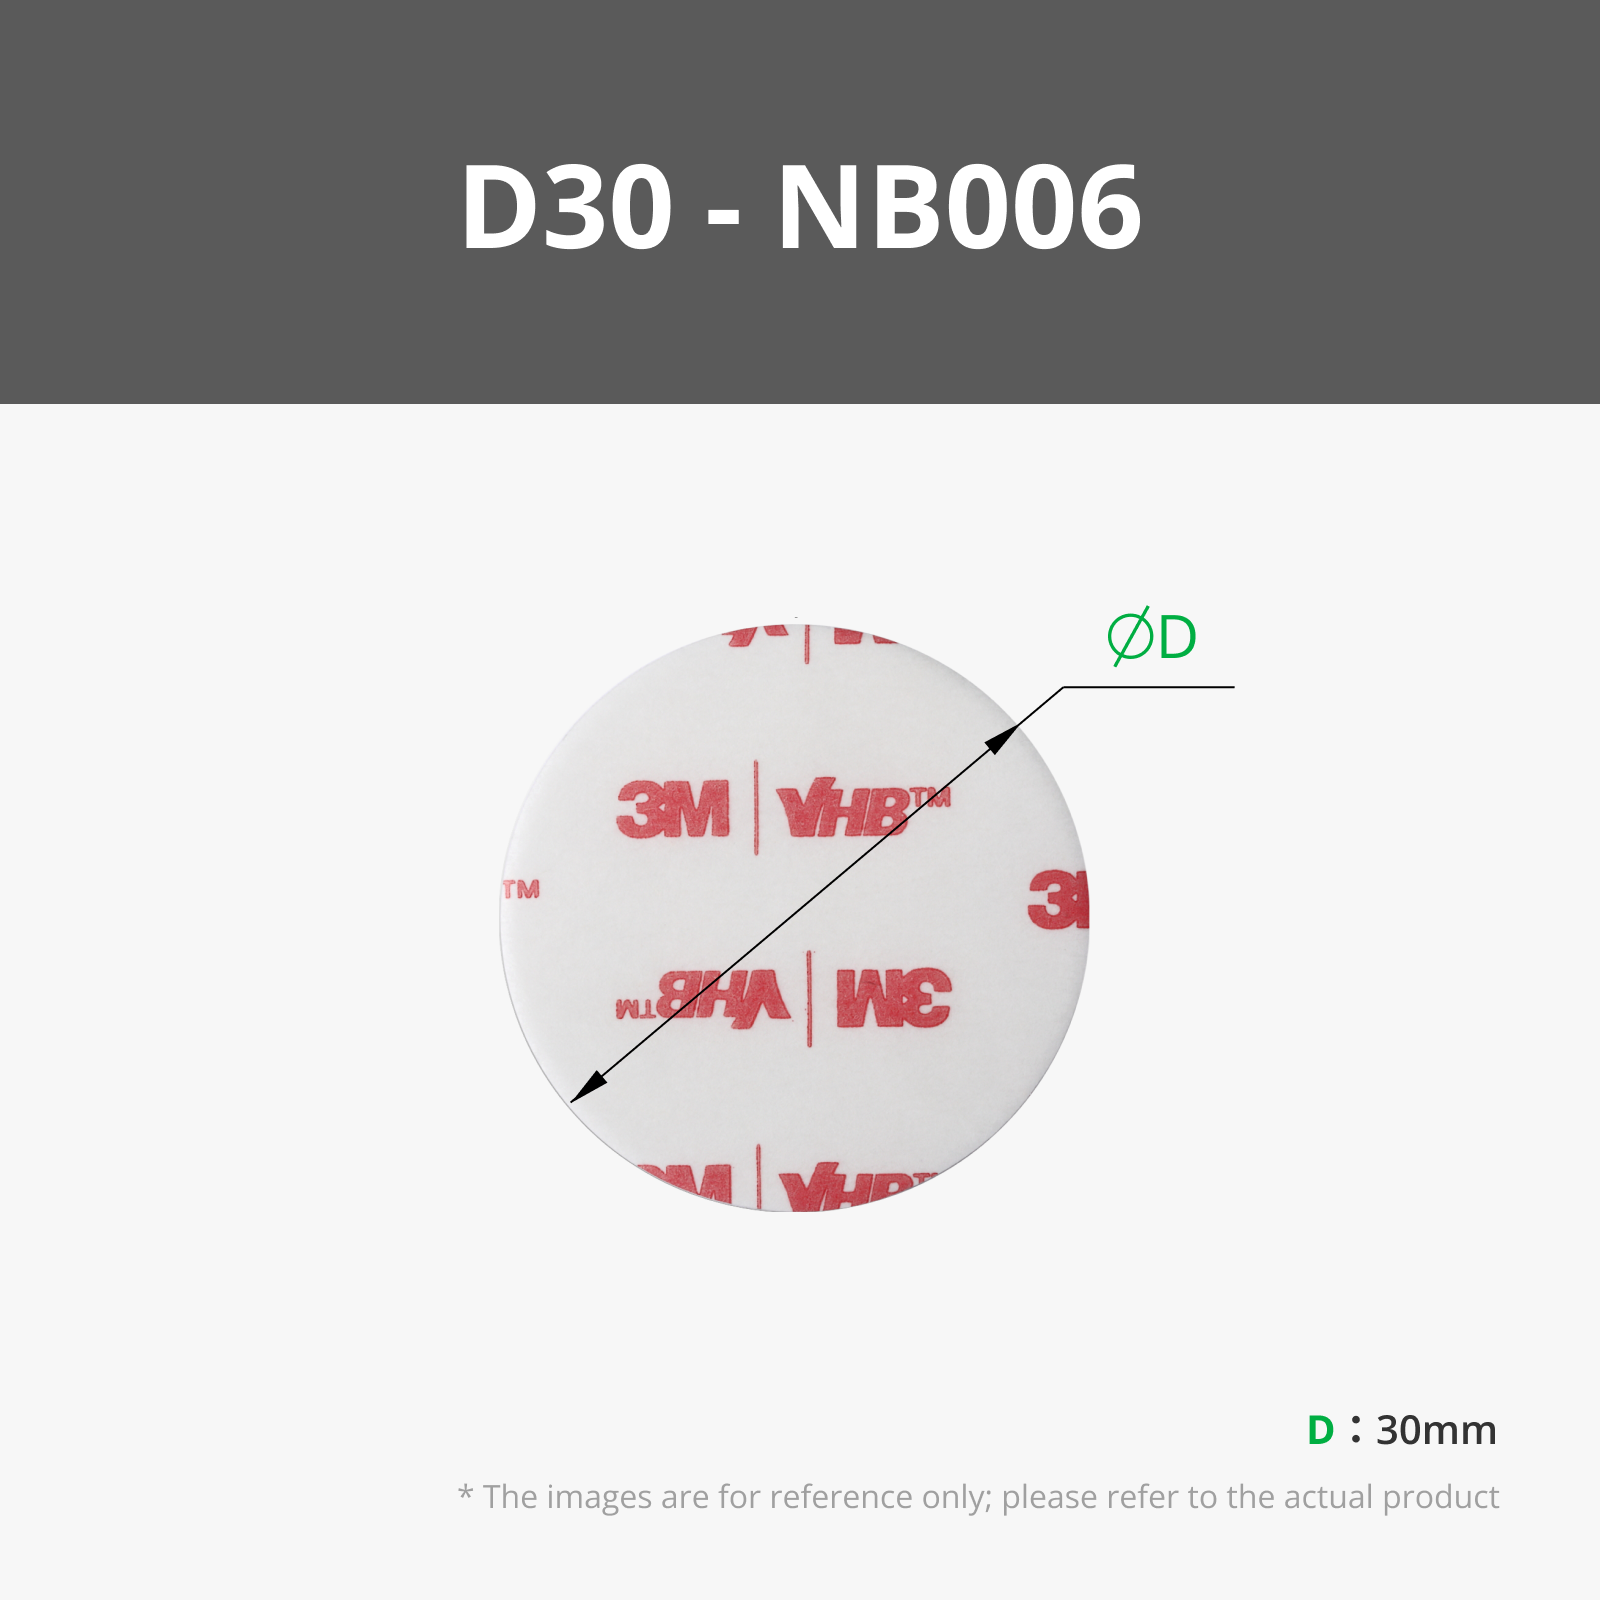
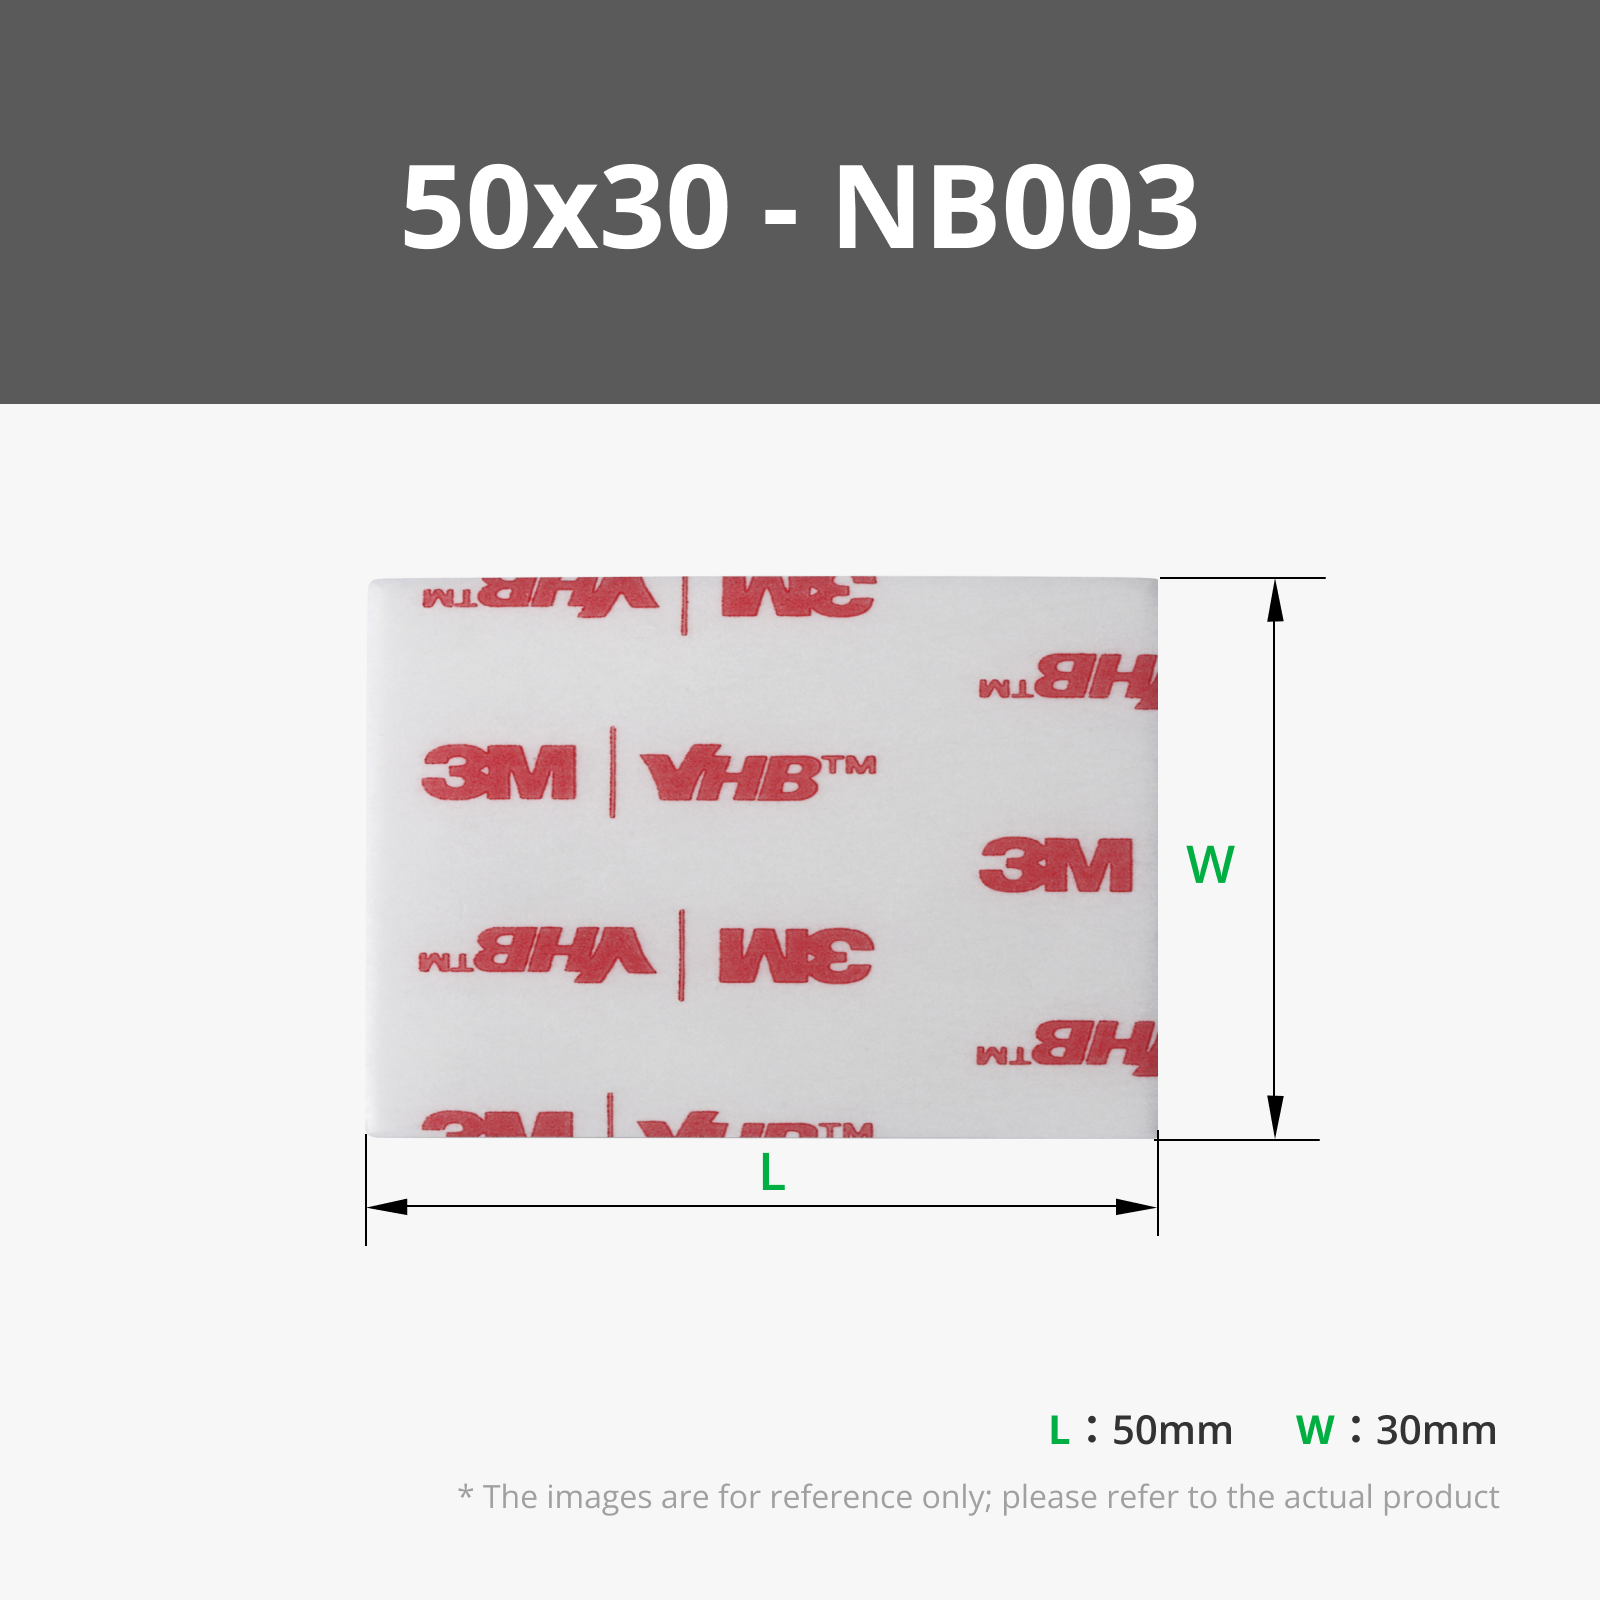
- Screw M4x35 x 1:
- Square Nut M4 x 1:
Description
Boost Me (for free)
Heyho
I built myself a new Office setup and did need some stands for my speakers.
After searching online I only found designs for very specific speakers/ dimensions and most of the times I missed either the ability to tilt the speakers or the stands took up too much table space.
So I spend (again) far too much time and designed my own solution!
Addons: I will soon release new Designs to further improove the acessability and versatility of the design: Less Hardware Parts & Headphoone Stand are incoming.
If you appreciate my work feel welcome to donate a small tip or boost me <3.

Features:
Adjustable Size for different Speakers.
Stopps range from ca. 121 mm to 213 mm.

Tiltable Speakers

Versatile Mounting Possibilities: C-Clamp & Base Design


Cable Management
Many Prototypes to provide a high Quality
I testprinted all parts on Bambulab X1C, A1, Prusa MK4, XL

Hardware List:
| M4 x 14 Screw | 1 (for the Wingbase) 2 (for the C-Clamp) 4 (for the Base) |
| M4 x 10 Screw | 1 (for the C-Clamp) |
| M4 x 35 Screw | 1 (for the Tower) |
| M4 Square Nut | 1 (for the Wingbase) |
| M4 Nut | 3 (1 for the Tower & 2 for the C-Clamp) |
| Foam Pads | 4 (for the bottom of the Base or Tower) 4 - 6 (for the Wingbase) |
| Double sided Tape | For the Foam if it is not already installed. Optional: To adhere the Speakers to the stand. |
| 3 mm Screws | Optional: To Screw the Speakers to the stand. |
| Cable Ties | Optional: To organize the cables. |
Printing Instructions:
Material Choice: You can print all Parts out of PLA. But I highly recommend using PETG or other tough materials that will not deform over time for the C-Clamp. Else the Stand could come loose over time due to constant pressure.
Supports are only recommended for the adjustable C-Clamp.
| Nozzle | 0,4 |
| Perimeter | 4 |
| Infill | 25 % |
| Layer Height | 0,2 mm |
Assembling:
1. Print all required Parts. If you want to have the Base you will not need the C-Clamp and the other way around.
2. Add the Wingbase to the Tower using the M4 x 35 Screw + M4 Nut. (Do not tighten the Screw yet)

3. Assemble the Wingbase (1 x M4 Square Nut, 1 x M4 x 14 mm Screw). The Sliding stops have a feature to avoid them from being pulled out while adjusting their length.
Optional: You can already add a Zip Tie to the Wingbase to use for the cables later on.
Optional: If you glue or screw the Speaker to the WIngbase later on you wight not need the sliding stopsat all.


4. Prepare the Base and add it to the Tower (If you are going to use the C-Clamp jump to Step 5.)
Add the Foam pads to the bottom of the base. Mount the Base to the Tower. Use 4 x M4 Screws with length from 10-14 mm.

Optional: For a cleaner Look I like to scrape off the small elephant foot, nearly every print leaves behind.

5. Assemble the C- Clamp. (If you use the Base jump to Step 6.)
Set the width of the opening to the width of your table. Add the M4 Nuts to the Jaw and use M4 Screws to fixate its position.
You can use 2 M4 x 14 mm Screws to hold the jaw (1 is optional) and 1 x M10 Screw to secure the wedge into place later on. (Dont screw that one in all the way yet!)
If you need a different size feel free to comment/ contact me!

6. Prepare the Wingbase for the Speaker.
Add some Foam to the Wingbase to give it more friction and dampening the speaker.
Place the pieces to the 4 Wingtips and to the adjustable Stops. (See 2 pictures below only without the extra double sided tape)
I cut all pieces out of a rectangular sheet piece of Foam.

Optionally:
Use some Double sided tape on top of the foam (or directly onto the Wingbase) to secure the Speaker even more.

Use some 3 mm Screws to screw the Wingbase to the Speaker.

7. Add the Speaker to the Whole Assembly.
- Open both of the stopping sliders and position the Speaker centered so that the wingbase is not tilting on its own.
Close the stopping sliders so that they provide the speakers to fall down while tiled. They must not be under tension!
Optional: If you use double sided tape or Screws you can now fixate the Speaker to this position.
- Tilt the Speaker to the desired angle.
- Tighten the M4 x 35 mm Screw.

8. Mount the Stand to the Table with the C-Clamp. (Skip if you use the Base instead)
Add some Foam pads to the bottom of the Tower.

- Insert the C- Clamp into the Tower and set its Jaw opening to the tables Size. Use the upper Screw with M4 Nut primarily and additionally you can use the lower printed threads to optionally add a second M4 x 14 mm Screw.

Install the Wedge to set the Clamp under tension and secure it with the M4 Screw. (Again: Make sure to choose a material that will maintain the tension over a longer period of time)

9. Cable Management:
You can add 1 Ziptie at the Wingbase and another one to the C-Clamp for a cleaner cable management.

Finished!
Now you have your Loudspeaker on the Stand and everything should look quite clean and the sound should be good! :D
Have fun!
IF you have any ideas how to improve the system or need special dimensions don't hesitate and contact me!
Also feel fre to donate me for all the work I put into these projects for you even If I am already satisfied for myself with a lower quality solution.
https://www.paypal.com/paypalme/MeisterEdel
Boost Me (for free)
Some Impressions of the Development:


License
You shall not share, sub-license, sell, rent, host, transfer, or distribute in any way the digital or 3D printed versions of this object, nor any other derivative work of this object in its digital or physical format (including - but not limited to - remixes of this object, and hosting on other digital platforms). The objects may not be used without permission in any way whatsoever in which you charge money, or collect fees.
Comment & Rating (17)