Kim Possible - Kimmunicator


Print Profile(5)


Description
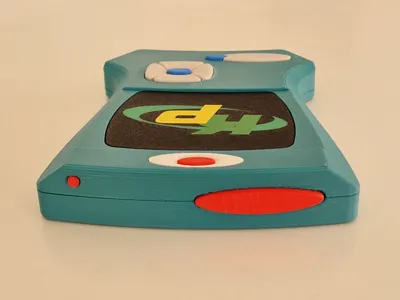
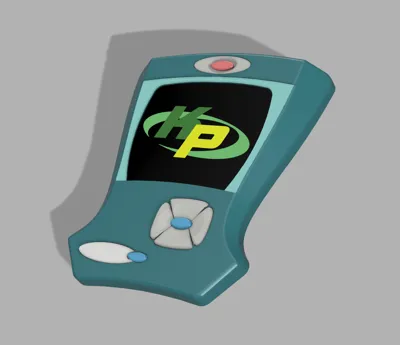
Kim Possible - Kimmunicator
A friend needed a “Kimmunicator” for a Halloween costume. I couldn't find a model I liked, so I designed this one. The model can be printed with and without AMS.
I created five print profiles because I used different layer heights for the individual parts. There are also optional profiles with ironing enabled, as I noticed that the ironing result strongly depends on the filament used, so decide for yourself if you want ironed parts or not. The main body is divided into two parts for better printing results.
- Kimmunicator Body
The main body of the Kimmunicator, print all parts once (plate 1 or plates 2-4) at 0.16mm layer height- Plate 1: All on one plate
- Plate 2: Top
- Plate 3: Bottom
- Plate 4: Connector
- Kimmunicator Body (with ironing)
Same as Kimmunicator Body, but with ironing enabled
- Kimmunicator Parts
All parts (excluding the display) for the Kimmunicator, print all parts once (plate 1 or plates 2-5) at 0.08mm layer height- Plate 1: All on one plate (Print by object)
- Plate 2: Grey parts
- Plate 3: Red parts
- Plate 4: White parts
- Plate 5: Blue parts
- Kimmunicator Parts(with ironing)
Same as Kimmunicator Parts, but with ironing enabled
- Kimmunicator Display
Display in different versions, print only one of them at 0.20mm layer height- Plate 1: Multicolor (4-color print with AMS)
- Plate 2: Multicolor (for manual filament change):
- Start with black (background)
- Pause at layer 6: Change to “orbit” green
- Pause at layer 9: Change to “K” green
- Pause at layer 12: Change to “P” yellow
- Plate 3: Singlecolor (same as plate 2, but without color changes)
- Plate 4: Complete black display
Assembly
Should be mostly self-explanatory, just glue the parts where they fit. But be careful with the following parts, as they can be easily mounted in the wrong direction:
- (Red) Button top (should align with the body)
- (Red) LED top (should align with the body)
- (Blue) Bottom button (curved to the right)
If you print this model, I would be happy if you leave a like and post a make and/or
Boost Me (for free)
Thank you for your boost :)
License
You shall not share, sub-license, sell, rent, host, transfer, or distribute in any way the digital or 3D printed versions of this object, nor any other derivative work of this object in its digital or physical format (including - but not limited to - remixes of this object, and hosting on other digital platforms). The objects may not be used without permission in any way whatsoever in which you charge money, or collect fees.
Comment & Rating (33)