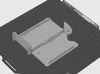
SlideWallet V2


Print Profile(5)


Description

Following the unexpectedly successful launch of the SlideWallet V1 and receiving a lot of feedback, I set out to create Version 2. This new version addresses as many issues as possible while incorporating a highly requested feature: a money clip.
Changes from the version 1 :
- The wallet now opens with a pushing motion instead of pulling.
- The base and slider are more securely locked together to prevent them from coming apart.
- The grippy texture is now applied to both sides for better handling.
- An internal stop has been added to prevent cards from falling into the mechanism and causing jams.
- An optional money clip has been added to the back for extra functionality.
Like the V1, the wallet consists of just three parts that snap together without the need for any additional hardware.
To ensure smooth operation, this print requires a highly precise and well-tuned 3D printer. Some light sanding may be necessary to achieve frictionless movement between the components. Applying a small amount of lubricant to the slider can help achieve smooth, frictionless movement. (Tip: I also experimented with candle wax as a lubricant, and it worked surprisingly well.)
Assembly instructions :
| 1/ Lay the base down, and position the inner part, called the "cascade," onto the pivot in the closed position (as indicated by the groove in the base). |  |
| 2/ Place the slider on top and snap it into place. |  |
| 3/ Place the money clip on the back and snap it into place in the groove |  |
Printing tips :
- Material: I’ve tested both PLA and PETG, and I prefer PETG for its smoother operation.
- Nozzle: Use a 0.4mm nozzle with a 0.16mm layer height and fine settings.
- Slicer Warning: You may receive a warning about a floating cantilever—this is intentional. It refers to the spring mechanism that holds the cards, which is raised one layer above the base to allow for free movement.
I understand this model might not be for everyone, as it requires precise printing, some sanding, and a bit of use to achieve a buttery-smooth operation. It won’t be perfectly smooth straight off the printer—it needs a little fidgeting and handling to break in.
However, if you successfully print it, enjoy! I’m proud of this deceptively simple design with its intricate mechanism.
License
You shall not share, sub-license, sell, rent, host, transfer, or distribute in any way the digital or 3D printed versions of this object, nor any other derivative work of this object in its digital or physical format (including - but not limited to - remixes of this object, and hosting on other digital platforms). The objects may not be used without permission in any way whatsoever in which you charge money, or collect fees.
Comment & Rating (392)