
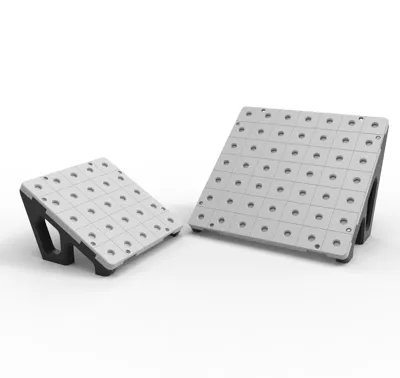
Stand for the UMSS Tiles




Print Profile(2)


Bill of Materials


Description
Boost Me (for free)
I usually don’t ask for this, but I’ve noticed that many creators actively encourage it on other platforms—and it makes sense, as it helps increase visibility. So, if you can follow me, it would make difference. It’s a great way to support my work and show appreciation. For more insight subscribe my blog at: https://designrepcom.com/ This design is freely available for the community, but if you enjoy my work and would like to show your support, you can boost this project. Thanks!
Description
Please consider following me if you download and print my work. It’s a simple way to support my activity and stay connected with me in the future. Your interest helps me understand the value of my work to the community. Thank you!
Introduction
These modules are part of the UMSS project. The project should therefore start there, with the creation and integration of tiles, eventually creating boxes and other items. These "containers" will hold these modules, which serve various purposes. In this case, they are tools and accessories that are available to all printers.
So, here you have a stand for tools to place beside the printer, to hold the tools you need at the moment. The modules can be changed and moved when you need it.

This is yet another example of the many things that can be done with the modules. The tools are perfectly secured, as well as their accessories, through a perfect fit or, in certain cases, through magnetism (when possible). They will not fall when printing at high speed…

To better understand, watch the video clip.
You can add as many as you like side-by-side.
Print and assemble
Regarding the print, there is nothing special to say. Just that I have added a TPU feet, that you can glue to the structure, but that is not mandatory…
You will need
- 4x BHCS M3x8(10) bolts (last number is the length)
- 4x M3 Nut
- tiles:
- with 5x5 (150x150mm) can be found on the main UMSS project;
- with 7x7 (210x210mm) that you can find on 3mf file on this project.
- Contact or superglue.
I've used PLA-CF on the lateral structures, always a very nice finish.
TPU for the feet. As stated earlier, it is not mandatory
Change Log
- (28-09-2024) - First Release
- (04-10-2024) - Added the 7x7 (210x210)mm option
Curious About My Tools? Check This Out!
For those of you who often ask about the tools I use to bring ideas to life, this article, The Journey From Idea To Object (Part I), offers some insights into the initial stages. It highlights the use of various tools, including software like Autodesk Fusion for CAD design, Blender for render and Bambu Studio for 3D printing preparation, and other... So, if you're curious about the software and hardware too, that I've incorporate in my workflow, take a look at the link for more details!" – Visit https://designrepcom.com/ for much more.
License

You shall not share, sub-license, sell, rent, host, transfer, or distribute in any way the digital or 3D printed versions of this object, nor any other derivative work of this object in its digital or physical format (including - but not limited to - remixes of this object, and hosting on other digital platforms). The objects may not be used without permission in any way whatsoever in which you charge money, or collect fees.


Comment & Rating (11)