Search models, users, collections, and posts

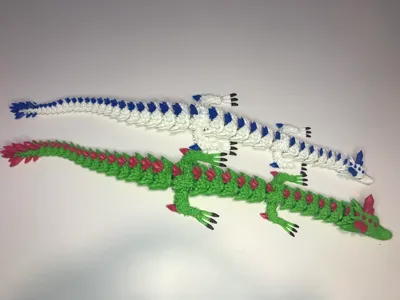
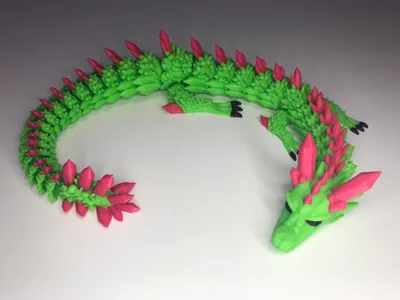
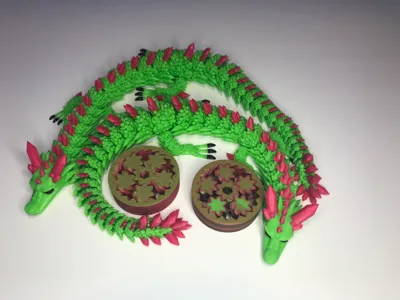
Improved Crystal Dragon

Remixed by

Print Profile(3)

All
P1S
H2C
X1 Carbon
A1
H2S
X1E
P1P
X1
H2D Pro
P2S
H2D
X2D
A2L
A1 mini

Optimized settings, 0.25mm layer height, 15% infill
Designer
16 h
1 plate
4.8(780)

90% SCALE ~ MAX a1 MINI ~ 0.25mm layer, 2 walls, 15% infill
4.6 h
1 plate
4.8(135)

0.2mm layer, 2 walls, 15% infill
9.8 h
1 plate
4.8(62)

Open in Bambu Studio
Boost
3360
8061
1368
1.2 k
23.3 k
12.6 k
Released 

Description

I'd like to start off with a thank you to everyone who has boosted and shared feedback to my first painted version! And a HUGE thanks to @Chrobakx for sharing it, one of the only crystal dragons that allows commercial use. In the beginning I tried to comment back on every comment, but unfortunately I won't be able to anymore simply because there are soooo many. Which is amazing. I appreciate everyone's comments and I enjoy reading them and seeing what awesome colors you have printed it in. Shoutout to @BubbleandPoppet and @LauraCampy. You have the best looking dragons. 


My goal with this project is to make a reliable, support free, good looking dragon that allows commercial use. 
 

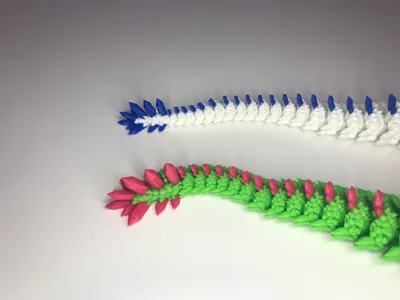
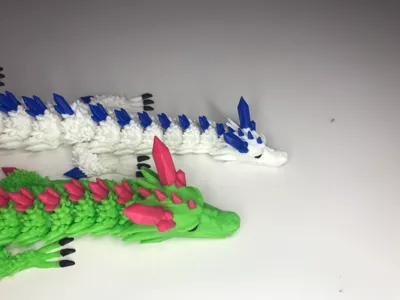
Changes from original: Upscaled the head and tail parts so it both looks more proportional and is stronger. Even though I fixed many issues of small links, please do not scale down. The links are still small (but bigger now), maybe you can if you are using a 0.2mm nozzle. Remember: THIS IS A VERY DELICATE DRAGON. It is not meant for young or uncareful people, because of the sharp crystals. Would not recommend giving it to kids, they will likely break it. I do not appreciate reviews that say ‘My kids broke it’ and giving a low review.


Print instructions for Texture PEI: Clean thoroughly with soap and water, and then ipa 99%. Wait for bed to FULLY COOL to at least 30 degrees. This will ensure that the tail doesn't rip off. BE VERY CAREFUL when removing. 

Print instructions for Smooth Plate: Again, make sure it's clean. I used Bambu's Liquid Glue. Flex the plate to release, since it sticks pretty well.
Print instructions for Supertack: Bambu says don't use any glue. Make sure it's clean, but they don't recommend using alcohol. I use dish soap water sprayed on to the plate, and then wiped off. I have not printed this model yet with this plate, this is just my regular printing routine.


Filament usage & time: It uses only 5g more than the original, despite being larger (single old one vs single new one, no flushies). Since the small parts are bigger now, adhesion will also be better.

There are two print profiles: “Two Dragons” and “Two Dragons with flushies”. “Two dragons” uses 215g and takes 14h55m. “Two Dragons with flushies” uses 223g and takes 15h40m. For just under one hour longer, I strongly recommend you print “two dragons with flushies” , you get two (almost) ‘free’ gear spinners.
Model is Gear Fidget Spinner by LongBeachRaider - MakerWorld (allows commercial use)


UPDATE: Added a print profile called High Detail. This has thinner extrusion width for sharper details, and lower layer height. Since the layer height is lower the overhangs should print a bit better. It does add a few extra hours (lower layer height = more layers = more time). PRINT AT YOUR OWN RISK, I have not tested this yet. 
I also added paint to the teeth.


Update 2: Commercial use for all of my models is permitted if you're selling in-person. Please contact me if you are selling online! 

Comment & Rating (1368)

(0/1000)

Print Profile
Optimized settings, 0.25mm layer height, 15% infill
This is a BIG dragon and a very generous free commercial use model. I printed this one using eryone silk rainbow Candy Pla and the crystals were in sunlu silk blue pla. incredible detail and a perfect print on my Bambu lab A1 combo printer. the profile has limited the poop and the flushies were a great idea although I didn’t have enough rainbow silk left to do the 2 dragons and flushies. great work and thanks for the sharing of this beautiful dragon.
The profile uploader has replied
profile
9
Reply
can't use it for commercial use anymore ☹️
(Edited)
0
Reply
Replying to @charcoal129 :
yes you can, just message me as stated in description.
0
Reply
Replying to @coopertrinh :
what does that mean
0
Reply
Boosted
Printed perfectly on my X1C and A1. Thanks for the great model.
The designer has replied
6
Reply
Hi there, did you by chance change any settings? If so what ones? We are having some troubles with the design. When it’s done with the color and it goes to clean the nozzle the top of the nozzle is hitting the project.
0
Reply
Boosted
Replying to @HeathSpears :
I did not make any changes to the settings. I have printed 4 on my A1 and 2 on my X1C with no issues.
1
Reply
Replying to @HeathSpears :
hey, are you using the print profile?
1
Reply
I am very sad. This was my first big print on my new Bambu A1 and it failed both times. the first time I tried just the two dragons and nothing else, they were fine until one lost a lot of segments early on. I fixed them by putting them back in their places almost exactly (using the second one as a guide) and I thought I fixed it. I woke up to one of the dragons completely off the bed and the other a stringy mess. I was dissaponted as this was a print I was extremely excited about. I then tried it again later but the same thing happened with one of the segments (I was only printing one dragon that time so I didn’t have a reference to put it back ☹️) I don’t know if it was the printer or the filiment or the model itself (it probably wasn’t because there are many successful prints here in the comments). idk what I am doing wrong (I’m still new to this). I’ve been using my Bambu at its original settings, am I missing something? please help!
The designer has replied
2
Reply
This looks like an adhesion issue. have you cleaned the bed? use running warm water and dish soap to clean it. then, ideally use isopropanol alcohol to clean it further before you print it.
1
Reply
Replying to @coopertrinh :
I cleaned the bed and added a little glue to the bed but it got too stuck and broke again. I would have loved to print this but I don’t think I will be trying again
0
Reply
Replying to @Dr4g0nfru1t :
Sorry this happened to you. Thanks for trying! I appreciate that you didn't just give it a 1 star review.
3
Reply
Boosted
printed and they worked fab. I used pla silk and love it. I'm not sure what the circle bits are though?
The designer has replied
0
Reply
they are like fidget spinners. if you pinch the middle you should be able to spin the outside
2
Reply
Boosted
Replying to @coopertrinh :
I was trying to spin them but they keep sticking. I'll try that though. Thank you, that is a good help.
0
Reply
Replying to @Aaran6969 :
if you take a 6MM/ 1/4 inch hex drill bit and put it in the drill, then slide the spinner into the drill bit and slowly start the drill it should free it up.
2
Reply
Thank you! Printed perfectly!! Any suggestions for reducing waste? This was our first multicolor print and we were a little surprised by the quantity of poop. I am a total Bambi newbie. Thank you for sharing your great design! Our crystal dragon is a mommy.
The designer has replied
0
Reply
Here are a few resources to hopefully help you. https://wiki.bambulab.com/en/software/bambu-studio/reduce-wasting-during-filament-change#wipe-into-object https://makerworld.com/en/models/112380?from=search#profileId-129748 If you need further help, join the Hybee3d discord, many amazing bambu users including myself to help you there.
0
Reply
Replying to @coopertrinh :
Thank you kindly for the resources! Keep up the great designs!
1
Reply
Replying to @Spicy_Mamba :
Try turning on Developer Mode, go into printer settings, and turn on Long Retraction When Cut (experimental). It saves so much waste.
0
Reply
Print Profile
Optimized settings, 0.25mm layer height, 15% infill
crazy smooth print on Bambo A1
1
Reply
Please help me. I am new to 3-D printing. What are the circles for in the center?
0
Reply
they are just fidgets
0
Reply
Boosted
Should we be using 0.4 nozzle?? Never seen these line width numbers myself.
The designer has replied
0
Reply
yes, use 0.4. I found 0.55 is a mix of strength and speed and detail. I have had no issues with this, and I regularly use 0.6mm line width with 0.4 nozzle. Of course you can do whatever you want with the settings. For extra crisp detail you can even lower the outer wall to 0.4mm.
1
Reply
Boosted
Replying to @coopertrinh :
Thanks for the info! Can you perhaps also tell me how I can change the colours? Normally I can select different parts but on the dragons only the body segments seem to be objects. I was hoping to just click all the crystals and give them a different AMS number.
0
Reply
Replying to @Yuuki :
You should be able to change colors in the top left in bambu studio. As long as the actual ams has colors close to what you have in Bambu studio, then it should auto switch. I am not on my home computer so it will look similar to this.
0
Reply
Print Profile
Optimized settings, 0.25mm layer height, 15% infill
kids love it
The profile uploader has replied
0
Reply
That's sick! what scale is it?
0
Reply
Replying to @coopertrinh :
can’t recall, probably around 150% 😀
0
Reply
Came out great as the first big test print on my new A1
1
Reply
Boosted
when using flushies do I need to turn off the tower
0
Reply
Boosted
The design is excellent - the print was 95% great. on both of these, the final joint at the tail, and the joint right behind the front legs were fused together needing a knife to free them. If you can fix that, it will be perfect!
The designer has replied
0
Reply
Ok, i can try! I didn't notice, but thanks for letting me know.
0
Reply
Boosted
Replying to @coopertrinh :
It’s possible it’s just my printer - x1 Carbon, 0.4 nozzle.
1
Reply