Bambu Labs X1 & P1 Spare Parts Case (Version 3.1)


Print Profile(4)


Description
IMPORTANT UPDATE - PLEASE READ:
The NEW Bambu X1 / P1 Series Spares Case Version 4.0 Design can be found here:
There is a newer version 4.0 of this case, which was just released, and is linked above. The new version 4.0 design has a number of updates and improvements over this version 3.1 design, and is not backwards compatible. I highly recommend using the updated version 4.0 design linked below, since I plan to remove this version 3.1 design soon (which will allow me to support only the new version 4.0 design, and not both of them).
Original Description:
The models have been updated to v3.0 and then to v3.1 as of 3/19/2025. The v3.0 update includes the following new features and changes:
- A new modular latch design - this is to resolve issues of cracking cases when the clasps are too tight. The v3.0 replaces the top and bottom mount points for the latches with inserts that can be printed in a more optimal orientation for strength.
- A new 5x full hot end module, which will also accommodate partial hot ends with a swing out tab. (thanks to Hits-Man for the suggestion for the 5x full module tray)
- Added screw holders to the all the hot end modules. (thanks to Hits-Man for the suggestion)
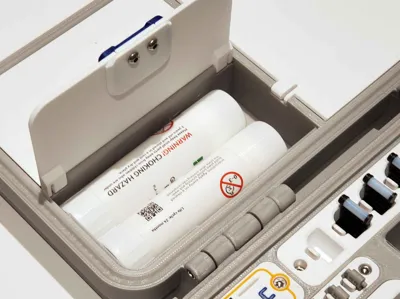
- Added some extra structure to the large door on the base option with the compartment. The updated door is a bit tight if storing a glue bottle, but otherwise it will offer a bit more stiffness to the door.
- The base with a compartment instead of the glue bottle holders is now rolled into this version (no longer a remix). See below for the different options for the base and lid.
The v3.1 update includes the following changes:
Updated the wiper module only, which holds 5 of the wipers using printed clips. This module is fully backwards compatible with prior versions, and has been updated to better hold onto the wipers. To update a previously printed case, only the following wiper module parts need to be printed from the “X1C_Bambu_ToolKit-rev160_NO_PRIME_TOWER_v3-1.3mf” profile:
Bambu_ToolKit-156_WIPER_INSERT.stl (plate 12)Bambu_ToolKit-160_WIPER_INSERT_CLIPS.stl (plate 17)
News:
8/2/2025 -There is a significant update to this design which will be released soon. The updates will include two latching bin options (to replace one or both of the hotend holders). Special thanks to Lexam for developing and proving the idea for the bin options, and for collaborating on and testing the prototype design! There will also be an option for embedding an Apple AirTag in the base of the case, under the inside label. I don't have any Airtags however, so if anyone likes that idea (and is planning to make one of these cases), drop a comment, and I will let you know when the Airtag base is ready to test. The gasket and hotend bins, as well as (possibly) the base, will also be redesigned. Finally, for folks who want to remix their own modules, the STEP file for the blank modules can be found here. I'm just finalizing some testing and the new design will be posted soon.
The only parts that are not backwards compatible with the prior v2.5 cases (and earlier) are the case top and bottom shells, and latches, due to the new modular latch design. The other modules and parts can be upgraded on all the existing case versions.
Feedback is welcome on this design.
Although I have tested this design, with many prototype prints done to tweak design elements over the past month, and am happy with how my case went together, this is is not a simple print, so feedback is welcome if you hit a snag. Many of those test prints were done to verify that the latches and inserts to fit well. But if you find that anything is too tight, please do not force the parts together (that could crack the case). Instead I recommend lightly sanding the dovetails if they do not fit, and then please post a comment, and I will have a look. I recommend calibrating the filament K-values for the materials used, due to several close fitting parts, in order to minimize any potential issues during assembly.
Description:
When I bought my X1C, I picked up some spares, and a few more since, so I needed a place for them. I really like some of the spares cases already available, but I also enjoy designing, so I tried my hand at making a case to store my spare parts, and this case is the result.
This case design is based largely on my (empty) Box For Stuff V2.1. Originally, this case used some remixed elements from Mr Sullivan's awesome Accessory Storage Case, however the latest versions have been redesigned with many updates and changes, to the point that it is no longer a remix.
This spares case is designed for the X1C, however it will work just fine with an X1E, P1P or P1S since all the spare parts should fit. There are labels included for the X1C, X1E, P1P, and P1S as well.
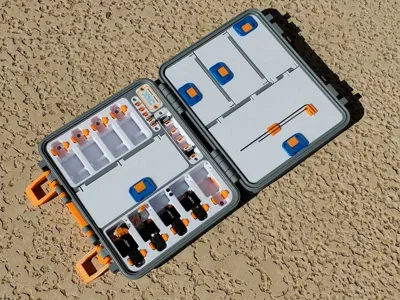
There are multiple ways which you can build this case, with the options shown below, based on the 3mf profile (X1C_Bambu_ToolKit-rev15Q_NO_PRIME_TOWER_v3-1.3mf).
Each option has a box drawn around the required plates, which are labeled from “A” to “F” and explained below:

The options shown in the pic above are:
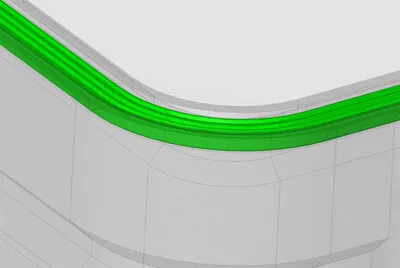
- A: Top (lid) with a TPU Gasket. Use plates 02 (PLA), 07 (TPU)
- B: Bottom (base) with a large compartment instead of the two large glue bottle holders. Use plates 04 (PLA), 09 (PETG)
- C: All the “basic” modules. These are the large and small hotend modules, the cutter module and the wiper module. The large 5x partial hotend module requires that the partial hotends do not have socks, while the small 4x full hotend module requires the hotends to have both a fan and sock attached. The hotend modules may be swapped with the other options D, E or F explained below. Use plates 12 (PLA or PETG), 17 (PETG)
- D: This is a large hotend module which holds 5x FULL hotends (with fans and socks attached), instead of the 5x partial hotends in the “basic” configuration of option “C” above. Use plates 13 (PLA or PETG), 18 (PETG)
- E: The next two options are “hybrid” hotend modules, and can accommodate either full, or partial hotends with or without a fan attached (using a swing out “table” when there is no fan). These are a bit more complex to assemble. HOWEVER please note that the hotends used with THIS module must have socks, even if they are partial hotends. Use plates 14 (PLA or PETG), 19 (PETG)
- F: This is a hybrid small hotend module similar to option “E”. It can also accommodate either full, or partial hotends with or without out a fan attached (using a swing out “table” when there is no fan). HOWEVER please note that the hotends used with THIS module must have socks, even if they are partial hotends. Use plates 15 (PLA or PETG), 20 (PETG)
Note that the TPU gasket version will not make the case water tight, there are too many variables to that. I think the gasket helps though. But don't expect to dunk this case, and have everything stay dry. If anyone has a suggestion on the gasket design, let me know, and I may try updating the gasket, if water resistance can be improved (depending on complexity of the changes).
If printing the gasket version of the base, I recommend that you test that your printer can run TPU without issues first. The cap of a sharpie is the tool I use to press the TPU gasket into place. Start by pressing in the middle of the gasket along all 4 sides, then once it's set in position, press in the corners.
I printed my prototype case in PETG, but PLA should work OK for most parts. PETG however is recommended to be used on the latches, clips and to a lesser degree, the compartment doors, since PLA may be a bit brittle for some of the tabs and printed springs which retain the various parts.
.3mf Files are included:
The .3mf files which were generated with Bambu Studio, and use a 0.4mm nozzle. The 3MF's are set up to help with printing:
1. X1C_Bambu_ToolKit-rev160_NO_PRIME_TOWER_v3-1.3mf
This file includes all the parts except for the labels and SD inserts. Most of the plates are single color, expect for the case tops and bases, which, which will need either a color swap or the AMS. I suggest running the 2 color parts without a prime tower since there will not be enough space for it. The profile is set up to NOT use a prime tower, since there is no room for it.
2. X1C_Bambu_ToolKit-REV11T_V2-4_LABELS_AND_INSERTS_FOR_AMS.3mf
This file includes all the labels and SD card inserts, which require the AMS and a prime tower. This profile and included parts are v2.4 models, but are fully compatible with the updated v3.0 design, since these parts did not change. Included is a plate with optional multicolor tabs, with or without a snapping action (they are also included as a single color print). The standard tabbed latches are shown below, and do not include a snap close for the tabs. The alternate snap closing latches have two small pawls which grip the tab, and keep it from flopping open when the lid of the case is inverted (such as when closing it). The alternate snap closing latch tabs are provided for folks who find the stock latch tabs are too loose, which can be a nuisance when closing the case.
To get the latch opened the first time off the printer, it can help to use a spudger tool or thin screwdriver, to pry up on the tab until it moves. Then cycle it a few times, open and close, to loosen the tab hinge and latching pawls (on the alternate snap close latch version), at which point the tabs should be easily closed, or pried up only using fingers. If printing in PETG, expect the latches to be much firmer than with PLA. You can also mix PLA and PETG for the A and B parts which works well.

The prime tower can be used normally on the X1C_Bambu_ToolKit-REV11T_V2-4_LABELS_AND_INSERTS_FOR_AMS.3mf profile. You can change the AMS colors, and delete any items which are not going to be used from the build plate, before printing. For reference, my AMS was set up with the following colors when I set up the X1C_Bambu_ToolKit-REV11T_V2-4_LABELS_AND_INSERTS_FOR_AMS.3mf profile:
- White PLA
- Blue PLA
- Orange PLA
Gray PLA
).
The current 3mf profile is named “X1C_Bambu_ToolKit-rev160_NO_PRIME_TOWER_v3-1.3mf” and X1C_Bambu_ToolKit-REV11T_V2-4_LABELS_AND_INSERTS_FOR_AMS.3mf for multicolor parts that require a prime tower.
If printing without using the included .3mf files, the following may help:
These models are organized into folders to help keep things together (it makes for quite a few folders, but most of them are not required). Most of the folders relate to parts for different labels, since those have different colors and each color is a part (to make it simple to colorize in the slicer). The parts are all designed to print without supports, but they will need to be oriented in the slicer for printing.
The print settings I used are the Bambu Studio defaults, with the following changes:
Quality > Wall Generator > Wall Generator > Arachne
For the TOP and BOT(tom) parts, which have an inlayed label. To get the alignment correct on the inlay, load both the part and the inlay together in the slicer, and then answer yes to the following:
I recommend disabling the prime tower when printing the case top and base. It will waste a bit more material, but since these parts take up most of the build area, there is no room for the prime tower. The AMS is only required on the first several layers of these parts anyway.
To disable the prime tower (for the Top and Bottom case parts with the inlayed labels):
Under Process “Global” > Others > Prime Tower > Enable (uncheck)
For the labels and inserts, which use the AMS, the prime tower can be used without an issue.
Tips on building it:
I recommend using safety glasses since there are a few parts that must snap in place. You can find a build guide on my website here:
https://www.mystoopidstuff.com/bambu-spares-box-build-guide.html
This will require some M3 hardware to assemble. Specifically, it requires the following screws:
(8) M3 x 6mm BHCS (now optional - see update below regarding snap together latch slides)
(2) M3 x 8mm SHCS (or FHCS)
(7) M3 x 10mm SHCS
(2) M3 x 14mm SHCS
(8) M3 x 20mm SHCS
(4) M3 x 25mm SHCS
(2) M3 x 30mm SHCS
BHCS = Button Head Cap Screws
SHCS = Socket Head Cap Screws
FHCS = Flat Head Cap Screws
Additionally, the optional large compartment door with the Allen key holder requires two 8x3mm cylinder magnets (see the v2.5 update from 12/10/2024).

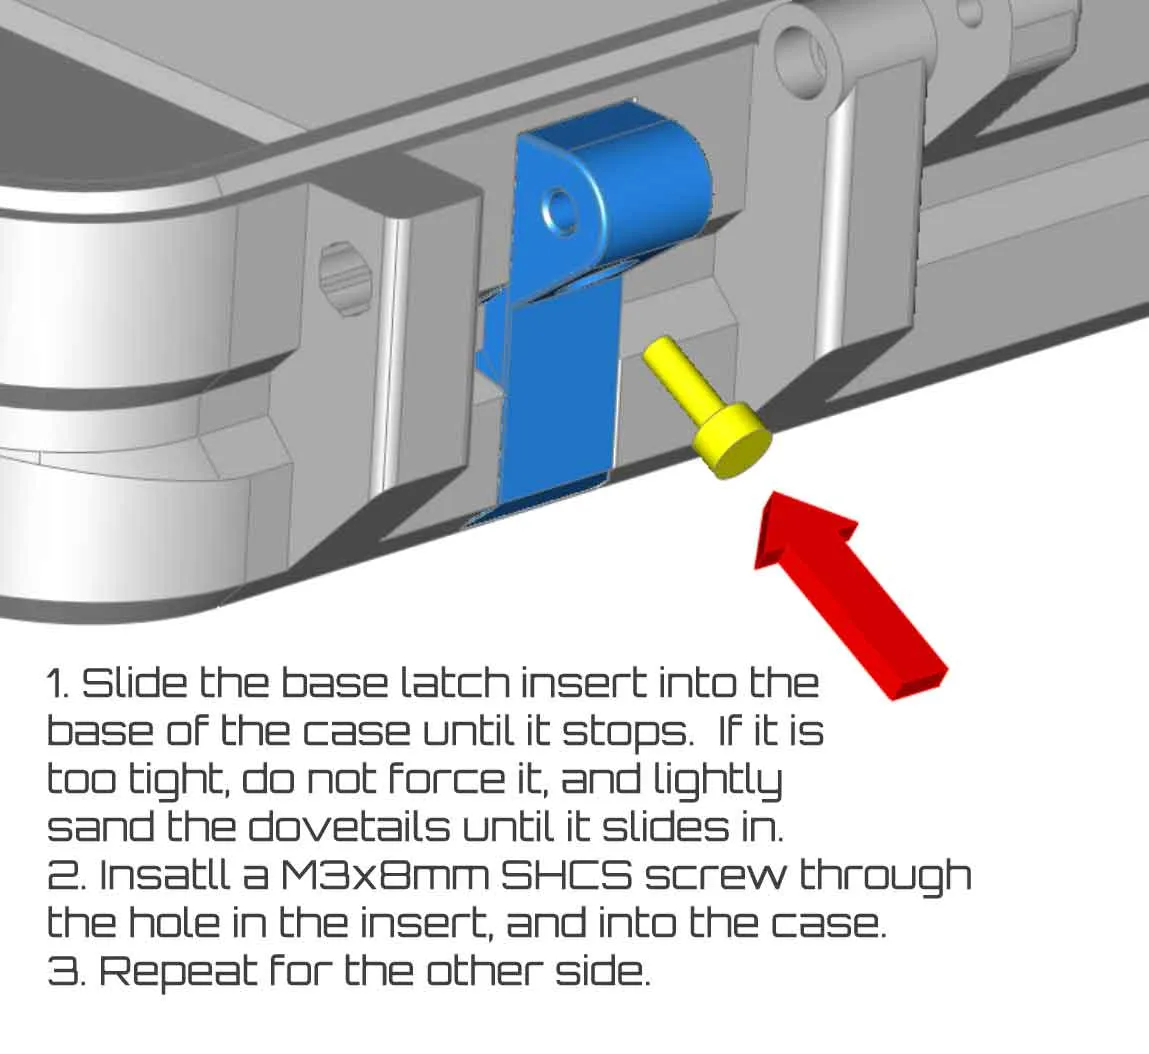
PLEASE READ:
Please don't force the lid closed if the latch seems too tight, since that may crack the case. If you have an issue, please post in the comments and I will try to assist.
The images below show the installation of the latch parts. You can also find more info on assembly on the build guide here:
https://www.mystoopidstuff.com/bambu-spares-box-build-guide.html

|  |
 |
 |

|  |
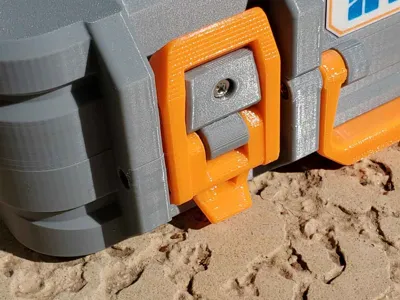
If you find the latches are too loose, you can try the shorter laches on plate 16 of the profile. Otherwise I recommend using the latches on plate 08, which should work
To assemble the latches for the small compartment doors, two M3x6mm BHCS (or SHCS) will be needed. They assemble by sandwiching the door with the top and bottom latch parts, which then connect using the screws (which are installed from below). The image below shows the orientation of the parts for assembly:

Update - There is a new alternative latch which requires no hardware (it snaps together).

If you want to try them out, just use the 2nd profile which is named “Updated Snap together slide latches”:
SNAP_TOGETHER_SLIDE_LATCHES_V7D.3mf
Note that when assembling the doors and latches, the flat (smooth) side of the door should face outward when finished. The side which has some extra structure will face inward on any doors which have that. To install the doors into the case, it will help to start by lining the doors up at an approximately 30-45° angle and then pressing in one side at a time. For the large door, install one side, then the middle and finally the last side hinge.
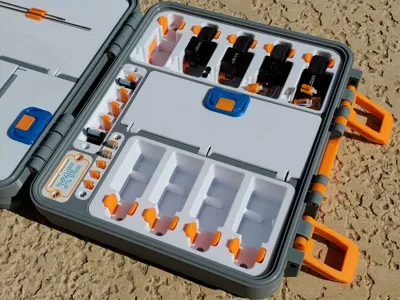
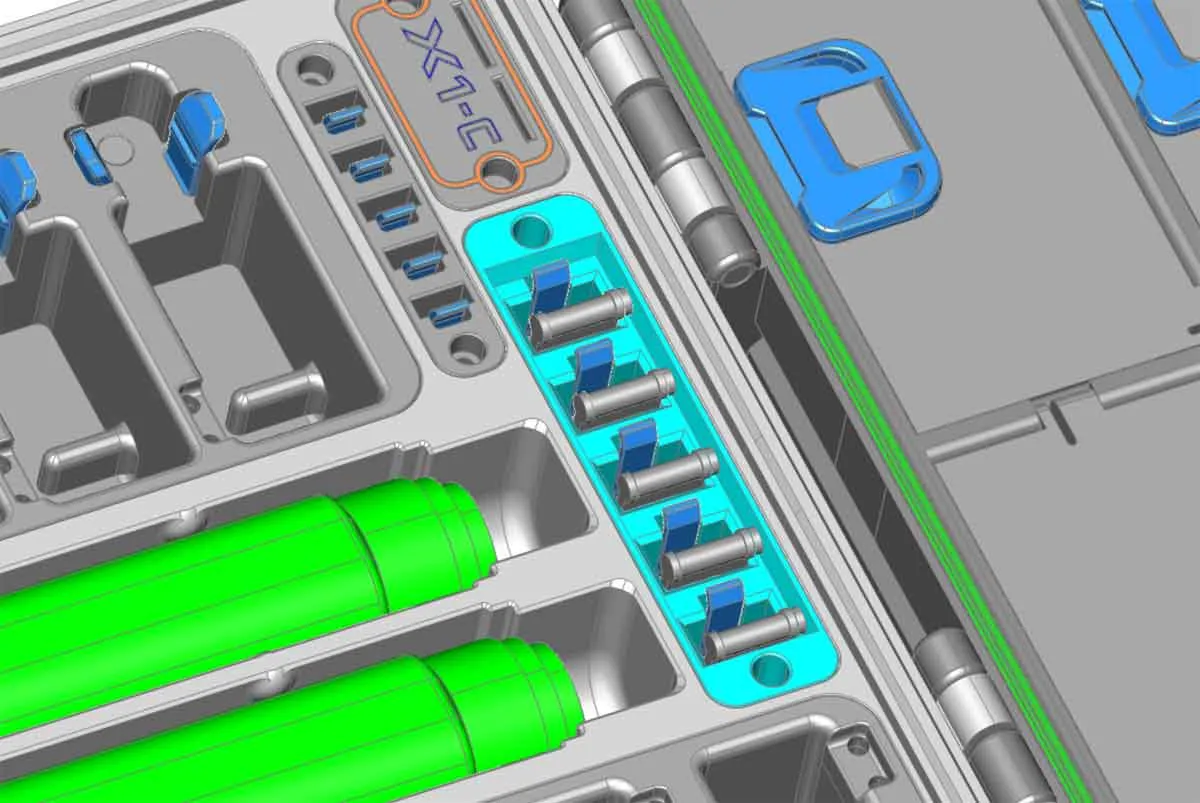
If you use the “hybrid” hotend modules, which can hold partial (no fan) or full hotends, the following images should help with assembling the modules with the inserts. The completed modules have flip out “tables” to help support partial hotends. Regardless of the type used (full or partial), the hotends will need to have socks installed, so the clips on the modules can grip the hotends. If you have questions, please post in the comments and I will try to assist.
 |  |  |
Other stuff:
This case design does not have a remixable license. However, if you want to create your own remixed modules, I've uploaded the STEP models for compatible parts (with a remixable license) here .
If you find these models useful, please post a like or a comment with some pics of your prints.
You can find the other things I'm working on at my blog here. You can also follow me here or on Printables, to see what new stuff I post. If you would like to support my work, you can Buy Me A Coffee using this link:
https://www.buymeacoffee.com/mystoopidstuff
Thanks for looking!
The model posted here is for personal, non-commercial use only, and is being shared (for free) with the 3D printing community to help us organize our Bambu printer stuff (so we can get it all together, and put in this box…all the stuff…so it's together). The trademarks used in this model belong to Bambu Lab.
Boost Me (for free)
Thanks for supporting my work!
UPDATES AND CHANGES:
Update 12/4/2023 - Apologies, I was looking over this model today and noticed that the draw latch parts were missing. I have since uploaded them in the folder named “Latch Parts”.
Update 12/25/2023 - Thanks to feedback from “Stephen Friend”@Printables, who advised me that the handle was missing, I've added that part to the “BOTTOM PARTS” folder.
UPDATE 1/20/2024: Thanks to some helpful feedback, the bins for the Wipers and Cutters have been updated.
Update 2/10/2024: I had two reports that installing the M3 SHCS would crack the hinge on this and similar models. The problem seemed to be related to slightly different size screw head diameters between M3 screws (I have measured between 4.9-5.6mm diameters). To address that problem, I've updated the files here to Version 2.1, which has a bit more clearance for larger M3 SHCS heads (the pockets are 5.8mm diameter). The new version also includes an update to the label and handle designs (if you need the old v1.0 3 peg labels or handle, see the remixes). The 3MF fils are also now updated with all the current V2.1 changes, including the new wiper and cutter designs.
Update 3/10/2024: (this update was rolled into the current v3+ version) It was suggested in the comments that since some folks don't use the Bambu Liquid Glue, the space could be better utilized. This remix will not replace the current design, but will be an additional option. The new compartment will also be able to hold the glue bottles (though not as securely as the current design). The changes made for this option were only to the bottom of the case. You can find the remix here:
https://makerworld.com/en/models/243389 (as of v3.0 on 3/10/2025, this remix has since been rolled into this version, so all files can be found here)
Update 6/12/2024: The profiles were updated with the following changes:
- increased walls from 2 to 3 on all parts
- changed infill on the latches, handles and labels to 100% to provide these with extra strength
Update 7/27/2024: I uploaded the V2.1 hotend inserts as STEP models, for folks that want to remix the holders.
Update 7/29/2024: I updated this design to v2.2 with several optimizations for the hotend holders. Version v2.2 includes the following updates:
- The hotend modules have been updated with separate tabs, which are replaceable and can be printed in the optimal orientation for increased strength.
- The 4x hotend module was modified to improve the area where the screw heads contact the module. This change requires a new base, so the v2.2 modules are not backwards compatible with v2.1. The old v2.1 files will be moved to a separate folder so they will remain available here.
- Updated the compartment latches to use tabbed latches.
- Both the “designer” profiles have been updated with the latest version, please verify if other print profiles have been been updated (if they have separate tabs for the hotends, then the profile is using the current v2.2)
Update 8/14/2024: Updated to version 2.3 with the following changes:
- New case label inserts for the X1C, X1E, P1P and P1S.
- New blank label inserts for the 2x and 5x SD card holders.
- All label inserts now use the same SD holder design as used in the A1 Spares case, which includes a small clip to hold the cards.
- The multicolor AMS profile named “X1C_Bambu_ToolKit-REV11T_V2-3_LABELS_AND_INSERTS_FOR_AMS.3mf” includes these changes.
- The updated case labels are fully backward compatible with all prior versions.
- The original v2.2 case labels are still available in the folder named "OLD Version 2-2 models".
 |  |  |
Update 10/3/2024: I'm working on an improvement to the snap in front labels (which will be backwards compatible to v2.1). The changes should improve the strength of the labels in certain areas, and there will also be additional front snap in labels for the P1P, P1S and X1E (which I missed on the last update). Those changes should be updated this week, once I test them.
Update 11/15/2024: Due to a report of a broken latch, I updated the model with a 0.3mm longer latch (Bambu_ToolKit-11X_LATCHES_BOTH-LONGER.stl). I set this up on the 3mf profile as the default choice, but I left the original latch on a separate plate if the longer version is too loose. I used the original latch without issues, but I recommend using the longer latch first and if that does not work, please post feedback. In any case, don't try and force the lid closed if the latch is too tight, since you may crack the case. If you have an issue, please post in the comments and I will try to assist. The current 3mf profile is “X1C_Bambu_ToolKit-rev11X_NO_PRIME_TOWER_v2-2.3mf”.

Update 12/3/2024: I added an alternate snap latch for the doors in the lid of the case. These have a very small catch, which ads some resistance so they should not flop down (which was a problem mentioned by some makers). There is a single color version of the new snap latches, and a mult-color version. The single color version can be found on the “X1C_Bambu_ToolKit-rev11X_NO_PRIME_TOWER_v2-4.3mf” profile (as “New Latching Lid With Catch_1B_BOTH.stl”), and the two color version can be found in the multi-color profile “X1C_Bambu_ToolKit-REV11T_V2-4_LABELS_AND_INSERTS_FOR_AMS.3mf” as “New Latching Lid With Catch_1B_A.stl” and “New Latching Lid With Catch_1B_B.stl” (which would be loaded together in the slicer if you are not using the profile which is already set up with all the correct settings to print them.
To get the latch opened, it can help to use a spudger tool thin screwdriver to pry up on the tab until it moves. Then cycle it a few times open and close, to loosen the latching pawls, at which point it should be easily snapped closed, or pried up only using fingers. If printing in PETG, expect the latches to be much firmer than with PLA. You can also mix PLA and PETG for the A and B parts, however I ran all my test parts in either PLA or PETG.
The current version is now v2-4 (v2.4).
 |  |  |
Update 12/10/2024: Thanks to the suggestion from AgentP1P, I updated the large compartment door (in the lid) to accommodate the two 1.5 and 2mm Allen keys which ship with the printer and AMS. The pics show the AMS keys, since those are the ones I could find, but there is room for longer keys as well. The new door has two clips, which each hold an 8x3mm cylinder magnet. The clips then snap into the door (you can glue them if you want, but they seem to be held well enough without it on mine). The new door (and the standard plain door) have also been updated with some additional structure which will help prevent flexing of the door. Only the large compartment door (in the lid of the case) was updated, no other changes were made. These changes have been updated in the 3MF (X1C_Bambu_ToolKit-rev11X_NO_PRIME_TOWER_v2-5.3mf). The new parts are set up as an additional two (alternate) plates. Feedback on the new clips is welcome.
 |  |  |  |
The current version is now v2-5 (v2.5).
Update 12/19/2024: I added another “extra long” latch option for folks who may need it. See the note in the description which explains this update. The new latch is Bambu_ToolKit-11Y_LATCHES_BOTH_EX_LONGER.stl (On it's own plate, 0.6mm longer latch).
Update 3/11/2025: MAJOR UPDATE to v3.0. This update adds several new features including modular latches, updated hotend modules with screw holders, and optional hybrid modules that can hold full or partial hotends (with socks). The base with a large compartment is also now rolled into this model, and a newer (stronger) door has been added for that option.
 |  |  |  |
Update 3/19/2025: Updated to v3.1. The only change is to the wiper module, which holds 5 of the wipers using printed clips. This module is fully backwards compatible with prior versions, and has been updated to better hold onto the wipers. To update a previously printed case, only the following wiper module parts need to be printed from the “X1C_Bambu_ToolKit-rev160_NO_PRIME_TOWER_v3-1.3mf” profile::
Bambu_ToolKit-156_WIPER_INSERT.stl (plate 12)
Bambu_ToolKit-160_WIPER_INSERT_CLIPS.stl (plate 17)
 |  |
The current 3mf version is now v3.1 (v3.1).
Update 7/11/2025: Updated the 4x full (and partial) hotend bin on plate 15 to remove an unsupported overhang. The model for the 4x bin on plate 15 (Bambu_ToolKit-170_4x_Full_Hotend_Module.stl) was updated with a small change, and the plate now uses painted supports in one location. No other changes were made. The current version is “X1C_Bambu_ToolKit-rev170_NO_PRIME_TOWER_v3-1.3mf”.
12/25/2025: Added an alternate set of base modules for folks that want to use bins instead of the hotend holders. They can be found in the files > Test Parts > AlternateBASEBinModulesV3-1R170.3mf. This will also be available as a seperate profile soon. Thanks to Lexam for the idea, and to Pepebuho for testing the smaller bin module!
3/23/2026: Added a profile named “Updated Snap together slide latches” with new snap together latch slides.
License
You shall not share, sub-license, sell, rent, host, transfer, or distribute in any way the digital or 3D printed versions of this object, nor any other derivative work of this object in its digital or physical format (including - but not limited to - remixes of this object, and hosting on other digital platforms). The objects may not be used without permission in any way whatsoever in which you charge money, or collect fees.
Comment & Rating (599)