Bottle Cap/Marker - Sealed with Rubber


Print Profile(6)

![[Smileys] 0.16mm layer, 2 walls, 15% infill](https://makerworld.bblmw.com/makerworld/model/US289a69db759f02/130685746/instance/2024-06-28_92a4c95dd2c0e.png?x-oss-process=image%2Fresize%2Cw_100%2Fformat%2Cwebp)
![[Card Symbols] 0.16mm layer, 2 walls, 15% infill](https://makerworld.bblmw.com/makerworld/model/US289a69db759f02/130685425/instance/2024-06-28_5a0f2c2862579.png?x-oss-process=image%2Fresize%2Cw_100%2Fformat%2Cwebp)
![[Symbol 2] 0.16mm layer, 2 walls, 15% infill](https://makerworld.bblmw.com/makerworld/model/US289a69db759f02/130685571/instance/2024-07-07_63916c9783018.png?x-oss-process=image%2Fresize%2Cw_100%2Fformat%2Cwebp)
Bill of Materials
Description
Bottle Marker/Cap *Sealed Edition with Rubber for Drinks & Beer
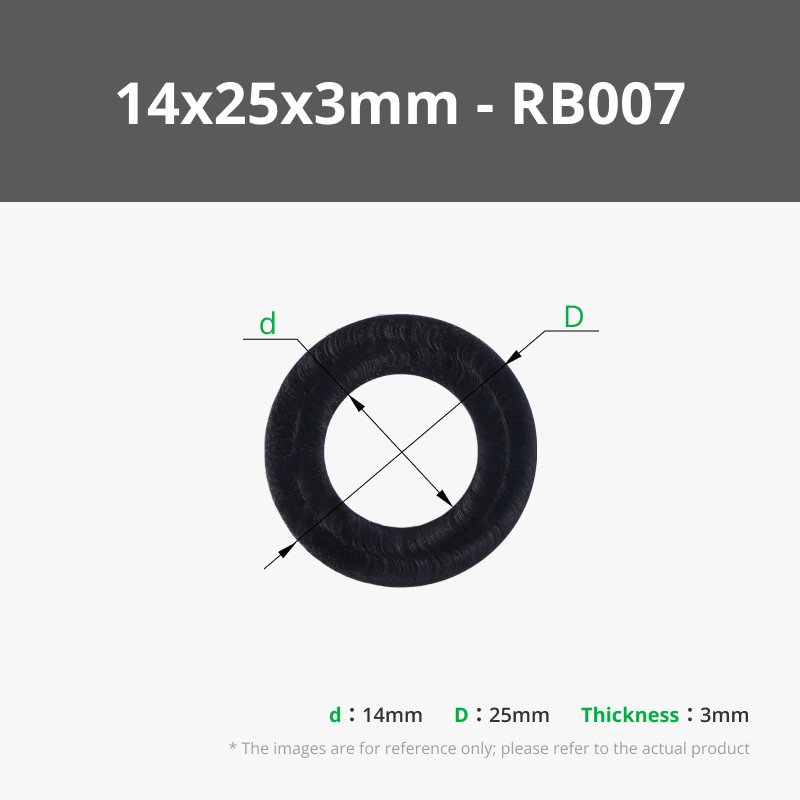
This is file is based on my Bottle Marker/Cap V2 with a slot for Rubber Gasket Seal Ring 14x25x3.
Jump to Bottle Marker/Cap V2 if you do not need it 100% tight!
- Sealed ! 100% tight
- Overall better fit
- Sturdier hinge with a tiny bit more tolerance
- Crown waves instead of slots to stretch the cap
- Bigger opener
- Optimized for MakeMySign
Perfect Summer Party Gadget! Use it at the beach, garden or at home to protect and mark your drinks. Every Crown Cap Bottle could be marked with the snap fit Bottle Marker!
And you can simple close it with the integrated Cap to protect from insects. Also the open/close blob makes it to a nice fidget toy.
😁
- Marked! Nobody drinks out of your bottle!
- Protect your Drink from insects!
- No other stuff can go into the bottle!
- Its 100% tight, keeps your drinks fresh for a long time
It's a Print in Place Part just insert the Rubber Gasket Seal Ring 14x25x3.


Try the hinges, snap over the bottle and close the Lid.
I adapt 3 Sets of 5 Caps, each has an print profile, where you can “exclude objects”, for choose your liking:
- Smileys
- Card Symbols
- Symbols 2
Happy Printing! If you find it useful please leave a like👍, boost🚀 and follow me✔. It's free🤗
Instruction for custom Caps with Make my Sign:
- Create a 26x26 round plate
- Set thickness to 0,36 (Base, Text, SVG, Shapes) and enable “facedown mode”
- Design the plate and download as 3mf
- Open “Blank" Cap in Slicer and import the just created 3mf (Geometry only)
- Align it with the Cap (You can delete the “backdrop” part for better visibility)
- Merge all parts and print
Disclaimer:
This work by BamBam Design is licensed under Standard Digital File License
Strict non-commercial, personal use only license.
You are not allowed to Remix or Copy this model to other 3D printing websites without my permission.
Commercial license you can get here:
https://www.patreon.com/BamBamDesign/membership
Membership
You want to sell printed objects from my designs or just support my work? Now you can subscribe on Makerworld! Thank you!
License
You shall not share, sub-license, sell, rent, host, transfer, or distribute in any way the digital or 3D printed versions of this object, nor any other derivative work of this object in its digital or physical format (including - but not limited to - remixes of this object, and hosting on other digital platforms). The objects may not be used without permission in any way whatsoever in which you charge money, or collect fees.
Comment & Rating (260)