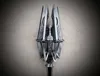
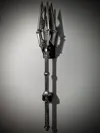
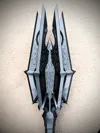
Sauron's Mace


Print Profile(13)
Description
Anyone still coming to read this after a couple years, thank you! As part of looking at this again after two years, I have went ahead an created a second version (v2 print profile) + added a profile for a 3M command hook mounted wall mount and table mount as well.
V2 : There are two major changes in v2, but the mace still assembles basically the same as below:
- This version is redesigned to fit a ½ inch PVC pipe throughout the model, which makes the model incredibly strong. Indexing pins have been added as well to keep handle pieces from rotating when gluing together.
- The print profile is now printed with just less than 1 kg of filament. I printed several maces to find the right balance for weight, forward-heaviness, and ability to carry and swing the mace.
With the lighter profile and added PVC support this becomes not only a display piece but a full on cosplay prop. The original profiles will be available for anyone who wants to print the original super heavy all 3d printed mace.
Mounts: Two mounts are now available as well that give perfect support. Both mounts fit either mace.
- Table mount: The first mount a table mount that allows the mace to be displayed horizontally on a table.
- Wall Mount: The second mount is a pair of mounts that allow for display on a wall. These utilize 3M medium designer command hooks and require a printed part that is in the profile plus can be seen individually here: https://makerworld.com/en/models/1609907-command-hook-for-medium-desinger-hooks#profileId-1698085
- This mount was designed in mind to support the heavier mace (and will easily do the lighter one). To support the heavier one, both mounts will absolutely be needed as each is rated for 1.3kg.
- Best way to get this on the wall is mount the upper mount to where you want the mace to be and then attached this properly to the wall as you would any command hook. Attach the upper mount to the hook on the wall and then mount the mace so it freely hangs. Then put the bottom hook on the bottom mounting bracket and stick the sticker to the hook. Peel off the wall section and carefully put the whole thing behind the mace but not yet touching the wall. Get it in place so the mount will support the bottom of the upper handle and then stick it to the wall. Take the mace off, take the bottom mount off and then press firmly to set the hook on the wall like normal (also make sure to clean the area you will stick to the wall with IPA first).
One mace to rule them all?
While there are a few adaptations of Sauron's mace scattered around the internet, I didn't necessary feel those were complete (no patterning), nor were they optimized well enough for printing and assembly (required internal structuring; a lot of post-processing). Therefore, I set out to model my own version from scratch that satisfied my own desired for a show piece. What I have here is a model designed entirely my me in fusion. I hope you enjoy it.
This model consists of 21 pieces and 8 connectors to create a model that is ~46 inches long and can weigh upwards of 2kg.
Printing Tips
- For my own print, I went with a silk filament because I hate post processing. While some parts can probably be printed flat, I have designed them to all be printed vertically. If using silk pla, I highly suggest to print all parts in the same orientation as that will give the best looking outcome.
- I only own a P1S and have optimized this to print using most of the vertical space of that sized printer. If you have a smaller printer, I do apologize, but there are likely some spots where you can use the slicer to make parts smaller.
- Any support I used were slim tree supports. I have uploaded my print profiles that I used which include manual tree supports. Threads, pattering, and small overhangs (like the handle rings) should not require any support.
- I highly suggest to print the longer thread of the Lower Handle (Upper) piece facing up. This piece will be a weak point as it connects the lower handle to the rest of the mace. If that thread is printed down it will be supported and will be a weaker junction. I also suggest to use multiple bottom and top layers so this piece is strong.
- Because the blades are optimized to be printed vertically, they have the pegs that will require support. Be sure to clean these supports well as the pegs being too large may effect final fitment.
- Silk filament can give weird banding when cooling rate are different, so, if using silk filament, it may be a good idea to print each piece separately. This is what I did to ensure good consistency in the finish.
- This print can probably use anywhere from 1kg all the way to 2kg of filament. Regardless, I highly suggest to make the lower handle sections either much more robust than the upper or, ideally, fully walled. My print profiles would culminate in a mace that weights about 1.7kg.
Assembly Tips
- Assembly should be rather straight forward. I have attached pictures of the fusion model exploded into sections so as to be able to follow how to assemble. I suggest to assemble from the bottom to the top. I also suggest doing each section as a dry fitment before gluing everything together. After gluing any section, I suggest letting it cure for 24 hours before gluing attaching sections.
- The threading has been given an ample offset, so these pieces should thread together easily. Thread each of the them together in the correct order dry and them take them apart and add a few drops of CA glue to the threads. Let these cure overnight.
- For the upper handle section, Use the connector and CA glue to put the lower and upper sections together. Let cure 24 hours.
- After both the lower and upper handle sections have cured, screw the lower handle section into the upper handle section. Use CA glue to bind these permanently. This will be a weakest point on the mace, so be careful.
- Connect the upper and lower pike pieces using the large connector and CA glue. Let these cure 24 hours.
- Using the smaller connector, connect the handle to the pike section. Fit this up with CA glue and let cure.
- Dry fit each of the upper and lower blade sections into their respective positions in the pike. If these don't go in with no more than a little effort, ensure all support material has been removed. For blade assembly what worked best for me was:
- Add few drops of CA glue into each of the pike holes
- Glue the blade connector into the bottom blade
- Add glue to the top of the connector and place the top blade onto the lower blade and connector (this should give a few seconds to pull them apart when placing them into the pike holes).
- Place the lower blade partway in to its pike hole
- Place the upper blade partway into its pike hole
- Press both the lower and upper blades all the way into their holes--this may require some wiggling and effort
- Hold the upper and lower sections together vertically while pressing the entire thing toward the pike. Hold this for several seconds until glue sets. Then let cure fully before moving on to the next blade.
For anyone interested in something a bit more out of the box, I have done a total rework of the mace head to be able to mounted as a standalone wall scone that can be hung from a type of command hook (yay no screws!). You can check it out here: https://makerworld.com/en/models/554562#profileId-473205
Edit: For anyone interested, I have also added a 20% version stl file that is a solid model with no cuts. So you want to try and cut it and print a mini one or use a resin printer, you can download that file. The file is huge, so it may take a while to download. There is also a new mini version print profile which looks really cool on desk shelf.
License
You shall not share, sub-license, sell, rent, host, transfer, or distribute in any way the digital or 3D printed versions of this object, nor any other derivative work of this object in its digital or physical format (including - but not limited to - remixes of this object, and hosting on other digital platforms). The objects may not be used without permission in any way whatsoever in which you charge money, or collect fees.
Comment & Rating (797)