Caliburn 4 - 2023 - EU Edition (metrisch) - Standard-/Kurzdarts
Caliburn 4 - 2023 - EU Edition (metrisch) - Standard-/Kurzdarts


Print Profile(1)

Description
Der Inhalt ist zu lang und wurde abgeschnitten
Beachtet auch meine neue Version des LYNX Blaster
CALIBURN 4 - EU Edition
HINWEIS! Bitte druckt diesen Blaster recht Farbenfroh, so dass er sich stark von echten Waffen unterscheidet. Es handelt sich hierbei nicht um Kinderspielzeug und bitte nicht auf Personen schießen oder in Innenräumen verwenden!
UPDATE 08.09.2023:
Danke an “scr1tch“ für den Hinweis auf Schraubenhändler GEDEX. Ich habe die BOM entsprechend erweitert um möglichst viel an Versandkosten zu sparen.
UPDATE 18.08.2023:
Ich habe kleine Änderungen an den Dateien “PGV_L” und “PGV_R” vorgenommen. Die Abstände zum Pump Teil “4DoomS” wurden minimiert um das Wobbeln zu entfernen. Die neuen Dateien haben den Namen PGV_Left_tight_EU und PGV_Right_tight_EU und können als Alternative verwendet werden.
UPDATE 08.08.2023:
Kleinere Änderungen am vorderen Griff (4DoomS_EU), so dass nun auf die 4x M5x8 Schrauben verzichtet werden kann. Es können jetzt ebenfalls 4x M5x10 verwendet werden. Die BOM wurde angepasst und die STEP Datei ebenfalls neu hochgeladen.
Ich bin bereits vor einiger Zeit auf den Original Caliburn 4 Blaster von Captain Slug aufmerksam geworden, hatte das Projekt jedoch mangels zölligem Zubehör aber erstmal auf Eis gelegt.
Nachdem nun aber der gute CHAOSDRUCKER mit der alten Caliburn in der German Edition um die Ecke kam, beschloss ich das Projekt nun doch anzugehen und den kompletten Blaster in Variante 4 auf metrische Einheiten umzuzeichnen. Mein Dank geht dennoch an den Chris a.k.a. CHAOSDRUCKER für die Recherche der richtigen Feder und die durch ihn geleistete Motivation das Projekt umzusetzen.
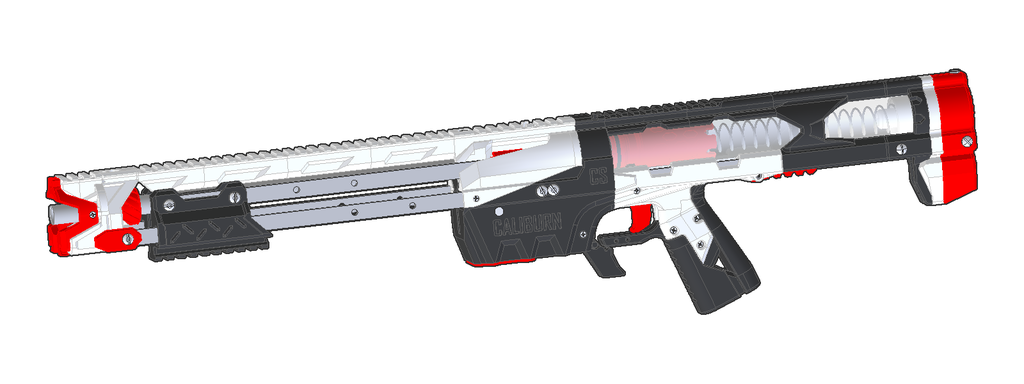
Darüber hinaus habe ich noch den Barrel Shroud inkl. Rail Riser, einen anderen Foregrip und den SCAR Schalldämpfer verbaut. Der Sear als auch der Trigger sind für eine Federaufnahme konzipiert, können aber auch durch die originale Variante mit Gummiband getauscht werden (In Dateien enthalten). Auf den Bildern sieht man die Caliburn 4 zum einen mit verbautem Barrel Shroud und OHNE. Hierbei handelt es sich um ein optionales Add-On und kein must have.
Hier bekommt ihr einen schönen Vergleich der Caliburn's:
Caliburn C4 vs Caliburn:
Ich habe weitestgehend versucht mit Einschmelzmuttern in den Größen M3 und M5 zu arbeiten und darauf geachtet, dass ihr die Hardware komplett im DIY Handel bekommt um den Preisrahmen nicht zu sprengen. Das Alurohr und sämtliche Schrauben, Muttern und die Spannstifte habe ich beim regionalen HORNBACH einzeln gekauft.
Anbei die komplette Bill of Material (BOM):
- 8x 12x3 mm Alu Flachprofil / Flachstange 370mm - alternativ direkt auf 400mm - eBay
- 1x Acrylrohr 40 /36mm - 1m Rohr - alternativ direkt auf Wunschmaß - eBay
zugeschnitten auf:
- 1x 185mm
- 1x 75mm
- 1x Alurohr 15x1mm 1m (für den Lauf)
zugeschnitten auf:
- min. 36cm (wenn es vorn bündig abschließen soll)
- alternativ auf 43cm für den Captain Slug Suppressor
- 5x Dichtring 36/30 - 3mm Strichstärke (mit Schalldämpfer 5x, ohne 3x)
- 3x Dichtring 13/10 -1,5mm Strichstärke
- 1x Feder, falls ausverkauft alternativ diese beiden Federn #1 - K25 + Feder #2 - K31.
Die beiden Federn (K25 & K31) werden ineinander gesteckt um so möglichst nah an der Original angebotenen zu sein.
- 3x Zugfedern 6x25 0,5mm Stärke
- 38x Einschmelzmuttern M3
- 41x M3x10 Senkkopf oder https://amzn.to/44fLHvr
- 2x M3x30 Senkkopf oder https://amzn.to/45ctccE
- 2x M3x8 Zylinderschrauben oder https://amzn.to/45wt6we
- 1x M3x30 Zylinderschrauben (für Foregrip - alternativ +1x M3x30 Senkkopf) oder https://amzn.to/3QKTjmv
- 2x Mutter M3 oder https://amzn.to/3QJNiqg
- 3x Einschmelzmuttern M5
- 10x Mutter M5 oder https://amzn.to/44jgWpg
- 11x M5x10 Linsenkopf oder https://amzn.to/3YC1tQ5
- 8x M5x20 Linsenkopf oder https://amzn.to/3KNfULg
- 5x Mutter M6 oder https://amzn.to/45wzMdv
- 2x M6x25 Zylinderschraube oder https://amzn.to/3YDPAJc
- 3x M6x40 Zylinderschraube - https://amzn.to/3E4JJ6t
- 2x Passstifte 3x45 (für Magazin Adapter) - nicht erforderlich bei NERF Elite Magazin
- 1x WORKER TALON Kurzdart Magazin
- 50x WORKER TALON Kurzdarts
- Optional das 1x NERF Elite Magazin 10 Schuss
- Und die passenden Darts - 400x Darts
Anleitung:
Die Originalanleitung von Captain Slug kann in den Arbeitsschritten verwendet werden. Lediglich der Plunger und Ram haben durch mich etwas größere Anpassungen erhalten, da ich auf den ALU Ram verzichten wollte. Die Aluminium Schienen im Maß 12x3mm müssen ebenfalls noch gebohrt werden. Ich empfehle die STEP Datei als Hilfestellung für die genauen Maße zu verwenden. Bei der Verbindung in der Mitte, habe ich in die Aluprofile jeweils ein Gewinde in M5 geschnitten, da aus Platzgründen keine Muttern etc. platziert werden können.
Zur besseren Übersicht und Anpassung hänge ich meine STEP Datei ebenfalls mit an.
PRINT SETTINGS
4/4/4/40% GITTER / GRID 0.2 ABS
Übersicht der Einschmelzmuttern:


Übersicht Ausrichtung:


Bei Fragen dürft ihr mich gerne Anschreiben!
Bin schon sehr auf eure Makes gespannt.
English Description:
CALIBURN 4 - EU Edition
NOTE! Please print this blaster quite colorful, so it is very different from real weapons. This is not a children's toy and please do not shoot at people or use indoors!
UPDATE 08.09.2023:
Thanks to "scr1tch" for the hint on screw dealer GEDEX. I have expanded the BOM accordingly to save as much as possible on shipping costs.
UPDATE 18.08.2023:
I have made small changes to the files "PGV_L" and "PGV_R". The distances to the pump part "4DoomS" were minimized to remove the wobble. The new files are named PGV_Left_tight_EU and PGV_Right_tight_EU and can be used as an alternative.
UPDATE 08.08.2023:
Minor changes to the front grip (4DoomS_EU) so that the 4x M5x8 screws can now be omitted. 4x M5x10 can be used now as well. The BOM has been adjusted and the STEP file has also been re-uploaded.
Some time ago I became aware of the original Caliburn 4 Blaster from Captain Slug, but put the project on hold for the time being due to the lack of inch accessories.
After the streamer CHAOSDRUCKER came around with the old Caliburn in the German Edition, I decided to start the project and redraw the complete blaster in variant 4 to metric units. My thanks still go to Chris a.k.a. CHAOSDRUCKER for the research of the right nib and the motivation he gave me to realize the project.
I also added the RMAX Barrel Shroud incl. Rail Riser, a different Foregrip and the SCAR Suppressor. The sear as well as the trigger are designed for a spring mount, but can also be replaced by the original version with rubber band (included in files). On the pictures / renders you can see the Caliburn 4 with the barrel shroud installed and WITHOUT. This is an optional add-on and not a must have.
Here you get a nice comparison of the Caliburn's:
Caliburn C4 vs Caliburn:
I have tried as far as possible to work with fusible nuts in the sizes M3 and M5 and made sure that you get the hardware completely in the DIY trade to not blow up the price range. The aluminum tube and all screws, nuts and the dowel pins I bought individually at the regional HORNBACH.
Enclosed the complete Bill of Material (BOM):
- 8x 12x3 mm aluminum flat profile / flat bar 370mm
- Acrylic tube 40/36mm 1m tube - alternatively cut directly to size - eBay
cut to:
- 1x 185mm
- 1x 75mm
- 1x alu tube 15x1mm 1m (as barrel)
- 5x sealing ring 36/30 - 3mm line thickness (with suppressor 5x, without 3x)
- 3x sealing ring 13/10 -1,5mm line thickness
- 1x spring, if sold out alternatively these two springs #1 - K25 + spring #2 - K31.
The two springs (K25 & K31) are inserted into each other to be as close as possible to the original offered.