5015 FAN DUCT FOR ELEGOO NEPTUNE 3 PRO/PLUS/MA
5015 FAN DUCT FOR ELEGOO NEPTUNE 3 PRO/PLUS/MA


Print Profile(0)
Description
Full Credit to makss70 for creating an incredible design
WORK IN PROGRESS
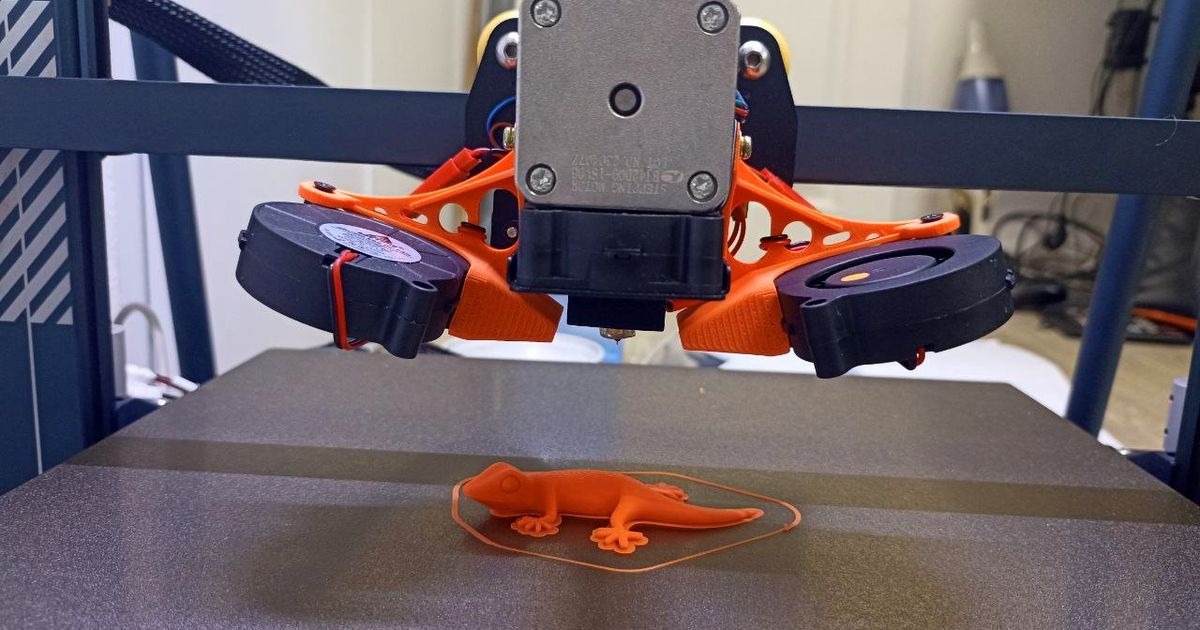
This is a remix of the original model. The original model was great but lacked some holes for mounting which caused me to have problems installing it, so I fixed it to make it one of the easiest and cost-effective upgrades for your Neptune 3 Pro. The performance of the ducts is incredible, take a look and you can see that there is absolutely no resistance for the airflow and it is only getting concentrated into a smaller area. This contrasts to other designs where the fans are mounted vertically and the air has to get redirected 90º through a longer duct.

This allows the power of the 2 5015 blower fans to stay unhindered and results in EXTREME part cooling. I can now print 75º overhangs with less defects than if I had used supports (!).
(I actually have to run the fans at <80% because running them at full speed gives me terrible layer adhesion, even with PLA)
BOM:
2x 5015 blower fans - I used these: https://www.aliexpress.com/item/32865977791.html?spm=a2g0o.order_list.order_list_main.5.292218025yQx7D I recomend the “24VDual Ball 8500RPM” option but the 6000rpm option would probably be enough as well. Other good fans would be fine but I believe that the Gdstime fans are a good price/performance option.
4x M3x8 Bolts (optional) - I had some lying around and used them to mount the printed parts to the print head but the original screws should be ok
2x small Cable ties - Used to attach the fans to the printed part, you can alternatively use bolts or glue.
Print Settings
Nozzle Size: 0.4mm
Material: I used ASA, Probably the best choice but other filaments would be fine
Infill: recommended >40% cubic, gyroid etc
Perimeters >4
Supports: no
Top/Bottom layers: >4
Layer height: 0.2mm
Line width: forced 0.4mm
(Other fasteners may be necessary if you are using the ADXL345 mount)
Assembly:
- Take off the original fan shroud using the 2 screws in the top corners of the print head.
- Somehow convert the connectors from the fans (usually JST XH) to the connectors on the toolhead (JST PH). I cut the connectors off the original fans, stripped them back so that the wires were exposed and then twisted them together and insulated them with electrical tape (probably not the safest option but it is what I used and it worked)
- Remove the the pair of screws form one side of the print head and then replace them with the M3x8 bolts and use them to hold the printed fan ducts to the print head. repeat for the other side.

- Insert the Blower fans into the ducts and use the cable ties to hold them in place via the mounting hole on the fans and the hole on the printed part

- Test - it will be loud when running at 100%, but don't worry it will practically never run at those speeds, (that is if you got good fans…)
notes for ADXL345 mount

- will need more M3 hardware (could reuse the screws that held the original shroud on maybe?)
- The mount was designed for BTT ADXL345/LIS2DW accelerometers but they have a generic mouning design, so others would probably work too. (The BTT S2DW is great, I used it for my Voron calibration - highly recommended)
(the accelerometer would only be useful if you have switched to klipper firmware)
Please give me any feedback or suggestions you have and any recommendations for future models :)