Nuka-Cola Bottle (from Fallout)


Print Profile(5)


Description
Thirsty, wastelander?
Here, have a Nuka-Cola, fresh from before the war. What it costs, you ask? Nothin', this is on me. But if if you can spare a "boost" I will be as happy as a puppy with two tails. ;)
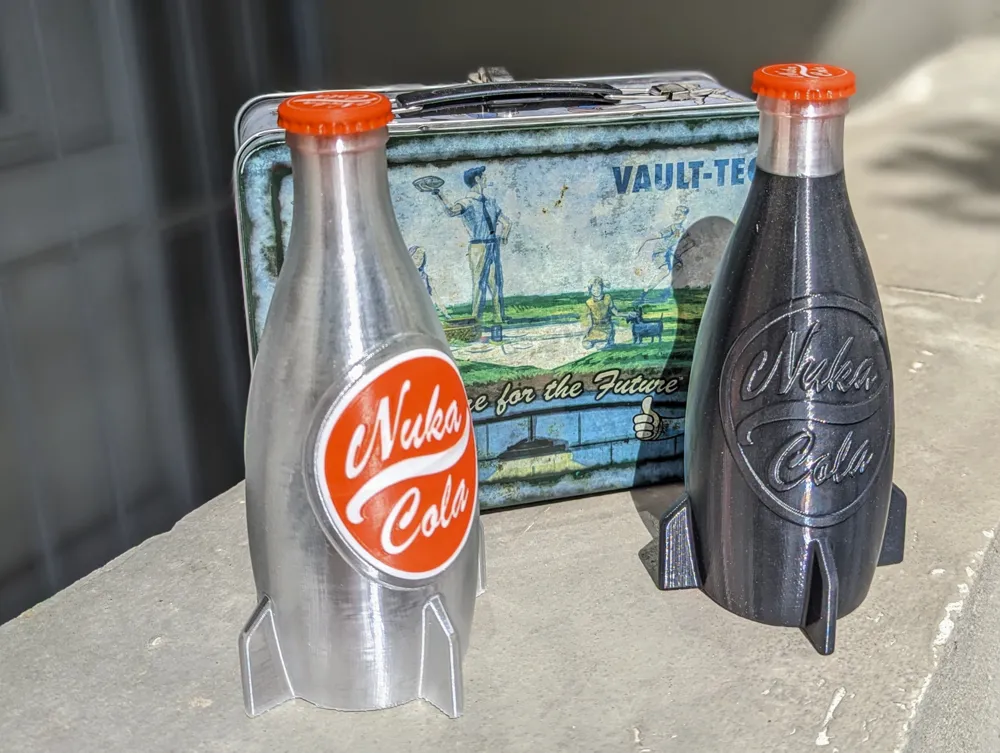
Print your own Nuka-Cola bottle from Fallout in the great 2077 Space Age design! I designed it from the scratch according to some photos of an original bottle. The bottle is hollow and matches my Nuka-Cola Bottle Cap. You can easily press the cap on the bottle. Without the cap the bottle has a height of 178mm and can hold a volume of 380ml.
I also added an optional label for the bottle that can be glue to one side. On the other side there is an embossed Nuka-Cola logo.
Ready for an upgrade? See my Nuka-Cola Quantum bottle.
Print preparation:
Make sure that your print bed is clean and grease-free. An unsufficient bed adhesion is in most cases not a problem of the print profile but a cleanliness issue. If you want you can use glue on your print bed but for PLA this should not be necessary. Use the textured PEI plate and a bed temperature of 55-60°C.
For the print quality it is important that you use a good and calibrated filament. Know your k-factor and use the correct flow setting. Bambu filament makes this step easier but any other quality brand will do the job.
Print settings for the bottle:
The bottle is an easy print. Use a 0.4mm nozzle, set the slicer to the 0.28 Extra Draft slicing profile and activate the spiral vase mode. The outer line thickness should be 0.8mm. Now you will get a robust, but hollow bottle. I like to reduce the outer wall speed a little bit to further improve quality.
Be warned - the bottle is not meant to be waterproof. You can try to use concentric pattern and ironing for all surfaces. But if you really want a leak-free bottle you need to use clear coat or expoy on the inside to seal all pores.
Print settings for the optional label:
The optional label will take a long time to print. It is divided into two parts to make printing easier. An AMS is necessary because you need two colours. Use the 0.08mm Extra Fine slicing profile but change the layer height to 0.1mm. Set the wall generator to "Arachne" and reduce the outer wall speed to 100 mm/s. A small print tower will help to enhance the colour separation. After printing glue both halves to the empty frame on the bottle.
I added the complete label to the raw model files if you want to try your own print settings.
For more detailed print settings take a look at my print profiles. The print profiles can be used with A1, P1 and X1 printers.
UPDATE 2024-04-22: User dplivingston proposed to print the label flat and use a heat gun to mold the label into the correct shape. I added a flat-label-STL to the download section if you want to try it. Again: DOWNLOAD SECTION, not 3mf print profile.
Download the label, import it to your slicer, split it into parts, choose your colours and print it.
UPDATE 2024-04-24: User 3dlyx tried out the flat label (+ shape it with heat) and noticed that it is not wide enough. I modified the flat label so that it should now better fill-out the frame on the bottle. I guess, it is still not perfect…
Nuka-Cola - containing 120% of the recommended daily allowance of sugar
If you want to support me you can leave a tip at ko-fi.com/blecheimer.
Disclaimer:
This work by blecheimer is licensed under a Standard Digital File License. It is for personal use only (e.g. printing, gifting, presenting, showing). All files and any prints of it must not be used commercially. Any form of charging money or collecting fees for this model is strictly forbidden.
Sharing, sub-licensing, selling, renting, hosting, transferring, distributing, adaptation or derivats in any form or format is prohibited. This includes remixes. Copying or hosting this model to other digital websites, online stores or cloud services in general is not allowed.
License
You shall not share, sub-license, sell, rent, host, transfer, or distribute in any way the digital or 3D printed versions of this object, nor any other derivative work of this object in its digital or physical format (including - but not limited to - remixes of this object, and hosting on other digital platforms). The objects may not be used without permission in any way whatsoever in which you charge money, or collect fees.
Comment & Rating (488)