mY Filament Splitter

mY Filament Splitter

Boost
296
459
218

Print Profile(6)

All
X1 Carbon
P1S
P1P
X1
X1E
A1
A1 mini

0.12mm layer, 2 walls, 15% infill
Designer
46 min
1 plate
4.8(94)

Added Brim - 0.12mm layer, 2 walls, 15% infill
Designer
46 min
1 plate
4.8(63)

0.16mm layer, 2 walls, 15% infill
27 min
1 plate
4.8(8)

0.12mm layer, 2 walls, 15% infill
46 min
1 plate
Click to see more

Boost
296
459
218
6
959
840
Released

Description

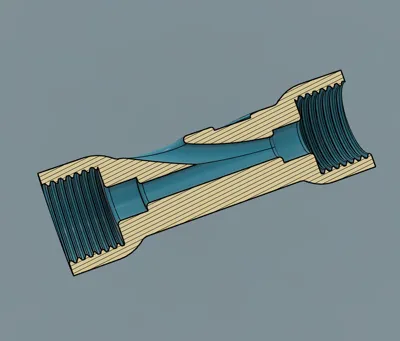
My filament splitter, hence the name :)


I wanted something smaller and light weight, and more robust than the experience I've had with other more famous splitters. My version keeps the filament path totally straight for the AMS to print head route, meaning less chance of snagging and less wear and tear for the most used (imo) operation.


Externally fed filament is fed through the hole on the side, one less connector makes the model more sleek and I really dont think its needed.


Requires 2 x PC4 M10 pneumatic connectors


Printing

The included 3mf file is setup ready to print @ 0.12 layer height with a tiny amount of supports for the hole which will be on the outgoing feed side. Supports are on build plate only.


I've printed 6 or 7 of these now and had zero adhesion issues. With it being a small model the minimum layer time will naturally slow the print speed down which will also help here.


Ignore the soon-to-be-added profiles promising faster print times, you want quality for this part to print well.


Fitting

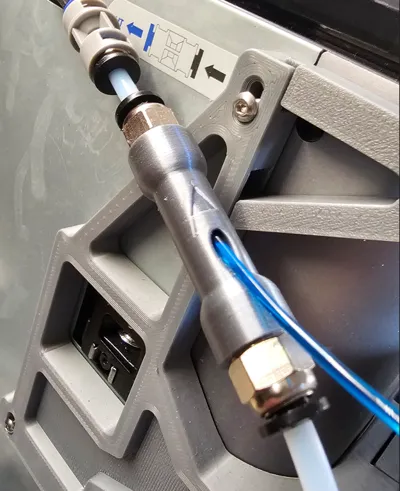
Remove the tiny support material and fit 2 PC4-M10 connectors

Make sure the PTFE tubing is pushed fully through the connector and into the internal recess.

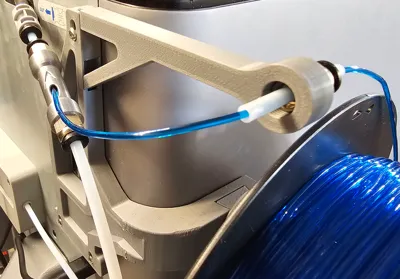
Attach to printer, note direction arrow for correct fitting.


Comment & Rating (218)

Please fill in your opinion
(0/5000)

Print Profile
0.12mm layer, 2 walls, 15% infill
This works really well, have had no issues (in both testing load/unload and real-world operation) and I certainly prefer the minimal profile/look of this versus the general y-splitters that are available. At the end I opted for 3D printable PC4-M10 replacements (which are a tight fit and certainly holds the tubes 100% in-place), if not, why not.
The designer has replied
3
Reply
Great idea, never seen those before!
0
Reply
Replying to @BCDesigns :
The Bowden locking connector is from here - https://www.printables.com/model/28895-locking-bowden-connector I used: - connector-nut-tall-v19.stl - taller connector nut (have not tried the "normal" version, just through I may want to have slightly easier grip) - connector-base-pc4-m10-through-hole-v29.stl - M10 with pass-though hole (I also printed the tighter version, but because of the slightly larger diameter Bambu tubes, the normal version is already a very tight fit) All in all, it would be nice to have these all built-in, i.e. you just have a connector nut and it is all a single print and certainly smaller and more compact than my version pictured above. Certainly an idea for a remix.
(Edited)
2
Reply
Replying to @19evdominta3 :
thanks for the link, I'll test later tonight :)
0
Reply
Such and elegant solution. This is the best one out there! Brim Added, 0.12mm layer, 2 walls, 15% infill.
(Edited)
The designer has replied
1
Reply
Thanks for the kind words :)
0
Reply
hat wunderbar geklappt, jedoch müssen die Schläuche ganz gerade abgeschnitten und bis anschlag eingeführt sein sonst kann es probleme geben, habe schon durch das loch ein filament führen und drucken lassen. Funktioniert sehr gut, danke. Habs in Bambu Filament PLA Matte geruckt
1
Reply
Du musst die linke Seite von hier, direkt auf den Schlauch stecken, der zum Extruder geht!!! Und nicht nicht noch ein Verbindung dazwischen stecken.
0
Reply
Print Profile
0.12mm layer, 2 walls, 15% infill
sliced directly over the app and failed immediately after layer one. edit: wasn’t aware that this is a review for the model instead of the printing profile. So I bump it up to 3 stars instead of 2. I like the model, but the profile doesn’t work for me. might be the app integration though.
(Edited)
The designer has replied
0
Reply
I've uploaded a print profile to include a brim, but it shouldnt need one. This isnt a difficult or fast print...
(Edited)
1
Reply
Replying to @BCDesigns :
I am sure your model prints fine but the profile provided didn’t work for me very well. I was asked by Bambu Lab / Maker World to rate the profile but the review somehow seems to apply to the model instead of the profile so I think I will delete it again. It’s not really fair to ask for a review for the profile and put it as a review for the model.
0
Reply
Print Profile
0.12mm layer, 2 walls, 15% infill
nice clean print
1
Reply
Print Profile
0.12mm layer, 2 walls, 15% infill
printed quickly and looks great.
1
Reply
Print Profile
Added Brim - 0.12mm layer, 2 walls, 15% infill
Perfect!! thank you!!
1
Reply
Print Profile
Added Brim - 0.12mm layer, 2 walls, 15% infill
Excellent solution. Simple and Effective. Should be included as standard Bamboo Equipment.
1
Reply
Print Profile
0.12mm layer, 2 walls, 15% infill
perfect!
(Edited)
1
Reply
Print Profile
0.12mm layer, 2 walls, 15% infill
Handy!
1
Reply

License

This work is licensed under a Standard Digital File License.

You shall not share, sub-license, sell, rent, host, transfer, or distribute in any way the digital or 3D printed versions of this object, nor any other derivative work of this object in its digital or physical format (including - but not limited to - remixes of this object, and hosting on other digital platforms). The objects may not be used without permission in any way whatsoever in which you charge money, or collect fees.