Filament swatch
Filament swatch


Print Profile(1)

Description
Sorry - customizer does not work yet here on the page, use OpenSCAD!
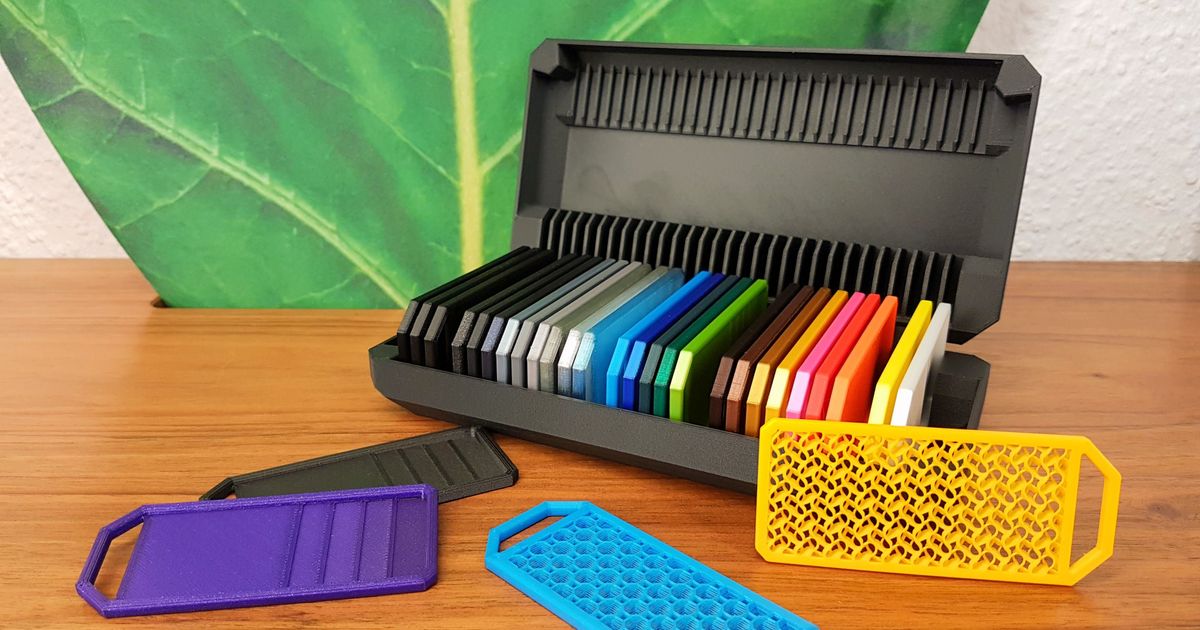
You need filament swatches / filament samples for testing different colors and makes? You want to know the colors you have on spool at the moment?
Customize and use these swatches which are compatible to Extrutims box:

Alternatively, you can use these customizable swatches, which are using less filament:

They are compatible to the configurable standard boxes and hinged boxes:

Two versions
There is a "full thickness" and a “bevelled” (=sunken) version available:

The bevelled version uses less filament to print.
Customization
Here are customizable filament swatches / tests, where you can change all the text using OpenSCAD. This way you don't have to print and stick any labels anymore.
To customize, install OpenSCAD on your own computer and follow the customizing instructions on this thing page or these more in depth instructions. Also check out the “Customizing using OpenSCAD” section below for tips about fonts etc.
You need to put the "Flat-infillsample.stl" into the same folder as the .scad file. Its the basis which will be included and modified by the openscad code.
Use without customization
There are also many “blank” material swatches available, use them if you don't need the customization or want to write material/printing parameters with a pen on top:

Included materials types are: PLA, PLA+, ABS, PETG, Nylon, PVB, HIPS, PEEK, TPU, PVA, PP, ASA , Resin, PA, HT, PHA, FLEX, PUR.
What is that little hole on top for?
The 7th hole is made to stick in a piece of filament for later reference, which is a great idea first realized in this remix by mathiaspl20
If you print a swatch, please share a picture using the "comment" button and attach the picture. This way we can collect here filament print quality via pictures...
You can customize:
- 3 lines of text (for make/type/color/printer settings for the material): upper, lower left, lower right
- By default, all kinds of test patterns are included in the swatch. This way you can easily see how well the filament printed. You can select how many round test pattern are included. You can check overhangs, bridging, pyramids, roundness, etc.
- There is a fourth text on the top side to indicate the material type quickly when the swatches are in their box. You can set this text using a drop-down box or a free text field, as requested by Sembazuru.
- Thickness progression of the 'layers', defined as an array of numbers
- Wether the thickness steps numbers have include leading zeroes, trailing zeroes or nothing, as requested by sparkyman215 and Sembazuru
- Font, font size (font size can be set for the main text and the steps separately. Setting a font size to 0 removes the text), text line distance, wether the text is raised or embossed
- Wether to rotate the text on the steps, as requested by IllyStorm
- As default, "Pathway Gothic One" font is selected for better readability. You can also check the V5 .stl files as font samples. The first line on each swatch is the fonts name. You can check if the text is still well readable after slicing these swatches all at once.
- You can add holes in the swatch to hang it up with a tack (either on top or on the right hand side). Use e.g. [tack_hole="top";]. The idea is from gloda, thanks!
Background on swatches
Insipration came from different swatch cards on thingiverse, all attached in the "remixed from" section on the Thingiverse model, and they seem to all go back to the design from venegade. The swatches are: Color swatches, Swatch for label maker, Swatch toolkit, Filament card with label, Elixir filament swatches, A better filament swatch, Yet another filament sample. Thanks go out to all of the designers for the idea and the subsequent iterations!
Credits
I use the “Flat-infillsample.stl” from Extrutim directly in OpenSCAD, modifying it with text and test patterns, so the swatch will be 100% compatible with his box.
Big thanks to WB for both the idea for this swatch as well as the title photo and print!
Print instructions
It slices well using PrusaSlicer, Slic3r or Simplify3D.
If you have troubles slicing using Cura, e.g. thickness steps are disappearing: Set "Slicing Tolerance Option" to "middle". Thanks go to Keichide for the hint.
To have comparable swatches as the ones posted here, please print the swatch at
- Layer height .2mm
- 2 Perimeter
- 5 Solid layers
- 20% infill (fill pattern grid, fill angle 45 degree)
Don't use supports. The structures are there to evaluate how well bridges work without supports.
Customizing using OpenSCAD
If you want to use OpenSCAD on your own computer to customize (good idea!):
- Download latest version of OpenSCAD, (See section "Development snapshots")
- Download the .SCAD file from here and also the flat-infillsample.stl, put them in the same folder.
- Open the .scad file in OpenSCAD.
- Change the variables. You find them in the beginning of the .SCAD file. E.g. text="your text";
- Press "F5" to get a quick preview.
- Press "F6" when you like the preview. This will render the geometry and takes a little time.
- Press "F7" to save the geometry to an .STL file.
- Slice and print the .STL file.
Additional hints for fonts
- Make sure you know the fonts on your system, and choose only from them. The fonts listed in the code are the ones available from google. By default, none are installed on your personal PC!
- In case you want to use the fonts listed in the code: All are available for free from google. E.g. download "Bangers". Install all the fonts you want to use. Then restart OpenSCAD.
- Set the fontname (either an installed one or one preinstalled on your system) fontname="Bangers"; in the .scad file.
Workaround in case fonts do not show up in OpenSCAD:
- Workaround 1: Choose the option to "install for all users" when installing the fonts.
- Workaround 2: The fonts are by default in C:/Windows/Fonts. Put the TTF files in C:\Program Files/OpenSCAD/fonts/Liberation-2.00.1/ttf instead and restart OpenSCAD.
- Workaround 3: Copy the font file to C:/Users//.fonts (create the directory if it doesn't exist)
- Workaround 4: Copy the font to a path and in OpenSCAD write “use ”
Comment & Rating (0)
This remix is based on