Filament Purge/Poop Shadow Box (Waste filament)


Print Profile(27)


Description
Boost Me (for free)
If you would like to support my work, feel free to give me a boost!
Filament Purge/Poop Shadow Box
UPDATE 1 : New faceplates added (Butterfly, Mushroom, Dolphins, Palm Tree, Peacock, Mouse Ears, Weiner Dog)
UPDATE 2 :
- New faceplates added (Dragon Ball Z, Motorcycle, Cat, Ghost, Magic Lamp, Ice Cream, Mandalorian)
- Fusion 360 Design file, Print Profiles and RAW Files have all been modified to include a lip at the bottom of the box to help hold the faceplate and window. The Window_Thickness was not references in the sketch, it is now fixed and changing this parameter will modify the design.
UPDATE 3_2026-02-19 : Updated the existing Vertical Print Profile to include the proper supports + Re-uploaded the Horizontal print profile
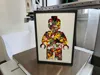
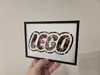
We all know multi-color printing with the Bambu printers produces a lot of waste, mostly in the form of filament poop. My design doesn't help reduce the waste produced but it does help with giving it a purpose. This shadow box with customizable size and face plates is a great way to display the colorful waste in a fun manner. It can be a great way to add a pop of color to your living room, your office or even your kid's room.
For this design, you will need to purchase some small acrylic sheets such as these ones from Amazon CA or Amazon US. Do not worry if you can't find these exact ones, as I have also included the Fusion 360 design file that is parametrized for you to customize the shadow box for yourself.
As of right now, the face plates available in the print profile and RAW files are the following :
*Note that I will be taking requests for face plates of the provided dimensions, but you can also customize one in your slicer or in Fusion 360
- Vertical Blank
- Vertical Bambu Logo
- Vertical Brick man
- Vertical Sunflower
- Horizontal Blank
- Horizontal Excavator
- Horizontal Golden Ratio
- Horizontal Star Wars
- Horizontal Brick Logo
Assembly instructions :
- Slide the acrylic sheet and the face plate into the grove at the front of the box. I suggest having the face plate be the outermost item, that way you will be able to easily change it without making a mess
- Add in the filament poop using the optional feeder funnel
- Slide the cover on and you're done, it is an intentional tight fit so nothing comes out.
- An optional looser cover is provided in both of the boxes print profiles
- For a 100% secure cover, use a bit of glue
How to make a custom face plate in the slicer :
- Right-Click on the blank face plate of your choice
- Click on ‘’add negative part'' then select the ‘’load'' option
- Select your intended file, scale it up or down and place it where you want it to be
- When you slice the file, it should then cut out the loaded file from the blank face plate
How to modify the Fusion 360 design file
Here are the parameters that you can change in the Fusion 360 file :
- Tolerance is used around the sliding cover and between the face plate/acrylic sheet and the walls of the shadow box. It is currently set as 0,2 mm and it worked perfectly for me.
- Window_Thickness is for the thickness of the acrylic sheet. This will not affect the thickness of the face plate (1 mm)
- Window_Horizontal is for the horizontal measurement of the acrylic sheet and face plate. Add the exact value without tolerance in mind.
- Window_Vertical is for the vertical measurement of the acrylic sheet and face plate. Add the exact value without tolerance in mind.
- Box_Depth is to adjust the depth of the shadow box as in making it more slim or thicker. This is the total outside measurement, I don't recommend you go under 30mm.
To change these parameters, you will need to :
- in the ‘’Solid'' menu, expand the ‘’modify'' tab and select ‘’Change Parameters''
- You will then have this new window open up, simply change the parameter of your choice in the ‘’Expression'' column

Membership
If you're interested in selling prints of my models, check out my commercial license tiers
Comment & Rating (1666)