Deckard's Blaster from Blade Runner 1982
Deckard's Blaster from Blade Runner 1982


Print Profile(1)

Description
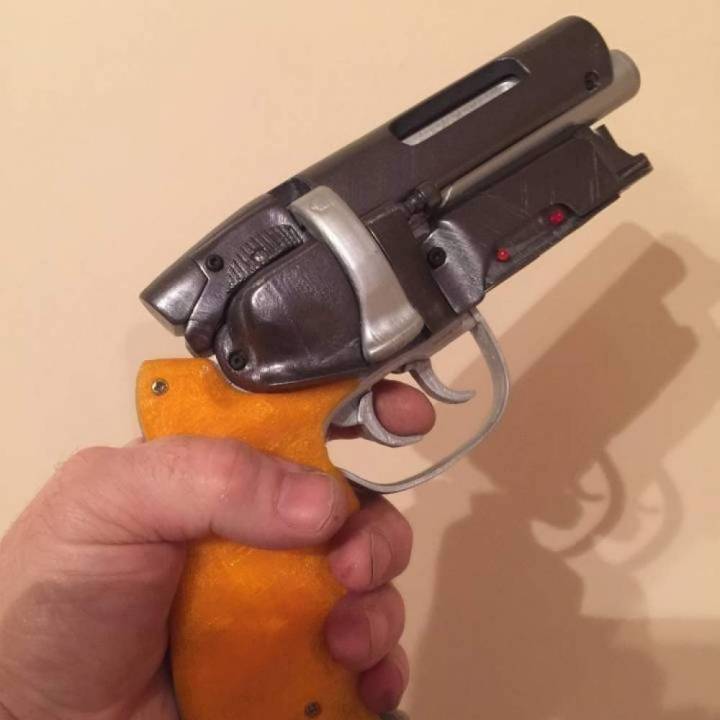
You're in a desert, walking along in the sand, when all of a sudden you look down and see a 3D Printed replica of Deckard's Blaster from the 1982 classic, Blade Runner.
- Features: The blaster has a functioning cocking action/charging handle and an opening cylinder cover door with a sliding lock and the cylinder can rotate.
- Customization: There's options for a debossed text or blank barrel covers, and smooth or textured grips. I used the blank barrel cover and the smooth grips.
- Print Settings: Printed using the standard 0.16 mm profile, with supports added on a few objects and thats all set up in the Bambu Lab .3mf project file.
- Filaments Used:
- Orange transparent PLA from InkStation
- Slate Gray PLA MAX from CC3D
- Bambu Lab Silver Silk PLA
- Bambu Lab Matte Black PLA
- Assembly: It's straightforward, but can look overwhelming to start with. Just take your time and follow the instructions, you'll need some glue like CA/Super Glue but use what you are comfortable with (I use the cheap stuff from Bunnings, $1.75 for 6 x 3ml tubes), and it easier to test fit everything first and then glue it. The printed bolts/pins are mostly for aesthetics, you could use actual M2 and M3 hardware but I'm not sure of the tolerances for the holes. I did use 2 x M3x12mm Cap Head screws to attach the handle bottom to the main body as well as glue.
- Weathering: To give it that authentic look, I used black and brown acrylic paints with silver leaf rub'n'buff. Watch Adam Savage's tutorials on Tested YouTube channel for some tips and tricks. For mine I basically just layering on watered down paint paints and then wipe most of it of with a paper towel and repeated whilst alternating between colours until it was dirty enough.
I have included the original assembly instructions from Andrew Foster and sorted through all the files. I grouped the files on plates by colour and replaced parts some original parts with remixed ones . So there is no hard work needed on your end, just load up the project, chuck in the filament and hit Print Plate. You're only a few hours away from one of the most iconic pistols in sci-fi cinema history. And it looks awesome too.
Thanks to Andrew Foster for providing an awesome model and assembly guide.
The display stand can be found here:
https://makerworld.com/en/models/443169#profileId-349248
Documentation (1)
Comment & Rating (16)