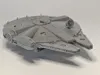
Millennium Falcon Kit Card - High Detail - No Glue


Print Profile(2)


Description
Boost Me (for free)
Check out my other Kit Cards:
Imperial Lambda Shuttle
X-Wing
Landing Gear can be found here
Display Stand can be found here
Set your coordinates for an immersive build experience with the "Millennium Falcon Kit Card," a high-detail masterpiece that embodies the core of the most storied spacecraft in the Star Wars galaxy. Tailored for enthusiasts who appreciate the confluence of model-making and the cultural phenomenon of Star Wars, this kit is the fruition of a labor of love, designed to honor the cherished memories of fans worldwide.
Features:
Precision-Crafted Assembly: Developed from the ground up with a 0.4mm nozzle and the Bambu A1's 180x180 build volume in mind, this Millennium Falcon is designed as a kit card with every detail, ensuring an assembly experience that is both engaging and faithful to the ship’s legendary design.
Tool-Free Construction: Embodying the ease and simplicity of kit card modeling, this Millennium Falcon requires no additional tools or glue for assembly, offering a clean and straightforward build process that reflects the ingenuity of its design.
Intricate Detailing: Every panel, port, and plate is rendered with remarkable precision, inviting builders to explore the Millennium Falcon's intricate design as seen on the silver screen.
Engaging Build for All Ages: With components engineered for ease of identification and removal, modelers of all skill levels can enjoy bringing this icon of space adventure to life.
Compact and Comprehensive: The kit is thoughtfully planned to utilize the capabilities of the printer, with every detail scaled to be perfectly captured at the size allowed by the nozzle, delivering an incredibly detailed model that belies its simplicity.
Upcoming Enhancements: A custom stand and landing gear are on the horizon, promising to complement your Millennium Falcon display with a touch of elegance.
Printing Advise:
For a stellar print of the Millennium Falcon Kit Card, stick close to these succinct guidelines or employ the custom profile provided for optimal results:
- Layer Height: 0.08mm for capturing the finest details.
- Print Speed: Very slow, to ensure precision.
- Infill: 10% lines infill for internal support with minimal material.
- Walls: 2-3 perimeters for robustness without compromising detail.
Add modifier to only use ironing on the desired layers:

Assembly Instructions
Look up table for all pieces
Step 1: Main Body Assembly
- Locate the MainBodyMid (labeled as '1' on the kit card).
- Take four pins from the array marked "Pins" on your kit card.
- Align the pins with the holes on the MainBodyMid (1) as indicated in the assembly guide image. Press them firmly into place, ensuring they are securely fitted.

Step 2: Securing the Main Body Sections - Take the MainBodyUpper (2) and MainBodyLower (3) sections from your kit card.
Align the MainBodyUpper (2) with the top of the MainBodyMid (1), ensuring the pins inserted previously fit into the designated holes of the upper section. - Similarly, align the MainBodyLower (3) with the bottom of the MainBodyMid (1), matching the pins to the corresponding holes on the lower section.
- Carefully press both the upper and lower sections onto the pins with equal pressure on both sides to avoid bending or breaking. The pieces should slot together seamlessly, creating a sturdy central structure of your Millennium Falcon.

Step 3: Cockpit Assembly
- Identify the CockpitUpper (4) and CockpitLower (5) pieces from your kit.
- Retrieve a single pin from the "Pins" section.
- Orient the CockpitLower (5) so it aligns with the underside of the CockpitUpper (4).
- Insert the pin through the corresponding hole in the CockpitUpper (4) and press into the hole in the CockpitLower (5) until both halves are firmly connected.

Step 4: Attaching the Cockpit - Locate the areas on the MainBodyMid (1) where the cockpit will be placed.
- Take two pins from the "Pins" section of your kit card.
- Insert the pins into the holes on the MainBodyMid (1) and MainBodyUpper (2) designated for the cockpit attachment, as shown in the visual guide.

Step 5: Finalizing the Cockpit Installation
- Carefully align the assembled cockpit (comprising CockpitUpper (4) and CockpitLower (5)) with the pins protruding from the MainBodyMid (1) and MainBodyUpper (2).
- Gently slide the cockpit onto the pins until it sits flush against the main body.
- Ensure that the cockpit is securely attached and properly aligned with the rest of the structure, with no gaps or misalignments.

Step 6: Sidepiece Installation
- Select two pins from your kit and locate the pin insertion points on the MainBodyLower(3) and MainBodyUpper (2) where the sidepiece will be attached.
- Carefully insert the pins into the designated holes on both the upper and lower parts of the main body, as indicated in your assembly guide.
- Take the sidepiece (identified as '6' in your parts list) and align it with the pins.
- Press the sidepiece firmly onto the pins, making sure it fits snugly against the main body with no gaps.
- Repeat on other side

Step 7: Assembling the Radar Dish
- Begin by taking the dish (9) and the dish holder (7) from your kit.
- Insert the dish onto the holder, ensuring a tight fit.
- Locate the dish base (8) and find the corresponding pins on the MainBodyUpper (2) that are designated for the radar assembly.
- Align the dish base with the pins, and then carefully fit the dish and holder assembly onto the dish base.
- Once aligned, gently press down so that the entire radar dish assembly attaches securely to the MainBodyUpper (2).

Step 8: Mounting the Cannons
- Select the cannons (labeled '10') from your kit.
- Identify the hole on the top of MainBodyUpper (2) designated for cannon placement.
- Take the pin on the base of a cannon and align it with the hole.
- Gently press the cannon into the hole, applying even pressure until it bottoms out, ensuring it is fully seated and secure.
- Repeat this process with the corresponding cannon on the MainBodyLower (3), ensuring symmetry and proper alignment.

Congratulations on Assembling Your Millennium Falcon Kit!
You've successfully navigated the assembly of this iconic starship, demonstrating skill worthy of a true pilot of the Millennium Falcon. Revel in the craftsmanship and detail of your completed model, a testament to your dedication and the legacy of Star Wars.
Enhance Your Millennium Falcon Model
To complete your display, don't forget to download the matching stand, landing gear, or the closed hatch, each designed to complement your Millennium Falcon perfectly. These finishing touches will soon be available to elevate your model to exhibition-ready status. Keep an eye out for their release and ready your collection for these final additions!
License
You shall not share, sub-license, sell, rent, host, transfer, or distribute in any way the digital or 3D printed versions of this object, nor any other derivative work of this object in its digital or physical format (including - but not limited to - remixes of this object, and hosting on other digital platforms). The objects may not be used without permission in any way whatsoever in which you charge money, or collect fees.
Comment & Rating (287)