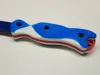
Reciprocating Saw Blade Handle - "Sawzall" Handle
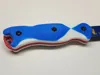
Reciprocating Saw Blade Handle - "Sawzall" Handle


Print Profile(3)

Description
Summary:
Four piece ergonomic handle to securely and safely hold reciprocating (Sawzall) blades. Uses three M4x16 machine screws and nuts.
Hardware Note:
Before printing be sure to select the correct “Right Handle” for your hardware. One is a counter sink (C-Sink) for a flat head machine screw. The other handle is a counterbore (C-Bore) for pan head and hex socket machine screws.
Print Settings:
PLA, Smooth Plate, 0.4 Nozzle, 0.2 Layer Height, Arachne Walls, 5 Wall Loops, 6 Top Shell, 6 Bottom Shell, 20% Grid Infill, No Supports needed. Feel free to pause when printing the handle to change the color in the contouring.
Directions for Assembly:
Begin by printing the inner blade holders/sleeves. I printed them solid by using a 0.4 nozzle, 0.2 layer heights and adjusting the top and bottom shell layers each to 6. After they finish printing, begin printing the left and right handles using a different color if desired.
While the handles are printing, use a 3/16" (4.5-5mm) drill bit to enlarge the hole that is already in the blade and create a new hole aligned with the hole on the inter blade holder. Align the blade in the inner blade holder and create a dimple with a nail or an awl, this will help prevent the drill bit from wandering.

The drill bit should be titanium coated HHS, cobalt, or carbide because the blades are made from hardened steel. Drilling hardened steel should also be done at a low RPM and feedrate, lubricant is also highly recommended. Be sure to file off any burrs created by drilling.

Once drilled, sandwich the blade between the two inner blade holders and ensure the holes are aligned.

When the left and right handles are finished printing assemble with three M4x16 machine screws and nuts.

Happy printing and happy sawing! Please upload a make and rate the model and print profile.
Different Style Saw Handle:
There is a link to a different style recip saw blade handle I created that uses the same hole pattern if you are drilling holes in blades:
https://makerworld.com/en/models/430121#profileId-334532

Don't want to drill holes in your blade? Try this saw handle:
https://makerworld.com/en/models/439985#profileId-345648


